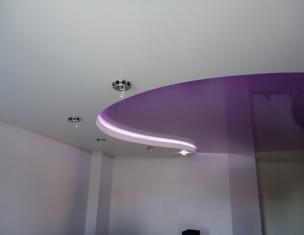
Two-level ceiling in the living room
Among all systems where stretch fabrics are present, the most difficult are two-level ceilings. This design requires from the master not only knowledge and skills in using tools, but also a lot of experience.
The shape of the ceiling in two tiers is distinguished by the fact that the lower level smoothly passes into the upper one. By the way, designers very often use with three or more tiers, thereby creating non-standard options for finishing the ceiling surface.
Many experts believe that two-level ceilings are a universal solution for decorating apartments, houses and offices. Especially if stretch fabrics are used for this. With this design, you can:
- Hide the defects of the base ceiling;
- Zoning the room;
- Hide engineering networks and communications under it;
- Create the illusion that the ceiling is higher than it actually is.
Two-level with photo printing is especially popular. Designers immediately appreciated the advantage of this type and often began to use it to decorate living rooms, halls, bedrooms, halls and other large rooms. They are appropriate wherever there is an opportunity to show design ideas in all its glory.
But, as practice shows, the installation of two-level stretch ceilings is a rather complicated matter. A lot of experience is needed here, because designers sometimes offer such intricate shapes that a beginner cannot cope with them.
Installation of two-level stretch ceilings - stages and materials
Stage number one is markup for ready. Usually, for this, designers prepare a project with a diagram of the shape and placement of canvases, which greatly simplifies the process itself. Such a scheme must be transferred to the ceiling surface. And this is where knowledge and experience are needed.
Note that often the bottom level is the main one. It is attached to the walls like a regular stretch ceiling. And there are never problems here. But its inner form is interspersed with the upper canvas. That is, a boundary is created where two levels meet, and it doesn't matter where the boundary is located on the ceiling.
So one of the highlights of the installation process is the exact drawing of the border on the base ceiling where the wooden structure will be installed.
In addition, the stretch ceiling will be created according to the scheme and will enter the room already in finished form. It cannot be altered and redrawn. Therefore, the boundary between the levels is determined exactly according to the scheme.
Wood frame border installation

The procedure for installing a two-tier ceiling
So, the boundaries of the two levels are defined and applied to the base ceiling with an ordinary simple pencil. After that, self-tapping screws are installed along the line, and a strong thread is pulled along them. She will define the border.
Then small square pieces of boards or plywood measuring 15 × 15 centimeters are attached to the ceiling. Exactly the same pieces are fixed to those already laid - perpendicular to the ceiling surface. They must be fastened together with metal squares.
This creates a design that looks like an inverted shelf. But keep in mind that the vertical element must end up inside the lower level. It should be perpendicular not only to the ceiling, but also to the contour of the border.
It is to this end part of all elements that a board will be attached, which will pass along the border of the contour and divide the ceiling into two parts. This is where the lower and upper levels will be set.
This is the whole complexity of the installation of two-level stretch ceilings. In all other respects, this is a normal process. It is the creation of a wooden frame that must be approached with all the responsibility.
Installation and fixing of the lower level

It looks like the lower level of a two-level ceiling
Please note that the installation of lower level profiles on the wall surface is determined by the scheme. But it must match the width of the already installed board. This is a very important point. There is no room for error here. A slight inaccuracy, and a plane difference will appear, which, unfortunately, will be visible to the naked eye.
So, the first is the installation of profiles. To do this, a contour is applied to the walls around the entire perimeter of the room, and profiles are installed on it. They are attached to the wall with dowels and self-tapping screws, for which it is necessary to drill holes.
The distance between the fasteners should not exceed 25-30 centimeters. The profiles are also installed on a wooden frame from the inside closer to the ceiling. There will be two rows of profiles on the frame. The upper level canvas will be mounted on the bottom row.
Further, any corner end of the canvas is installed in the profiles and distributed along adjacent walls. The remaining ends are hung to the profile on special clothespins, which are fixed at the corners of the room with a cord. So the canvas is suspended from the ceiling. All corners are filled.
The outer sides of the stretch fabric are left hanging, and all attention is switched to the inner edges, that is, to the border. It is there that it is necessary to fasten the material to the profiles. It must be held at the highest level. Here it is impossible to allow any edge to stick out or be inserted into the profile unreliably.
After that, proceed to dressing the outer edges. This is where the gas burner comes into play. That is, the tension fabric is gradually heated up, inserting the ends and edges into the profiles. This is done by moving from wall to wall, gradually installing the canvas. After cooling, a stretched ceiling coating will appear - even and smooth.
Installation of the upper tier

finished ceiling
This process is easier. On the inside of the wooden frame, under the fixed profiles of the lower web, a series of profiles is installed, on which the upper level will be attached. It will hide that part of the stretch fabric that remains as a covering for the wooden frame board.
Everything exactly repeats the technology of mounting a single-level ceiling. Here the canvas is gradually inserted into the profiles, while heating occurs with a gas burner. After cooling, the canvas will stretch and become even and smooth.
Conclusion
Two-level ceilings made of stretch fabrics are a solution to many problems associated with a design approach to interior design. Of course, this type of finish will be expensive, but keep in mind that stretch ceilings have excellent physical, technical and operational characteristics. This is the first.
Secondly, with the help of such a design, repair costs can be reduced. Thirdly, the opportunity to create a non-standard interior design increases. Fourth - of course, it will not work to make such a ceiling on your own, but it is worth forking out to get the original design of your own home.


