
The advantages of installation plastic windows not only performance characteristics, but also ease of installation. A simple process, facilitated by the presence of fastening devices and additional parts in the factory configuration, House master He will be able to master and implement it himself. There are a number of nuances in it that dictate the independent installer to scrupulously comply with construction regulations. You will need patience, accuracy and at least one person to help you. Then installing plastic windows yourself will be done flawlessly and practically free of charge.
Video tutorial for DIY builders
Preliminary measurements and calculations
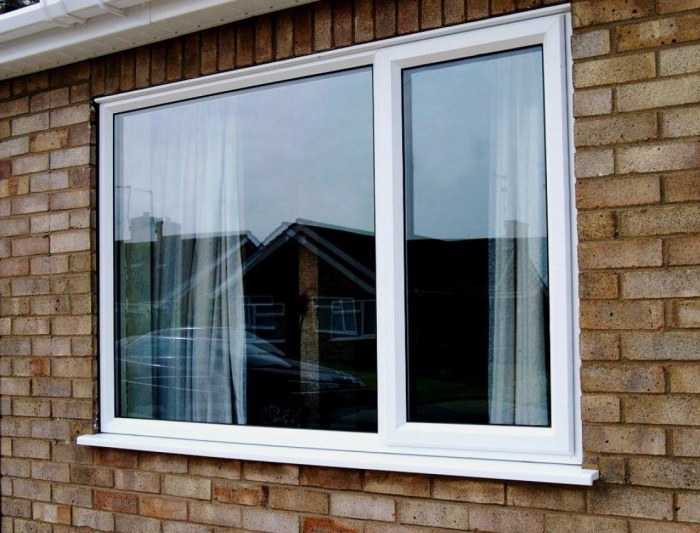
Before buying a window, they traditionally take measurements of the opening, taking into account whether it has a quarter or without. Openings with a quarter are a characteristic detail of a foam concrete structure, which significantly reduces heat loss. For an opening without a quarter, you need to order a window whose length will be 5 cm less than the equivalent parameter of the opening. You need to subtract 3 cm from the width value. Gaps along the contour of 1.5 cm are needed for foaming, an additional 3.5 cm from the bottom are needed for the window sill. GOSTs recommend leaving 2.0 cm around the perimeter.
To create an opening with a quarter, measurements are taken at the narrowest point. Windows are ordered by adding 3 cm to the width, the length does not change.

Windows are usually located not in the middle of the opening, but retreating from the outer plane 1/3 in depth. But those who want to install a plastic window with their own hands may have options with an offset to either side. This circumstance must be taken into account when ordering window sills and external ebbs. The widths of both elements calculated according to the location of the window must be added by 5 cm.
Calculations for the width of the window sill are also affected by the location of the battery. It should only cover the radiator halfway. Plus 2 cm for placement under the base of the window. The minimum length margin is 8 cm, but it’s better not to skimp and add 15 cm to cut this part beautifully.
Note. The window sills and ebbs are supplied with plastic side plugs. Don't give up on them.
Frame mounting methods
The installation technology does not depend on the number of internal chambers in the metal-plastic profile, nor on the number of chambers in double-glazed windows. It depends on the material from which the walls of the building are constructed, and on the dimensions of the window. Based on the above prerequisites, the fastening method and devices are selected.
You can fix the plastic window structure:
- mounting anchors or dowels, embedded in the walls through through holes drilled in the profile;
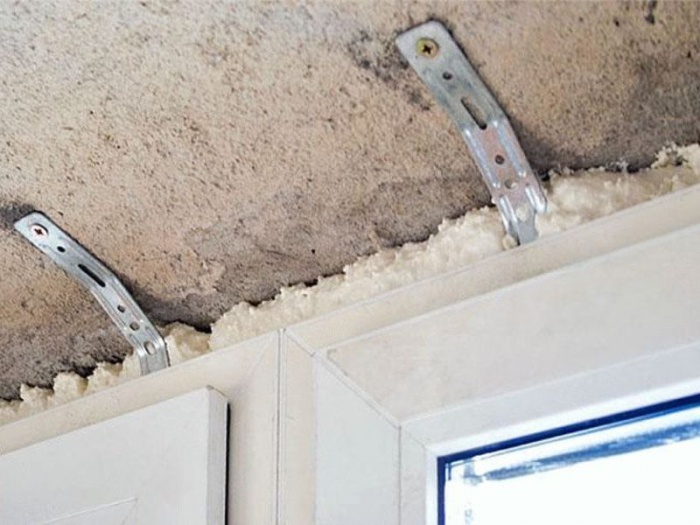
- Using special toothed plates that are pressed into the profile, they are not embedded in the wall, but are installed by surprise and secured with screws.

The first method is considered the most reliable. It is used primarily for the installation of large and heavy window systems. With through-mounting, the window will firmly resist numerous impact loads that arise, for example, when operating windows with sashes that open in two different positions. In addition, anchors passing through the frame will allow you to more accurately adjust the verticals and horizontals of the mounted structure.
However, those who want to know how to properly install small plastic windows with double-glazed windows should be interested in the method of fixation with anchor plates. Appearance they will not spoil the windows, since they will then be hidden under the slopes.
Advice. When installing anchor plates in a concrete or brick opening, it is advisable to make small recesses so that you do not have to apply an extra leveling layer before installing the internal slopes.
Often builders combine both methods. The anchors are buried in the walls through the side elements of the frame and through the bottom profile (window base), and the top is fixed only with plates. If you install plastic windows yourself wooden bath, anchor plates are rarely used, they can become loose. Instead of anchors, galvanized self-tapping screws are sometimes used.
Specifics of installation in a wooden structure
To a large extent, the installation process is influenced by the type of building material. If for walls made of foam concrete, hollow or solid brick The differences lie only in the depth of the anchors, so there is a special approach to openings in log frames and timber walls. You need to take into account not only how, but also when it is better to install plastic windows in wooden openings, and also how this should be done.
- Equip with plastic windows wooden building possible only after a year, preferably two years after completion of construction. This significant break is necessary due to post-construction settlement. The shortest shrinkage period and its size are for buildings made of laminated veneer lumber.
- Installation is not carried out directly into the opening. The window can only be inserted into a wooden box, which protects the window structure from deformation. There should be no damage, defects or rot on the window unit. Before starting work, it must be treated with an antiseptic.
- Shrinkage, although not so intense, will continue to occur after the installation of windows and finishing. Taking this into account, a gap of 3-7 cm is left between the upper plane of the opening and the frame. The size of the gap depends on the humidity and the category of materials used in construction. After installing the window, the gap is filled with jute insulation and closed with platbands on both sides.

There are no exact recommendations in building regulations regarding the material for ebbs and window sills in wooden houses. Shimmers are usually used standard, attached to the window structure. The window sill can be either polymer or wood. It is not prohibited for the bottom profile to rest directly on wooden window sill. That is, before installation it may already be there.
There is a nuance that is not specified in the regulations, but is recommended by experienced builders for those who are figuring out how to properly install plastic windows. Wood that can allow evaporation to pass through will help reduce the technical qualities of the polyurethane foam. To prevent the foam “blown out” around the perimeter from becoming moistened, it is advisable to equip the window block along the line of its application with foil-lined polyethylene foam tape.
Standards for installing plastic windows
A distinctive feature of the technology is the use of polyurethane foam, which imparts rigidity to the frame-opening connection. The layer obtained as a result of polymerization of the foam simultaneously serves as insulation and additional fastening. In order for this element to maintain the necessary technical characteristics, the foam layer is surrounded by insulating layers.

When it is better to install a plastic window, the owner himself decides. Winter installation is often recommended due to the immediate appearance of all flaws. When choosing polyurethane foam, you must take into account at what atmospheric temperatures the composition will harden better. It is recommended to prefer professional foam, and to work with negative thermometer readings you need to buy a specialized nozzle.
How to perform foaming is described in detail by the manufacturer in the instructions supplied with the product. Foaming usually begins from the bottom, moving upward in a rotary and circular motion. To avoid overconsumption of expensive material, blow out the foam in several stages in sections of 25-30 cm.
Advice. In order to shift the dew point, foaming is performed with unequal density. It is recommended to make the outward-facing layer of foam less dense than the inner one. The foam must be blown evenly around the perimeter, without voids or gaps.

Preparing the window opening
There should be no dust, no debris, no paint residues in the opening - this is a mandatory condition. Home craftsmen who want to know how to insert a plastic window into a wooden structure need to plan off the top “unreliable” layer if the installation will be carried out in a box that has already been used. The foam will adhere firmly to the top layer. If there is a suspicion that it will peel off over time, it is better to eliminate it.
Advice. The gaps between the frame and the opening are filled only with foam if the distance does not exceed the limit of 4 cm. If the gaps are larger, it is better to partially fill them with cheaper material: plasterboard, pieces of timber, foam plastic, brick, etc.
Preparing a plastic window
- First, free the frame from the sash by removing the pin inserted into the top hinge. You need to carefully pick it up from below with pliers and a screwdriver. Then, slightly lifting it, remove the sash from the lower hinge. Double-glazed windows are removed from fixed windows, having first removed the longitudinal and then the transverse beads. To remove glazing beads, a knife with the thick side or a spatula is carefully inserted into the gap and slowly moved, trying not to damage the glass.
Note. You can insert a small plastic window using mounting plates without removing the sashes or double-glazed windows. If possible, there is no need to violate the integrity of the factory structure.
- Place the glass unit or sash at an angle against the wall, placing it on a flat surface covered with cardboard or some soft material.
Attention. You can't lay it flat! Place it skewed too. The smallest pebble under the base will cause a crack to appear.
- Remove the protective film from the outer surface of the frame. If you don’t remove it now, it will be much more difficult to do it later and you will have to use a hair dryer.
- Regardless of the type of mount chosen, the locations for its installation are marked. The step strongly recommended by builders is 40 cm (a little less is possible), the maximum allowed by GOST is 70 cm. The standard distance from corners and from the impost is 15 cm. If mounting plates are used, they are pre-attached to the frame with self-tapping screws. Holes are made for anchor bolts or long self-tapping screws by placing a metal drill on the outside of the frame.

Most video instructions teaching how to install a plastic window yourself dictate fixing the PSUL protective tape before installation. However, craftsmen who are faced with its sticky “inconvenience” convince us that it is wiser to attach it after installation.
The installation process itself
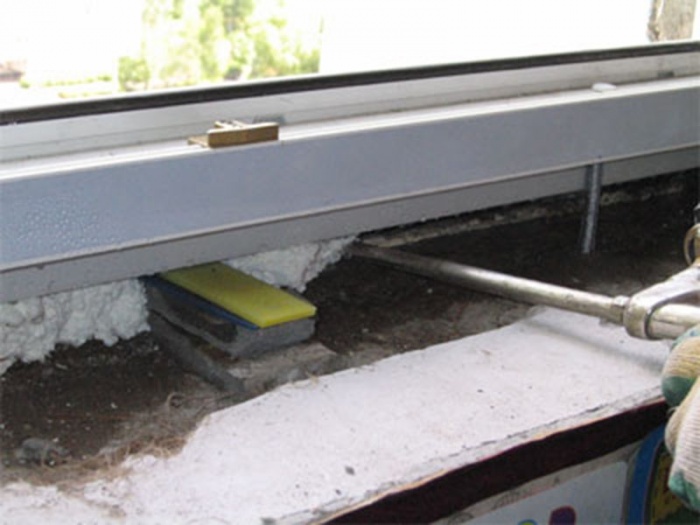
- Insert the frame into the opening, placing special plastic corners or small blocks to provide a technological gap. By slightly moving these spacer wedges, align the frame clearly horizontally and vertically with uniform side gaps.
Advice. It is advisable to place the spacer devices next to the fastening point with a self-tapping screw or anchor. They will protect the frame from deformation.

- Since installing PVC windows yourself can be done using different fasteners, differences appear at this stage.
- Into the opening wooden house Immediately screw the self-tapping screw through the holes in the frame. There is no need to screw it in all the way.
- On walls made of foam concrete or brick, mark points through the holes in the frame, then remove the frame and drill holes with a drill appropriate for the material. Then return the frame to its place, “attach” the fasteners.
- There will be no need for double manipulations with the frame when installing it on anchor plates. They should simply be bent so that they are adjacent to the place intended for their fastening.

- The final fastening is made after checking the horizontal and vertical lines with a spirit level and plumb line. You cannot persist with tightening so that the frame does not begin to bend barrel-shaped. Finish screwing once the head is flush with the frame. Installers advise leaving 1 mm above the surface.
- Return the dismantled parts to their place in the reverse order and check the functionality of the structure.
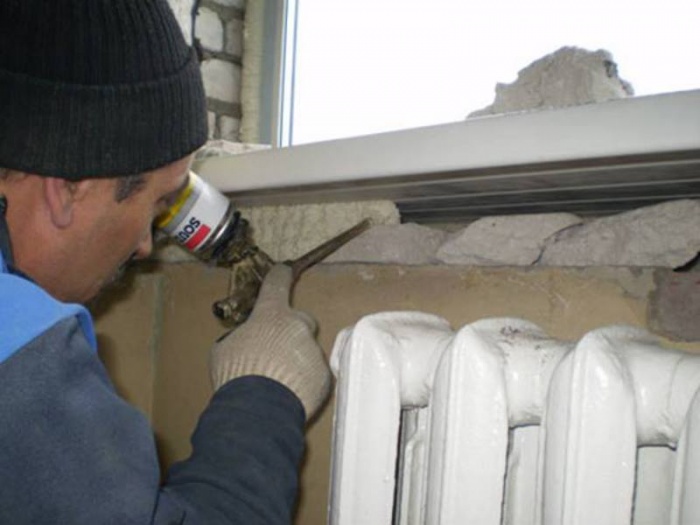
- Fill the gaps with foam. Cover the foam seams on the outside and inside with protective tapes. On the outside, the insulating tape must be “sinked” into
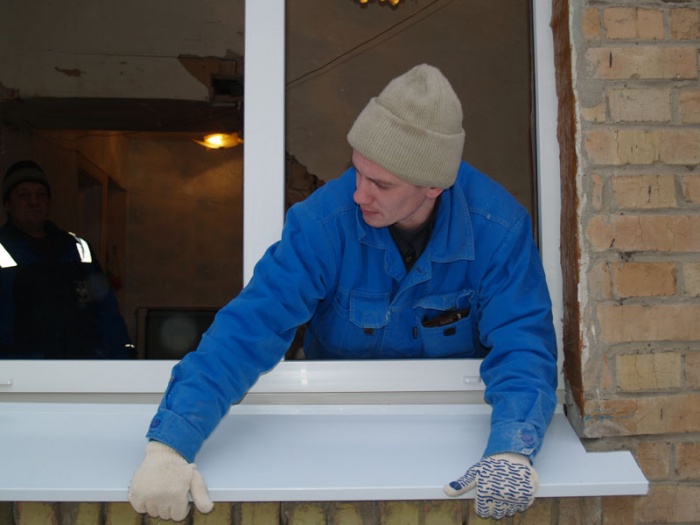
- Fill the gap under the drain with foam. Install it at an angle away from the window, attach it with self-tapping screws to the bottom profile.
- After the foam has polymerized, you need to install the window sill. The plastic version fits 2 cm under the clover. To create a slight slope from the window, the space under the window sill can also be foamed.
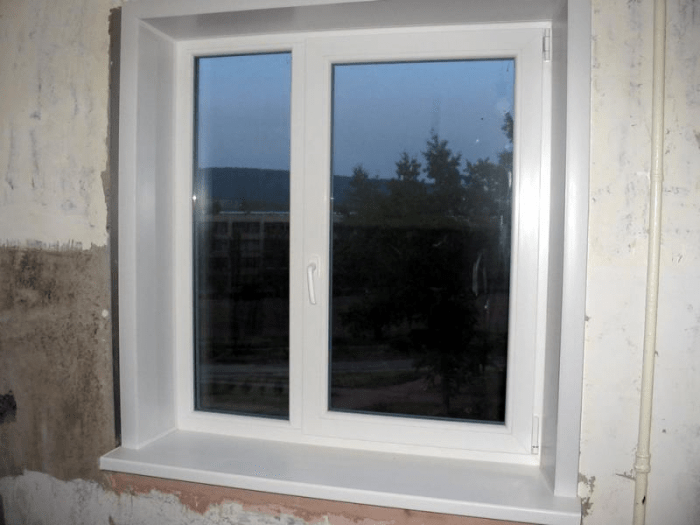
- It is advisable to make the slopes on the day of installation. Maximum break 3 days after installation.

After completing all operations for 16 hours, it is not recommended to use windows so as not to damage the integrity of the installation seams. Not only skilled owners need to know how to install a plastic window. If the owner of a country estate decides to order the services of a little-known team of installers, he also needs to study the specifics of installation in advance.
Plastic windows are increasingly being installed by owners country houses, since they have many advantages compared to wooden products. They are also reasonably priced. But before installation, you need to carefully prepare for such work. To do everything yourself, you need to know the specifics of performing all operations.
All plastic products are equipped with parts for installation, so with proper preparation, you can install the window without outside help. It is necessary to perform all actions very carefully so as not to damage the structure. In order to secure the windows in the opening more carefully, it is worth working with an assistant. In some cases, before carrying out work, it is necessary to strengthen the opening.
Materials required for work
Before you begin installation, you need to prepare the following materials:
- wedges inserted for correct location windows;
- polyurethane foam;
- sealant;
- water vapor barrier material necessary to protect joints from moisture;
- anchor bolts.
Wedges are used during the installation process to more accurately install the plastic profile. Without these materials, it is much more difficult to monitor. Polyurethane foam is an insulating material that fills the space between the wall and the frame. When choosing foam, it must be taken into account that it must correspond to the temperature at which the work will be carried out. If you purchase material intended for use in summer time, its use in winter can lead to the creation of a poor-quality insulating layer.
You will also need self-expanding sealing tape during work. This material is glued around the perimeter of the window from the outside, after which it expands. Sealant is used to fill the space between the slopes and the window sill.
How to determine the correct position of a plastic window
Before carrying out installation work, it is important to correctly determine the position of the frame relative to the thickness of the wall. The plastic window should extend about a third inside from the street side. This rule is not mandatory, but when moving the window in any direction relative to the specified distance, it is worth considering that the length of the sills and window sills must correspond to the project.
It is important to consider the size of the radiator and its position. The window sill should not overlap it by more than ½ of the width. If you completely turn off the radiator, this may negatively affect the room temperature in winter time, as well as on the state of the window. If installed incorrectly, plastic windows usually begin to fog up.
The length of the window sill should be approximately 15 cm longer than the window opening. Thanks to this, you can process the edges of the window sill while finishing the slopes. The window sill comes with side plugs, which should also be secured after installing the window.
Methods for fixing plastic windows
The choice of a specific fastening method depends on parameters such as the size of the window opening and the wall material. This should also be taken into account when choosing fasteners for a plastic structure.
Plastic windows can be fixed in several ways:
- Using dowels or anchor bolts. They are fixed in pre-created holes in the wall.
- Plates with teeth that are located on the outside of the window profile. They are installed on a spacer and secured with self-tapping screws.
The first method described is considered more reliable. That is why, with the help of dowels, plastic structures that have big sizes. The fastening that passes through the window block is more reliable and can withstand impacts.
If you decide to install a small plastic window, they can be secured using anchor plates. These fasteners can be hidden by slopes and finishing materials. But before carrying out work, small recesses should be prepared for them. This will avoid problems with plane alignment.
It is worth noting that when installing plastic windows, professionals combine the above methods. In this case, anchor bolts are used to secure the base of the profile and its vertical parts. The upper part is secured with plates.
Basic rules for installing plastic windows
To install windows correctly, you should follow several basic rules:
- Installation of plastic double-glazed windows should be done using polyurethane foam. This material allows you to give the structure additional rigidity. It also acts as a retainer and heat insulator.
- To protect the space between the window and the wall, it is necessary to secure a waterproofing material on the outside and a vapor barrier on the inside.
- Windows can be installed at any time of the year. Many professionals recommend carrying out work in winter, as this will allow you to immediately see whether mistakes have been made.
- Before purchasing foam, you must carefully study the features of the composition. Such materials differ in several respects. One of them is the solidification temperature. The instructions on the container indicate the most favorable conditions for using the foam. If they are ignored, the material may begin to deteriorate during the operation of the structure.
- When foaming the gaps between plastic windows and walls, it is necessary to fill in small portions. This allows you to use less foam.
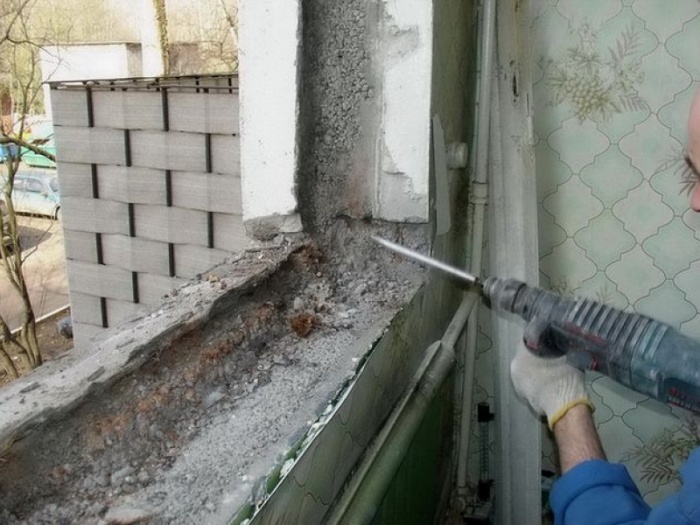
- If the opening crumbles, it is necessary to clean the surface of old materials and strengthen it.
By following the described rules, you can install windows with your own hands, without making the mistakes that people who do not have experience in such work make. Technology for installing plastic windows in brick house is quite simple, but it is important to carefully perform each action so as not to make a mistake.
How the opening is prepared
Before performing window installation work, it is necessary to thoroughly clean the opening from dirt and dust. It is important to remove all remaining paint and building materials. Before installation, it is also important to compare the dimensions of the opening and the plastic frame. If the gap is more than 4 cm, it is necessary to use not only foam. This is due to the fact that when using it, it will not be possible to create an even and high-quality seam. In addition, quite a lot of foam will be lost.
Before installation, you must remove the sashes from the frame. To do this, simply pull the pin out of the hinges. If it is necessary to remove a glass unit from the frame, remove the glazing beads holding the glass. These steps must be performed very carefully so as not to scratch the glass.
After removal, the sashes and double-glazed windows should be placed on a soft mat and leaned against the wall so that they are in a stable position. Double-glazed windows should not be laid flat, as this may lead to scratches on the surface of the glass.
After this, the protective film is removed and markings are applied to the places where the fasteners will be located. The distance between them should be about 40 cm. It is important to take into account that the distances from the corners should be more than 15 cm.
Installation process
After carrying out the described steps, spacers should be inserted into the window opening in the brick wall to create the necessary gap. The frame must be leveled using building level. It is also important to control side clearances.
In the openings of brick houses, it is necessary to mark the installation locations of anchors. After this, holes are created in the walls. If fastening is done using anchor plates, it is necessary to bend them so that they fit well on the wall.
The next step is to install the frame. It is important to check the horizontal and vertical structure of the structure before. How will it be finally fixed? After this, the bolts are finally tightened until the head protrudes above the surface by no more than 1 mm.
After all the described work, the sashes and double-glazed windows are installed, as well as the functionality of the entire structure is checked. If you installed the products with your own hands for the first time, you should carefully inspect the opening and make sure that no mistakes were made during the work.
Installation of slopes
Before installing external slopes, it is necessary to measure the width and length of the opening. Cutting plastic slopes is done using a circular saw.
Important! Slopes should only be secured to clean and level surfaces.
At the first stage, the upper horizontal part is secured. It needs to be recessed as deep as possible, and the space should be filled with polyurethane foam. Worth remembering. That it should not be released too much, since when hardening the material can change the shape of plastic products.
After this, the installation of vertical slopes occurs. During this work, it is important to check the verticality of the elements. The installation of the lower slope occurs in the same way. It is important to ensure that all elements are correctly joined and there are no gaps between them. Corners between plastic slopes are closed with a special part.
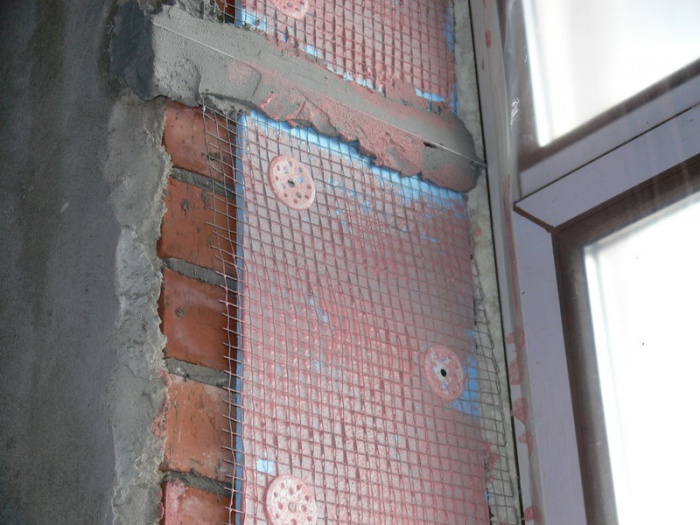
Installation of internal slopes should be done only after careful preparation of the surface. If the opening crumbles, it is better to clean it up to the main wall and only then carry out further work. After this, the opening is leveled and filled with insulation. If necessary, the window opening is strengthened.
Reading time: 7 minutes.
More recently, in glazing residential buildings and industrial buildings, exclusively wooden window frames were used. Today, many consider them relics of the past and are in a hurry to replace them with modern metal-plastic structures. Indeed, in addition to high performance characteristics, they are much cheaper than wooden frames. To install plastic windows with your own hands, you don’t need to have superpowers. Almost any person who can hold a tool in their hands can cope with such a task.
However, do not forget that each job requires certain skills and craftsmanship. Lack of experience in installing windows can lead to a number of troubles. These are systematic breakdowns, loose fit and high throughput of street air into the apartment.
To avoid the above points, in this article we will provide step-by-step instructions that will help you install your windows correctly and efficiently. If you still decide to trust professionals, know that some of them are not really professionals, and for a number of reasons they openly neglect certain stages of proper installation (some save time, others save money). Having an idea of the work being carried out, you can easily exercise independent control over the entire process. And subsequently you will enjoy the high-quality operation of your windows, which will bring joy to all family members.
The main stages of installing new windows:
- taking measurements;
- dismantling old windows;
- preparing openings;
- installation of a metal-plastic structure.
Not everyone knows that the manufacturer gives absolutely no guarantee for their services if they install windows on their own. Therefore, if various troubles arise during the installation process, you should not hope for a return or replacement. All metal-plastic structures are manufactured strictly according to pre-agreed dimensions. If you make a mistake, the window may not fit in the opening or may end up being much smaller. And it will only be your fault. The company's employees are solely responsible for the implementation of each stage of product installation.
Also, any inaccuracy made when installing a metal-plastic window will deprive you and your loved ones of all advantages modern design and expected level of comfort.
Window measurements
When taking the necessary measurements, you need to pay attention to the fact that window openings exist with and without a quarter. Accordingly, their formulas for calculating sizes are different. 
For the first case, we must measure the width of the opening between the existing quarters, this is done at the narrowest point. And then add 3-4 cm to the resulting figures - this will be the width of our plastic frame. In addition, it is important to check: the largest distance between the vertical quarters should not exceed the design width of the block.
Read also: Valve supply ventilation for plastic windows for micro-ventilation of rooms

The height is determined by measuring between the top quarter and bottom surface of the window opening.
If the window opening is without a quarter, the required values can be obtained by subtracting 5 cm from the vertical dimension (to place a window sill) and 3 cm from the horizontal dimension.

When determining the size of the window sill and ebb, it is worth considering the following details:
- Often the size of a window sill is chosen based on its functionality. He must cover heating batteries and indoor flowers should be placed on it;
- The length of the window sill is taken to be 8-10 cm longer than the window opening, its edges should be recessed into the cavity of the slope by approximately 4-5 cm;
- The dimensions of the ebb are calculated taking into account the planned insulation. It is recommended to leave it protruding 5-10 cm from the wall.
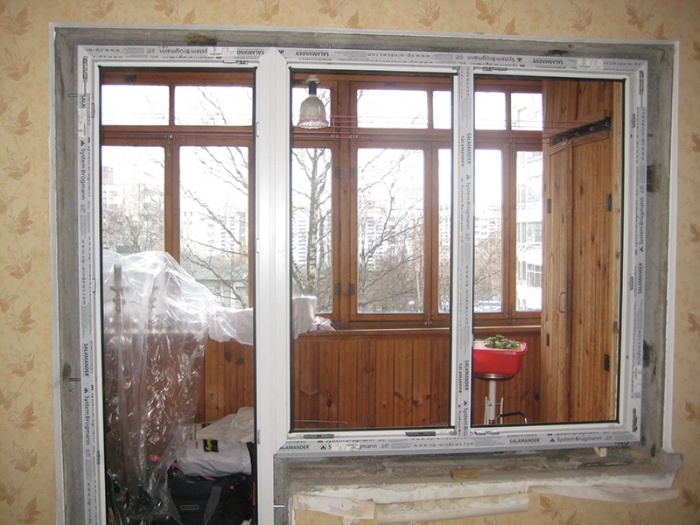
Features of measuring balcony windows
When calculating the width of balcony windows, the length of the parapet is taken as a basis; the entire structure will rest on it. Also, on both sides it is necessary to subtract 6-7 cm, which will be needed for installation corner profile, with the help of it they connect window blocks front and side parts. The distance from the roof to the railing, with the exception of the difference of 2.5-3 cm, which is important to set aside for gaps for fastening, will be the height.
Regarding the side balcony frames, their dimensions are determined in the same way. The only thing is that you need to subtract 6-7 cm from the width to install the corner profile, as well as 2.5-3 cm for the gap from the wall to the window.

Features of window measurements in private houses and old buildings
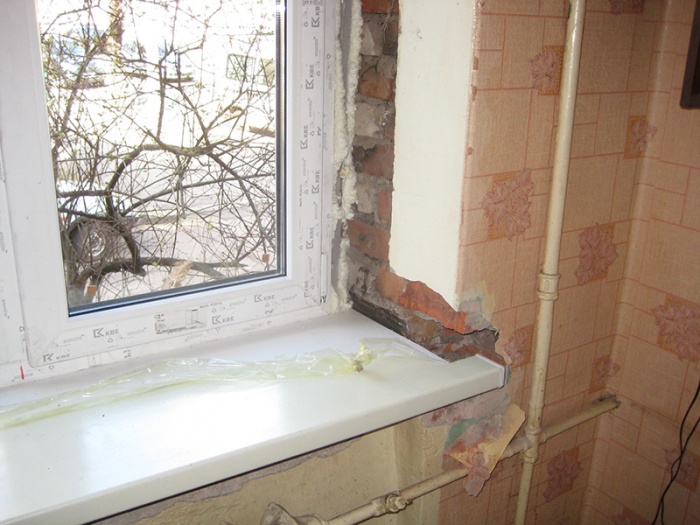
When taking measurements of windows in private houses and old buildings, it is recommended to first knock off part of the slopes on both sides (in the measurement areas). This is done in order to see what the space occupied by the window opening is like. It often happens that there are dilapidated cement mortar And various insulation materials, which can crumble during disassembly of an existing window. The positive point here is that the new plastic structure can be slightly enlarged by expanding the cleaned window opening. 
Ordering a metal-plastic window
Before contacting a company with an order, you should think about what type of double-glazed window is right for you. It can be one-, two- or three-chamber. As for fittings and fasteners, you can also choose them yourself.
WITH technical characteristics The manufacturer's consultants will help you figure out which plastic windows will be preferable for your home at the time of ordering.
Some important points during installation
When installing windows yourself, you should pay attention to the following:
- the metal-plastic structure must be well secured;
- the mounting foam used to fix the windows must be plastered on both sides (this will prevent it from sagging and deforming the frame in the future);
- It is very important to align the structure vertically and horizontally using a level (this will help avoid warping).
How to install metal-plastic windows with your own hands
Before starting installation, prepare everything you need for work:
- Window frame with fasteners;
- Building level;
- Polyurethane foam;
- Mount;
- Bulgarian;
- Windowsill.
The process of preparing a window block
Window preparation is important stage installation work that you do with your own hands. If necessary, the double-glazed windows and hinged sashes themselves are dismantled from the window structure. To release the double-glazed window, a chisel is used; very carefully, you need to use it to pick out the glazing bead (fastening) and after a light blow on the tool it will come out of the grooves. Then the vertical fasteners are removed, top and bottom. The released glazing beads will need to be marked; sometimes their sizes can differ significantly, which will lead to the formation of gaps of several millimeters. The glass unit will come out of the grooves on its own if you tilt the frame a little. Gently lean it against the wall, creating a slight angle.
Today, PVC windows have become very common, and along with them, those companies that install them have gained wide popularity.
However, installing PVC windows with your own hands does not represent any special difficulties, so you shouldn’t be afraid of such work.
Step-by-step instructions for installing windows

The whole process consists of several actions that require a sequence of execution:
- Dismantling old windows.
- Preparatory activities for installing a new window.
- Installation of the stand profile.
- Attaching the mounting hardware to the frame of the new window.
- Creation of special recesses for these fasteners in the wall.
- Direct installation of the window and its alignment.
- PVC fastening.
- Filling all seams with foam.
- Window sill installation and leveling.
- Fastening slopes.
- Adjusting window fittings.
- Low tide installation.
It must be said that many of these stages are preparatory, so the whole process can be divided into the following types of work:
- Preliminary measurements of all parameters.
- Preparing to install the opening.
- Do-it-yourself preparation of PVC windows.
- Direct installation.
Return to contents
Measurements and calculations

Before purchasing a product, you should carefully measure its required parameters. In this case, you need to take into account one characteristic of the opening:
- has a quarter;
- does not have a quarter.
A quarter is a special detail of a block, concrete or other structure, which serves to reduce heat loss.
If there is no quarter, then the window is made 5 cm shorter in length and 3 cm shorter in width. This is explained by the fact that in this case it is necessary to leave gaps - 1.5 cm on each side, and 3.5 cm at the bottom for the window sill.
It must also be said that in various documentation (standards) there are 2 cm, not 1.5 cm.
As for the opening that has a quarter, then PVC windows are ordered into it, which are 3 cm wider than the width of the opening itself. But the length in this case should remain the same.

In order for all measurements to be correct and the window to fit in the future, they must be carried out at the narrowest point.
There are subtleties when choosing the size of the ebb and window sill. In most cases, windows are installed by removing them a third deep into the opening, that is, not in the center. However, installing windows yourself allows you to make a choice in this regard. Accordingly, the window sill is chosen based on the result obtained.
You just need to say that both ebb and window sills should be 5 cm larger than what was obtained as a result of the measurements.
As for the width of the window sill, it should overlap the window on each side by 2 cm. When calculating minimum stock you can consider 8 cm, but it is better to make 15 cm, so that later these cutouts can be redone if the first attempt is unsuccessful.
Return to contents
Making a window opening

So, when all the calculations are completed and the dimensions of all components are known, you can begin to prepare the place where the product will be installed.
First you need to start removing the old window. This can be done different ways. If you are dealing with old wooden window, then it’s better to do this:
- First, remove all the glass, for which you need to remove the glazing beads or nails holding them in place.
- Then remove any nails or glazing beads that are holding the frame itself.
- Remove frame.
Why do you need to remove glass? The fact is that old windows were very often simply nailed to the window sill through the frame. During the process of dismantling the fixed window, the glass could simply crack and fall out of its place, which is unsafe. After the old window frame is dismantled, the entire niche must be cleaned of dirt, dust and paint residues.
It should be noted: foam adheres best to fresh wood, so the old layer must be removed, which can be done with a plane, sandpaper or a grinder with a grinding wheel.
Of course, this should only be done in wooden niches.
Return to contents
The process of preparing a new window

It must be said right away that some professional workers who have already installed more than a dozen PVC windows with their own hands do this without disassembling them. Concerning independent work, it is better to adhere to the following recommendations.
It is necessary to free the frame from the sashes. To do this, remove the pin, which is located in the upper loop. It can be removed with pliers and a screwdriver by carefully picking it up and pushing it out. After removing the pin, the sash can be easily removed from the bottom hinge. If the window does not have sashes, then it is necessary to remove the glass from it, which can be done by removing all the glazing beads. You can use a knife or spatula for this. It is inserted into the gap between it and the frame and moved to the side with a smooth movement.
It must be said that such procedures need to be performed only in the case of large products. If it is possible not to violate the integrity of the new window, then it is better not to do this.
It is necessary to remove the protective film from the outside of the frame so that there are no difficulties with this later.
Then you need to apply markings, that is, mark the places where the product is attached to the niche, regardless of which method is chosen (we will talk about them a little further). It is recommended to adhere to a step of 0.4 m. Minimum distance there should be at least 15 cm from the attachment point to the corner.
Return to contents
Installation methods for PVC windows

It must be said right away that the choice of method should not be based on such product parameters as the number of sashes and chambers in a double-glazed window. The installation method should be chosen based on the dimensions of the product and depend only on the material from which the walls are made.
So, installation of PVC windows can be carried out in one of two ways:
- on anchor bolts or dowels;
- using special fastening fittings.
Anchors and dowels secure the frame to the wall. In this case, in the case of both anchor bolts and dowels, holes of appropriate sizes are drilled.
Installation using these fasteners is good when we're talking about about concrete, block or brick walls.

As for fastening fittings, they are usually used in the case of wooden walls. But it should be noted that this is an optional rule.
The bottom line is that the plates are pressed into the profile and installed against the wall. Such plates themselves are attached using ordinary self-tapping screws.
If you want to install plates on brick or concrete walls, then it is best to pre-cut openings of appropriate sizes in them. This will help avoid unnecessary work associated with subsequent leveling of slopes.
Very often, builders use both methods at once when installing windows, which is also acceptable.
Return to contents
Installation technology

Window installation begins with the prepared frame or the entire window being inserted into the niche. Before this, it is necessary to lay bars or plastic corners around the entire perimeter. They will help ensure the required minimum clearance.
The frame is aligned vertically and horizontally, as well as relative to the center of the niche. This is easy to do by moving these same corners.
Spacer wedges or angles are best placed under the frame mounting points.
This will give it additional rigidity and thereby protect it from deformation at the time of fastening.
Since the installation of PVC windows may differ in the fastening devices used, the installation technology will also be different. And the differences begin with the next step:
- If the opening is made of wood, then further installation involves screwing a self-tapping screw through a pre-drilled hole in the frame. The self-tapping screw is not screwed in completely, but only so as to slightly “bait” it.
- On concrete or brick walls, marks are placed through the same holes. Then the frame is removed, and holes for anchor bolts or dowels are drilled at the marks. The frame is then installed in its original place and secured with anchors, but not completely.
- In the case when fastening is carried out using anchor plates, they simply need to be bent so that they touch both the opening and the frame in the right place.

After preliminary installation, you need to check the verticality and horizontality of the installed frame again. This can be done using a conventional construction hydraulic level or a plumb line.
After checking, the frame is completely secured. At the same time, the anchors are not tightened too much. The final tightening time is determined by the moment when the head of the anchor is aligned with the plane of the frame. Some builders even recommend leaving 1 mm.
Then you should attach all dismantled to preparatory stage window parts, i.e. glass or sash. After installation they should be adjusted.
All gaps between the window and the opening are filled with foam. A situation often arises when the window is so smaller than the opening that there is a gap between them that is larger than necessary. If this gap does not exceed 4 cm, then it can be completely filled with polyurethane foam. If the gap is from 4 to 7 cm, then it is recommended to fill it with polystyrene foam, securing it with polyurethane foam.
When the gap is more than 7 cm (except as specified below), it is required to fill it with boards, bricks or other similar materials. Cement mortar will also work.
The ebb is installed on foam. Additionally, it is attached with self-tapping screws to this profile, if it was used, or to wooden blocks.
The ebb tide is installed with an inclination away from the window.
After the foam has dried, you can begin installing the window sill. It starts under the “clover” by 2 cm. It must be said that window sills are not installed strictly horizontally. This is done to prevent moisture from accumulating on their surface. In order to create a slope of the window sill, it is also installed on polyurethane foam.
After all installation steps have been completed, the window should not be touched for another 16-20 hours. This is necessary in order not to violate the integrity of all gaps, that is, not to displace the product relative to its original position.


