
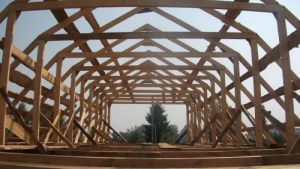
The basis of a beautiful and reliable roof is the solid design of the rafter system. It is important to install it so that it serves for many years, especially in difficult places adjacent to the walls of the building, chimneys and pipes of the ventilation system. Depending on the weight of the snow, the wind load and the severity of the roof, it is necessary to select the correct pitch of the rafters and the design of the joints of the individual elements of the rafter group. We will consider options for attaching parts of the structure to floor beams and ridges, and ways to increase the load capacity rafter legs And step by step installation trusses and a complex roof in general.
Construction of the rafter system
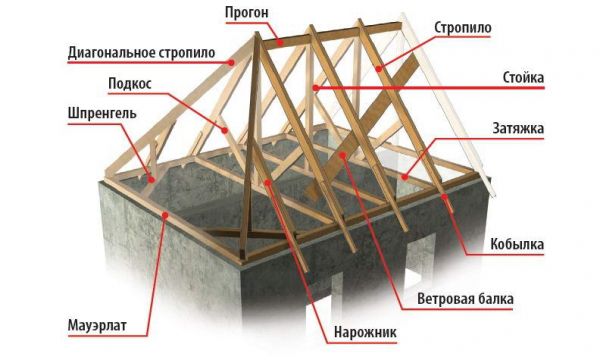
The construction of the roof is the final stage of the construction of the house; it determines the degree of protection of the building from atmospheric influences and the appearance of the entire structure as a whole. The roof frame on which the roofing and insulation is mounted is called the rafter system. The structure of the rafter group depends on the type of roof and its complexity, on climatic conditions and from destination attic space. It is mounted on a Mauerlat fixed to the perimeter walls of the house and consists of the following elements:
- floor beam or tie - a horizontal beam resting on the mauerlat;
- hanging or layered rafter legs, which are attached in the lower part to a tie or mauerlat, and in the upper part they are connected and form a ridge;
- purlin - a beam connecting the trusses of the rafter group;
Depending on the type and size of the roof, rafter systems can be layered, suspended or combined, but their main elements are largely repeated
- racks, crossbars, struts and tie-downs are auxiliary elements that are necessary to give strength to the rafters and the entire roof structure;
- narozhniki - used on hip roofs and are shortened rafters;
The diagonal rafters of the hip roof are fastened with flanges and trusses to ensure even distribution of the load
- trusses - designed to give strength to the diagonal rafters of a hip roof;
- fillies - used to lengthen rafter legs and spouts and form a cornice overhang;
- frontal boards - attached to vertically cut rafters or fillets and are used for mounting drip edges, wind strips and drainage system brackets;
- counter-lattice - mounted on the rafters and used to create a ventilation gap between the waterproofing layer and the roofing material;
- sheathing - stuffed perpendicular to the counter-lattice and used for fastening roofing material.
More complex types of roofs are formed from a combination of pitched, hip and hip types; their rafter system is also assembled from the described elements.
The basis of any rafter and truss system is a rigid triangular connection, which gives strength to the roof structure and allows it to withstand the weight of snow and wind exposure.
Rafter options
Rafter system of any type is designed to create inclined pitched surfaces from which precipitation flows down without accumulating on the roof. In addition, the inclined surface better withstands multidirectional wind loads. When constructing a rafter system, the following types of rafters can be used:

These types of rafters are assembled different types roofs Let's consider the most popular options devices of pitched systems of various configurations.
Shed roofs are used in construction country houses, garages, bathhouses and utility rooms. Such roofs are made using the simplest rafter system, which can become more complex as the length of the slope increases. If the distance between the walls of the building is more than 4.5 m, then the rafter legs are reinforced with struts. For spans of more than 6 m, it is necessary to use two rafter legs on each side or install an additional vertical post with symmetrical slopes.
The choice of design for a single-pitch rafter system depends on the length of the slope, while the use of composite beams is allowed
As the length of the slope increases, the design of the rafter system becomes more complicated with rigid triangular elements and contractions, which gives it additional strength.
Based on the experience of the author of this article, for soft roofing materials with small angles of inclination of the slopes, it is necessary to use a continuous sheathing of plywood with a thickness of 12 mm or more. When sheet roofing material is used, the sheathing pitch should be reduced to 10 cm, the overlap should be increased to 15 cm, and the joints of the sheets should be additionally sealed.
Gable and broken attic structures
The gable roof type, traditional throughout our country, remains popular today. This is facilitated by the simplicity and reliability of the rafter system, as well as the ability to equip a cold or habitable attic. As a rule, a gable roof with an attic is formed by hanging rafters without a middle support, and its rigidity is ensured by crossbars and side posts, which serve as the walls and ceiling of the attic space.
Gable and sloping mansard roofs are very popular in suburban construction thanks to the opportunity to equip an additional living space under the roof
Sloping gable roofs are distinguished by the largest volume of built-in attic; the frame system here is represented by a combination of hanging and layered rafters with different slope angles.
Gable rafter systems are distinguished by their simplicity of design, high strength and minimum consumption building materials, such roofs are often used in budget dacha construction.
Four-slope rafter systems
Four-slope roofs are formed by two trapezoidal and two triangular slopes and have a complex structure of a rafter system with a supporting frame on which row and diagonal beams are mounted. The space between the rafter joists is filled with trusses, and additional support for the diagonal legs is provided by trusses resting on the corner lintels.
Four-slope rafter systems are typical for hip and half-hip roofs, under which you can place a spacious attic space
Hip-slope roofs are perfectly protected from multidirectional gusts of wind and give the building a special chic, but their disadvantage is the expensive and difficult to install rafter system.
The basis for the rafter system of a half-hip roof is the walls of the building, on which the mauerlat, purlins and longitudinal trusses are located
The rafter group of a half-hip roof, as a rule, rests on the side and front walls of the building and has a slightly different design from others with truncated triangular slopes.
Construction of the supporting frame of hip roofs
The rafters of hipped roofs in the upper part converge at one point and form a multifaceted pyramid. To increase the strength of the connection of the rafter legs, special joining elements, sheathing beams and additional extensions are used.
The rafters of the tent system converge at the top at one point and are fastened to each other with ties; in the lower part they are fixed with the help of cuts
Hip roofs give the building a unique appearance, but are characterized by increased consumption of roofing and lumber. Most often they are used on outbuildings, gazebos, and in a truncated version - as roofs for bay windows.
Multi-gable rafter groups
Multi-gable roofs are pitched fragments cut at right angles to each other and forming at the junction internal corners or valleys. The rafters of such a roof have different lengths, and the assembly of this structure requires professional skills, since the size and angle of inclination of the slopes may differ from each other.
The rafter system of a multi-gable roof forms eight triangular slopes, at the junction of which valleys are located
Roofs of this type are designed to provide daylight under-roof space and have a very attractive appearance, but they are quite difficult to install and insulate.
The passage of ventilation and chimney pipes through the roof sometimes requires the displacement of the rafter legs in violation of the selected step between them. But if there are pipes of sufficiently large dimensions combined into one block, this is not enough. It is necessary to cut the rafters at the place where the pipes pass and connect the cut sections with other rafters with bars secured at the corners. The distance between the pipe and the wooden elements must correspond to a fire clearance of 130–150 mm.
Rafter system around chimney is built taking into account the fire gap, and the cutout is reinforced with additional racks
Next, the cut rafters are fastened using vertical posts to the tie rods or floor beams. Thus, a box is created around the pipe, which does not come into contact with its hot surface and, if necessary, is filled with non-flammable heat-insulating material.
Installing a roof over an old covering
During service, the roofing covering is subject to natural wear and tear. If there is no deformation of the old rafter system and you are convinced that it will last for a long time, then repairs can be carried out quickly and efficiently. When there is no time to dismantle the old roof, you can lay a new covering directly on top of the old roof. To do this, you need to know exactly where the rafter beams with counter-lattice and sheathing boards go.
In my personal opinion, based on practical experience, for a new roofing it is better to choose corrugated sheeting, metal tiles or ondulin, which will not create a large load on the structure of the old roof.
Video: replacing the roof without dismantling the old one
The pitch of the rafter legs when installing the roof
When installing the roof, the rafters are installed at a certain distance from each other. This distance is called a step. Recommendations for choosing the pitch of the rafter system are set out in SNiP II-26–76 * “Roofs”. The decision must be made taking into account the following parameters:
- roof type;
- the length of the slopes and the angle of inclination;
- type of roofing material;
- rafter section;
- expected wind and snow load.
The pitch and number of rafters can be selected based on recommendations and adjusted taking into account the characteristics of a particular roof. For simple gable roofs with cold attics, the calculation can be made based on the following table.
Table: selection of length, pitch and section of rafters
For mansard and complex roofs, a more durable rafter system is required with a more frequent arrangement of trusses and a change in pitch at the joint areas with different types stingrays On such roofs, the rafters are timber with a cross section of 50X150 and 100X200 mm, and the pitch is selected in the range from 60 to 120 cm.
When constructing roofs with a habitable attic space, timber of a larger cross-section is selected, and rafters are installed more often to increase the strength of the truss
According to the observations of the author of this article, the size of the step has an indirect influence on the choice of steps. insulation material. For example, the standard width of the insulation is 60 cm, and the permissible pitch of rafters with a section of 50X150 mm per pitched roof is in the range from 60 to 120 cm. Thrifty owners choose a step that is a multiple of 59 cm in order to mount insulating mats between the rafters tightly and without gaps.
Installation of complex roof structures
Complex roofs include multi-level architectural solutions, which are often distinguished by a mixture of styles, for example, a pitched roof with a bay window or a combination hip design with a tent element. Even an ordinary multi-gable roof with gables at different levels often has a very complex rafter system. The design of such systems is carried out in accordance with the requirements of SP 64.13330.2011 “ Wooden structures" and SP 17.13330.2011 "Roofs". TO design work Professional specialists should be involved, since even a small mistake can lead to defects and loss of expensive materials.
Complex roofs should be erected only according to ready-made design solutions, which contain all the necessary information for selecting materials and describe the sequence of installation work
The rafter system of complex roofs can be divided into simpler components, and valleys, vertical posts and horizontal ridge-type beams can be mounted at the points where they are connected.
When installing complex rafter systems, it is important to ensure that there is a gap on all slopes for under-roof ventilation, otherwise condensation will lead to damage to the rafters, sheathing and insulating layer.
Video: installation of complex roofs
The nodes connecting the elements of the rafter group perform the function of providing rigid and durable fastening of the parts. Increased demands are placed on the assembly quality of the units, since in these connections the load is evenly distributed from the load-bearing elements to the tie rods, floor beams and mauerlat. The main types of connections that are used when installing rafters include the following components:

There are also particularly complex connections, for example, the junction of the diagonal rafters of a hip roof to the purlin and Mauerlat, or the sloping roof junction, where five parts of the rafter system are connected.
When assembling a sloping roof, special attention should be paid to the transition of hanging rafters to layered rafters, since they connect five load-bearing elements at once
Let's look at the attachment point for rafters, racks, purlins and tie-downs using the example of a broken line mansard roof. In it, a vertical post is connected using a tie-in to a horizontal purlin and a tie; then a lower rafter leg is mounted to them, which rests on the tie using a tie-in and a metal bracket. Then the upper truss is fastened with ridge ties and is also cut into the tie and fixed to the bracket. In other components of the rafter system that are used on various types roofs, the same principles of connecting parts are used. As fastening elements Nails, self-tapping screws, bolts, perforated metal strips and angles of various designs are used.
Installation of the rafter system
Before starting the construction of the rafter system, it is necessary to carry out preparatory measures to ensure efficient and quick assembly. It is necessary to create safe conditions for work, prepare a place for cutting and making templates, and also ensure the availability of lumber and fasteners. During the installation process, working drawings and the following tools will be required:
- protractor (small), level, construction pencil, cord;
- chain saw for rough cutting and trimming;
- circular saw, jigsaw;
- electric drill, screwdriver;
- hammer, chisels.
Before assembly, it is necessary to make templates of the same type of elements of the rafter system and make sure that they are well connected and fit well at the installation site.
Rafter trusses must be made according to a single template, and this can be done both on the ground and directly at the work site
The final stage preparatory work involves cutting lumber to size, impregnating the elements with fire-retardant and antiseptic compounds and allowing natural drying for at least 24 hours.
In the absence of design documentation for the roof, it is important to select in advance methods for attaching the rafter legs in the ridge and eaves parts, as well as Constructive decisions for connecting parts in various docking and other units.
The rafters are fastened to the floor beams or tightened in the lower part different ways depending on the complexity of the truss and the length, and therefore the weight, of the rafter legs. Rafters with a length of less than 4 m and a cross-section of 50X100 mm are sufficient to be fastened to the beams with a plank assembly or with the help of metal plates, cutting the beam at the required angle and using nails.
The choice of method of attaching the rafter legs to the mauerlat or floor beams depends on the angle of inclination of the slopes, the weight and length of the rafters, as well as on the expected external load
For large lengths and weights of rafter legs and expected snow and wind loads, the connection must be made with a frontal notch, single or double tooth. In this case, sub-beam pads are used to ensure a tight fit of the threaded rods. Before installation, it is necessary to create templates that will ensure correct cutting of materials at the cutting unit and perfect fit of the elements. To avoid chipping at the edges of the floor beam, it is necessary to cut to a depth of at least 2 cm and at a distance of 1.5 h from the edge of the beam (where h is the height of the beam).
It is important that the holes for the threaded rods are located at an angle of 90° to the upper plane of the rafters, as this will ensure a tight fit and reliable fastening of the parts to each other without displacement or distortion.
How to properly make cuts on rafter beams
During the assembly of the rafter system, it is necessary to join elements with different angles of inclination. Used for marking cuts, notches and corner joints. building levels and goniometer tools, and in the mass production of similar parts, templates are made. Cuts on the rafters can be made in the following sequence.
- The timber is placed on the mauerlat and ridge girder; vertical lines and the exact position of the tie-in are marked according to the level.
- The angle of inclination is fixed on the cutter, and the dimensions of the insert are measured with a tape measure or square.
- Using a square and a protractor, the measurement results are transferred to the workpieces, after which the cutting angles and dimensions of the notch tenons are marked.
- The necessary cuts are made on the marked workpiece.
Places for cuts are marked in several stages using a construction pencil and a goniometer tool.
Diagonal rafters or rafters come to the joint at different angles in two planes; in this case, use a level to mark vertical angle joint, and then the desired abutment angle is fixed with a small tool and transferred to the part.
According to the author of the article, cutting material according to a single sample is not an unnecessary operation, since the time lost on making templates is more than compensated for in the installation process, which is significantly faster and becomes more rational and of higher quality. You need to pay attention to the good condition of the goniometer tool and use only proven specimens.
Do-it-yourself rafter system installation step by step
Many owners, in order to save money, install the roof of their house themselves. If you have some construction experience, this decision is completely justified, since even complex roofs can be assembled with your own hands, having project documentation. In the absence of a project, you need to make a drawing of the future structure yourself with the main parameters and dimensions of the elements of the rafter system.
Blanks for roof trusses can be collected on the ground or directly on the roof. Usually a triangle is made from two side beams and a bottom tie; all other elements are mounted after installing the truss in a vertical position. Each structure must be made according to a template made in advance and tested at the installation site. If the structural elements are significant in length and weight, assembly is carried out in stages.
Installation is carried out in the following sequence.
- Solid Mauerlat bars are mounted on the threaded studs of the reinforced belt or the last crown of the walls along the perimeter to ensure uniform distribution of the load from the rafter system to the walls of the building.
In houses made of concrete or building blocks, the Mauerlat is installed on studs embedded in an armored belt, in wooden buildings its role is usually played by the last crown of the wall
- Floor beams or tightening beams are attached to the Mauerlat using brackets, metal corners or bolts. When using long and massive rafter legs, vertical posts are mounted in the middle of the floor beams, and ridge purlins are attached to them.
- The first blank for the truss is installed from one edge of the roof (on the gable). An insert is made on the rafter legs, and they are attached to the mauerlat, floor beams and ridge girder.
Roof trusses on the gables are installed first
- The second blank is installed in place of another pediment.
- Both trusses are fixed in a vertical position, which is controlled by a level or plumb line.
- Guide cords are stretched between the installed trusses.
Guide cords are stretched between the trusses installed on the gables to control the correct position of the intermediate elements
- Intermediate rafter structures are installed with the selected pitch. All of them must be aligned vertically and along the stretched cords.
- The ridge and additional horizontal purlins are installed (if they are provided for in the design).
- The rafters are reinforced with crossbars, racks and other elements provided for by the project.
After installing all trusses, horizontal purlins and additional reinforcing elements are installed
- On hip roofs, row rafters are first installed, supported by a ridge girder and a mauerlat, and then diagonal rafters and soffits are installed alternately.
- With the help of gable and front boards, overhangs are formed that protect the walls of the building from precipitation.
- A waterproofing film with a sag of no more than 20 mm and counter-lattice bars are attached to the rafters, which provide a ventilation gap between the waterproofing and the roofing. Then a longitudinal sheathing is laid, which serves as the basis for the roofing.
Installation of a waterproofing film, counter-batten and sheathing completes the assembly of the rafter system
Experience shows that when the length of rafters is more than 6 m, they need to be built up at the joints using a tenon, double-sided overlays and using threaded rods or bolts installed in increments of 15 to 20 cm. The joint must be reinforced with additional posts or struts. In 2010, using the specified technology, the author installed a roof with a length of rafter legs of more than eight meters; to date, no deflections or other changes in shape have been found on the slopes.
Complex roofs are installed starting from the main supporting structures on which the rafter system is based. Then ordinary and diagonal rafter legs, extensions and auxiliary elements are installed. In conclusion, different types of fragments are joined together into a single structure.
According to the author of this article, who installed three roofs of varying complexity with his own hands, the installation of the rafter system can and should be done by yourself. The first roof was cut and assembled according to the drawing in four days, and on the fifth and sixth days the waterproofing, sheathing, fascia boards and roofing material were installed. The second roof took three and a half days, and the third was erected in two days. With increasing skill and proper planning installation of the rafter system is significantly accelerated. If you have construction experience, then installing a roof with the proper quality is not difficult at all. If difficulties arise, it is necessary to involve design engineers or professional builders for consultation who will help in a difficult situation.
Video: design and installation of the rafter system
We considered options for assembling the rafter system at the junction with pipes, on top of old roofs, at the points adjacent to the Mauerlat, as well as in the case of complex rafter structures. Along the way, we studied some ways to connect elements of trusses and slopes. You can assemble the roof with your own hands, it is important to strictly follow step by step instructions and strictly follow safety precautions, then success will be ensured.
Rafter system - powerful roof frame for holding roofing and other elements.
How well is the roof frame constructed? The strength of the roof as a whole depends.
Otherwise, its functionality, ability to protect the building from external influences and provide heat in the house may deteriorate.
Therefore, you need to correctly approach the choice of rafter systems and correctly draw up a rafter plan.
You can read how to calculate the rafter system.
Depending on the purpose of the room, size gable roof, the design of the rafter system is classified as follows: hanging system and layered.
Hanging system
Hanging rafter system for a gable roof has support only on load-bearing external walls building.
Depending on the width of the span and the design of the roof, the installation of hanging systems has features.
For small houses
It is advisable to erect a hanging structure for buildings where the distance from one wall to the opposite does not exceed 6 meters. The frame has the shape of a triangle.
To strengthen the load-bearing capacity of the faces of the frame triangle, several methods are used:
- The bases of the rafter legs at the top are secured with overlays;
- Use bars of a larger cross-section on the side parts;
- The bars are secured by cutting them into the ridge element;
- The slopes for the canopy equipment are increased by cutting out an opening for the frame beams in the extended boards so that they converge behind a line running from the edge of the inner wall to the slope of the rafters.
Using these methods, it is possible to distribute the load throughout the entire structure.
Strengthening the frame triangle
For mansard roofs
When arranging the frame, you should pay attention to some points:
- Mandatory installation of a mauerlat on which the frame beam is installed by cutting;
- Installation of the crossbar - the base for the ceiling canopy of the floor. The most effective fastening option is to cut the crossbar into the rafter half-square;
- The length of the bevel board should be longer than the wall line;
- The cross-section of the frame bars should be maximum;
- The tie should be secured with a pendant. If the string is long, it needs to be strengthened in the center with nailed boards at the top and bottom.
CAREFULLY!
Particular attention should be paid to fastening the elements, since the attic experiences loads both outside and inside.
In addition, the rafter system of a gable roof with an attic is equipped with insulation, which increases the load.

Rafter frame for mansard roofs
For large houses
When spanning more than 6.5 meters, installing a hanging system requires installing more fastening elements to prevent sagging of the tie, which is caused by its own weight.
Points to consider:
- It is advisable to make the tie from two beams by cutting and secure it with metal plates;
- A headstock should be installed in the central part of the frame;
- To reliably distribute weight to the headstock and rafter boards, it is better to attach struts, as well as other retaining elements.
When installing a hanging-type system, sometimes you can do without installing a Mauerlat and limit yourself to installing boards on film. In addition, the hanging system is characterized by the absence of complex components, which facilitates the work on arranging the roof frame.
Hanging system
Layered system
The difference between a layered structure and a hanging one is that the structure has additional support points inside the room. A prerequisite for installing a layered system is the installation of a Mauerlat.
The system design provides for the installation of both spacer and non-spacer frames.
Spaceless frame
A non-thrust frame should be installed in houses with log walls. When installing rafters, their bases must be attached to the Mauerlat.
Options for attaching the system base to the Mauerlat:
- By beveling the sole of the rafter leg so that its area with the mauerlat is the same, and the cut does not exceed 0.25 cm of the height of the beam. In this case, the rafters, without connecting to each other, are attached to the ridge element on both sides;
- By connecting the rafter beams at the ridge with one nail - at the top, and by hinged connection with a flexible metal plate to the mauerlat - at the bottom.
When attaching rafter legs without connecting them at the ridge part special attention should be paid to the accuracy of calculations.
Even for minor discrepancies in the scheme, expansion pressure will act on the walls of the building, which may lead to the destruction of walls.
Spaceless frame
With contractions
To strengthen the structure and give it stability, Screws are mounted to the pillars of the structure. You should use timber of the same cross-section as for the rafters. To increase strength, the screeds are nailed on both sides of the beam.
The same fastening option is effective for firmly fixing the ridge element, which prevents the roof from moving horizontally.

Frame with contractions
With struts
Struts enhance load-bearing capacity wooden frame and ensure the strength of the rafter board.
An important requirement when installing a strut is a correctly measured cutting angle, which makes it possible for the strut to fit tightly to the elements being connected.
ATTENTION!
If, with a layered system, the support part is located in the center of the base of the frame, then the strut is attached at an angle of 45° to the horizontal line; if the support is closer to one of the load-bearing walls, then the attachment angle can be different: from 45° to 53°.
It is advisable to erect a frame with struts in places where there is a possibility of the foundation settling, or in wooden buildings where slight shrinkage of the walls is acceptable.

Frame with struts
With two indoor supports
When there are two supports in the form interior walls, then when arranging the rafter legs, beams are placed under them. If the beams are not installed, then a post resting on the internal support is nailed to the base of the rafters.
Rafter beams are installed on load-bearing supports. On the supports inside the room, beds are installed, onto which the load from the rafter beams from the racks falls. The rafters are cut so that they fit snugly against each other and secured.
With this design, the ridge girder is not installed.
To ensure that the structure is non-thrust, tie downs are attached.
The stability of the structure is ensured with the help of racks, which are installed horizontally from the inner base to the rafter leg, and joints, - wooden beams, which connect the bases of the racks diagonally.
If the structure is spacer, then a beam is attached above the purlin, connecting the frame legs - a crossbar.

Layered system

Types of rafter systems
Installation of rafters for an attic roof

Before installing the rafter system under the attic, it is necessary to correctly calculate the roof load and take into account other factors, which may affect its functionality. All wooden elements must be treated with antiseptics.
Installation of the rafter system is carried out in stages:
- Install the Mauerlat on the waterproofing layer. The board is fastened to the walls with staples or nails and tied with metal wire to hooks prepared in advance in the wall;
- Frame elements are cut out;
- The main rectangle is made from tie rods and racks;
- Two middle purlins are mounted, to which the lower rafters are attached;
- The structure can be lifted to the roof, where it can already be installed upper rafters, connecting them at the upper base, securing the ridge beam and side girder;
- The structure is reinforced with the necessary elements: tightening, racks, struts, additional stops.
After installing the frame, a vapor barrier film is laid on it, elements and covering material are installed.

Mansard roof installation
Installation of rafters for the attic
The attic of a gable roof has the simplest hanging system.
For attic floor It is advisable to make ready-made trusses on the ground, and then lift them to the roof, having previously installed the Mauerlat.
Trusses consist of rafter legs, firmly secured with a tie at the lower base. You can additionally use struts or headstocks.
Securing the tie rods to the rafters is of great importance. It is recommended to install the tie rods so that their beams are located half a meter behind the wall line, then there will be no need to additionally install an overhang.
You can read how to make rafters yourself.
The trusses are secured using upper and lower purlins.

Rafter system for the attic
Gable roof rafter system: elements
When arranging the frame of a gable roof, the following elements are used:
- Mauerlat. The element that is attached to load-bearing wall. The entire structure of the rafter frame is mounted to it;
- Run. Beam connecting the rafter legs on the sides and in the ridge element;
- Puff. A beam attached to the rafter legs, preventing them from diverging;
- Grandma. A beam located vertically and secured at the ridge and tie;
- Strut. A plank connecting the beam and the rafter at an angle;
- Rack. Vertically rests on the bed and rafters;
- . Beam connecting the upper bases of the rafters;
- Filly. Extensible part of the rafter for overhang;
- Overhang. An additional structure serves to protect the outer wall from rain;
- Lathing. A lattice installed on the rafter frame to attach the covering layer.
The combination of several elements (rafters, racks, braces) in one plane is called a truss.
Rafter system of a gable roof, drawings and photos below:

Drawing of rafter system elements
Knots of the rafter system of a gable roof

Reliable fastening of structural components ensures the strength and durability of the structure and helps to increase its service life.
The strength of the base of a gable roof depends not only on proper fastening.
It also consists of the correct calculation of all frame elements, from a verified determination of the type of structure at the project stage.
Rafters for a gable roof are connected to different structural elements.
Main structural components:
- With beam: secured either with a spiked tooth or a tooth with a stop. Additionally, corners are used. They are mounted to the beam by cutting out a stop for the tenon in the beam with a socket. A single tooth is attached with a tenon and a stop. If a notch is made, then the distance from the edge of the block should be 0.2 - 0.4 m;
- With Mauerlat: for rigid fastening, use corners or make cuts, which is secured with nails or staples, with a hinge - a moving metal fastener, with a saw - a nail or staple;
- With a skate: cut the edge at an angle and fasten it end-to-end with nails, secured with a bracket or overhead board. Overlapping boards are fastened with a bolt or studs.
Depending on the span, the elements are attached:
- Grandma. Top - with staples and a clamp, bottom - with a clamp;
- With a brace. The top is attached to the rafter, the bottom to the headstock;
For the manufacture of rafters in individual construction, they usually use wooden materials: boards, beams, logs. Despite their relative cheapness, wooden roof rafters are strong enough to withstand all roofing loads and serve faithfully for many years.
Other possible materials for rafter systems - metal and reinforced concrete - are not practical for private construction due to their heavy weight, complex installation and high cost.
The rafter system must be strong, but not heavy. Of course, for the load-bearing foundation of the roof of large industrial buildings and high-rise buildings, you have to use metal or reinforced concrete. But for ordinary private houses this is an unnecessary excess. In this case, the rafters are made of wood - from boards, timber (regular or glued), logs.
Logs are rarely used, exclusively for log houses. This material is too heavy, requiring high professionalism from the carpenter and the ability to make complex cuts in the fastening areas.
Timber is the most the best option, from which you can mount strong and durable rafters. The only drawback of the timber is the high price.
Cheaper boards with a minimum thickness of 40-60 mm are often used as a replacement for timber. The list of their advantages also includes low weight, ease of installation and a high margin of safety.
The following requirements apply to the selected lumber:
- The minimum acceptable types of wood are 1-3. The presence of knots is allowed in small quantities (it is better to do without them at all!), no more than three knots, up to 3 cm high, per 3 m.p. Cracks are also acceptable, but they should not penetrate right through the wood, and their length cannot exceed half the length of the material.
- It is allowed to use dried wood with a moisture content of up to 18-22%. If these indicators are higher, the rafters, as they dry, may crack or bend and lose their shape.
- The load-bearing parts of the rafter system are made of material with a thickness of 5 cm and a width of 10-15 cm.
- The length of elements made from coniferous trees is up to 6.5 m, and from hard deciduous trees – up to 4.5 m.
- All wooden parts of the rafters, before use, must be treated with protective compounds to prevent them from rotting, fire and damage by wood-boring insects.
Main parts of a wooden rafter system
The main component unit of a wooden rafter system is a truss - a flat triangular structure. The sides of the “triangle” form rafter legs connected at the top at an angle. To connect the rafters horizontally, tie-rods, crossbars, and clamps are used.
The rafter system is made up of several trusses placed on the mauerlat and fastened together by purlins.
To better understand the specifics of the farm, let’s define its elements. Their composition and quantity in one structure depends on the type of roof, its dimensions and the type of rafters used.
So, the components could be like this:
- Rafter leg- These are the rafters themselves, onto which the sheathing is stuffed and the roofing material is laid. The truss consists of two rafters (beams) connected at the top at the ridge in the form of a triangle. The angle of their inclination is equal to the angle of inclination of the roof slopes.
- Puff– a crossbar that fastens the rafter legs horizontally and prevents them from moving in different directions under load. Used in a hanging rafter system.
- Rigel- a beam similar to a puff, but working on a different principle. In the system it is compressed, not stretched. Fastens the rafter beams in their upper part.
- Fight– also a horizontal crossbar that connects the rafter beams and increases the stability of the truss. Used in a layered rafter system.
- Rack– a horizontal beam that serves as an additional support for fixing the rafter legs.
- Strut- an element mounted at an angle to the horizontal, giving the rafters additional stability.
- fillies– used to lengthen rafter legs when it is necessary to create overhangs.
Also, the rafter system can include parts that are not directly related to the trusses, but are used for their installation and assembly. They are:
- Run- a beam running along the slopes, connecting the rafter legs of the trusses. A special case is a ridge purlin, which is installed along the roof slopes at its highest point (ridge).
- Lathing- consists of beams or boards placed on the rafters from above along the roof slopes. Roofing material is mounted on the sheathing.
- Mauerlat– timber or boards laid along the perimeter of the external (main) walls of the building. The presence of a Mauerlat is provided for securing the lower ends of the rafters to it.
- Sill- an element similar to a Mauerlat, but laid along the inner wall of the building. Vertical posts are fixed to the bed.

Types of rafter systems
From wood you can assemble many options for trusses and, accordingly, rafter systems. But all of them can be divided into two types: hanging and layered.
Hanging rafter systems
Used for rooms without internal walls. Trusses made up of rafters rest solely on the outer walls; there is no need for additional support. That is, hanging rafters cover one span, 6-14 m wide.
An obligatory part of hanging trusses, in addition to the rafter legs connected at the top at an angle, is a tie - a horizontal beam connecting the rafters. The tie becomes the basis of the “triangle” of the truss. In most cases, it is located at the bottom of the structure, connecting the lower ends of paired rafters. But raised-pull designs are also used. And also with its modified version - a crossbar, which looks like a raised tightening, but works on compression, and not on tension, like a true tightening.
The need to use a Mauerlat depends on the presence of the tie and its location in the farm. If the tightening is located at the base of the rafter legs, then the Mauerlat is not needed. During installation, the truss is supported on the external walls through the existing tie, which at the same time becomes a floor beam. If the tie is raised upward or a crossbar is used instead, then the Mauerlat must be included in the diagram as the basis for attaching the rafters to the upper edges of the walls.
As additional elements in a hanging system, headstocks and struts are used. They serve to strengthen the truss when covering wide spans.
The headstock in appearance resembles a vertical post running from the center of the tightening to the top point of the truss (ridge part). In fact, the headstock is a suspension, the function of which is to support a pull that is too long (more than 6 m) and prevent it from sagging.
In tandem with the headstock, with an even greater increase in the tightening length, struts are used - diagonal beams. They are rested with one end against the rafter leg, and the other against the headstock. In one farm, two struts are used, on both sides of the headstock.
In country houses and small private houses, hanging rafters made of wood are good because they allow you to create spacious attic rooms without partitions inside. Certainly, we're talking about about schemes where there are no struts and headstocks. Their presence imposes on the developer the need to divide the attic into at least two rooms.

Layered rafter systems
The layered structure of wooden rafters is used for rooms with internal main walls, which serve as additional support for the system. In this case, the distance between the external walls (total overlapped span) can be within 6-15 m.
Pillar farms, in mandatory, consist of rafter legs resting on the outer walls and a vertical drain resting on the inner wall. If there are two internal walls, two studs can be used in the scheme.
Unlike a hanging system, a layered system must have a Mauerlat to which the rafter legs are attached. The racks crash into a kind of mauerlat - a bench. This is a timber laid on top of an internal supporting wall.
For a span of 6 m or less, the simplest layered truss is used, consisting of two paired rafter legs and a stand. The arrangement of wooden rafters with an increase in span requires inclusion in the diagram additional details, such as contractions and struts (rafter legs).
The contractions are similar to the ties in hanging systems, but they are always located above the base of the rafters. The main purpose of scrum is to increase the stability of the system.
For stability, struts, also called rafter legs, are also provided. The strut supports the rafter leg, that is, in fact, it becomes an additional (third in a row, after the Mauerlat and ridge girder) support for it.
Layered wooden rafters are the most common for private residential buildings, cottages. As a rule, such buildings have one or more internal main partition walls, which can become a support and additional support for a strong rafter system.

Methods of fastening rafters to the Mauerlat
The attachment point of the rafters to the mauerlat is one of the most important; the functionality of the rafter system and its ability to bear loads depend on its correct execution.
There are two types of such fastenings: rigid and sliding. The choice of one of them depends on the design of the truss structure. Replacing a rigid fastening with a sliding one or vice versa, as well as insufficient provision of the required degree of shift of the rafter leg, will lead to the fact that the circuit will “break” and will not work.
The rigid fastening ensures a strong, motionless connection between the rafter and the mauerlat. Shift is not allowed, but the rafter can be rotated at the hinge. Such fastening is organized in two main ways:
- by cutting the rafter beam into the mauerlat and further fixing the assembly with corners, staples, nails;
- using metal corners and a support bar.
A sliding fastening (or, as roofers call it, a “sliding fastener”) is of a slightly different type and functionality. It allows the rafter leg to move relative to the support. Of course, this shift will not be noticeable to the eye, but will allow the rafter system not to deform during the natural shrinkage of the walls of the house. Sliding fastening is especially necessary in the construction of wooden log houses. It is also implemented in the construction of houses of any other type, if required by the design and calculations of wooden rafters.

To provide the rafter leg with a small range of movement relative to the Mauerlat, special fastening elements are used - sliders. Structurally, they consist of two metal elements, the first of which is static, and the second is capable of moving relative to the first. There are two types of sliding mounts: open and closed types.
The open type slider is a prefabricated structure consisting of two individual parts: a static guide bar and a corner with a bend at the top. The guide is threaded into the bend of the corner and fixed on the rafter leg, the corner is attached to the mauerlat. When changing the geometric dimensions of the building, the guide can move relative to the rigidly fixed corner by 60-160 mm.
Sliding mount closed type its properties are exactly the same. The design changes a little; it is no longer collapsible, but solid. The corner, which is attached to the Mauerlat, has a loop in the central part. A guide is inserted into it, which, in turn, is attached to the rafter leg.

What both fastening options are (sliding and rigid) is shown in the video:
Another the most important node rafter truss - rafter attachment point in the ridge part. In private housing construction, the following fastening options are most often used for these purposes:
- overlap;
- end-to-end;
- using a half-tree cut.
Overlapping fastening is considered the most simple option. The upper edges of paired rafters are simply placed on top of each other. Then a hole is made at both ends and the connection is secured with a pin or bolt and nut.
To make a butt connection, the upper ends of the rafter legs are cut off at an angle to make it possible to align the sawn surfaces. Fastening is carried out using nails, which are driven into the end of the ridge part through both rafter legs. To further secure the nail joint, use wooden horizontal plates or metal plates that are placed over the joint on both sides of the truss.
A half-tree connection involves preliminary cutting out notches at the upper ends of the rafters to half the thickness of the beam. This allows you to combine the rafters in the ridge, like parts of a designer, without increasing the thickness of the ridge assembly (as happens with an overlap connection). After combining the parts, they are fixed with nails, bolts or dowels.
In addition to the methods described, there are other, less common ones. For example, a tongue-and-groove connection. It is not popular, as it requires great professionalism from the carpenter. The essence of the fastening is that a groove is made in one rafter, and a tenon is cut out on the other. The tenon and groove are combined and fastened with a nail or dowel.

One of the possible connections of the rafters in the ridge (end-to-end, through the ridge purlin) is discussed in the video:
Advantages and disadvantages of wooden rafters
However, working with wood and installing wooden rafters does not present any particular difficulties. In addition, there are other advantages of using wood as a material for rafters:
- low cost of wood;
- universal availability;
- relatively light weight, simplifying installation;
- there is no need to use heavy construction equipment;
- versatility, the ability to be used on buildings made of any material, regardless of the bearing capacity of the foundation.
The disadvantages of choosing wooden rafters are minor, but they also need to be known in person before starting construction:
- the need for treatment with protective agents that prevent fire and rotting of wood, as well as reducing its “attractiveness” to various insect pests;
- the use of wooden rafters is possible only on spans up to 14-17 m; for wider spans it is recommended to use metal or reinforced concrete;
- slightly reduced service life compared to metal or reinforced concrete trusses.
Thus, all the shortcomings are features rather than real negative aspects. This explains such a widespread use of wooden rafters in private housing construction.


Rafter system gable roof It is considered one of the simplest in purely constructive terms. It consists of only a few elements, the number of which decreases or increases due to the size of the roof itself. But despite its apparent simplicity, the process of erecting a gable roof requires knowledge of some nuances that affect the quality of the final result.

Rafter system for a gable roof Source tues.ru
What is a gable roof?
From the name it becomes clear that the roof structure consists of two slopes having a rectangular shape in the plane. More often, the slopes have the same dimensions, but there are so-called asymmetrical designs in which the slopes differ in size from each other.
In this case, the slopes are installed to each other at a certain angle, which is called inclination. The line of contact is the ridge beam, which is part of the rafter system. Simply called the ridge, it is the highest point of the roof.
The side planes formed by the slopes are called pediments. They have triangular shape. After constructing the roof, the sidewalls are lined with sheet or panel materials: plywood, OSB, even boards, etc.
What is a gable roof rafter system?
The basis of the structures of the slopes are the rafter legs, also known as rafters. They are made either from lumber (timbers, boards) or from a steel profile (angle, channel). Wood is used in private house construction. It’s easier to work with, plus the lumber is cheaper.
The construction of a gable roof rafter system is not only about rafters. In addition to these, there are several more required elements. The photo below shows all the elements of a gable roof. Let's label them.

Each of the roof elements has its own purpose Source lestorg32.ru
Elements of a gable roof rafter system
Mauerlat. Essentially, this is a beam on which the rafters rest. Its purpose is to evenly distribute the loads from the rafter legs onto the walls of the house. If the Mauerlat is not used, then the rafters will put pressure on the walls pointwise, that is, large stresses will arise at the installation sites, which will lead to cracking of the walls.
Rafters installed at an angle.
Horse, aka ridge beam or purlin. Its task is to form the joining point of the rafter legs. Ridge beam is an optional element of a gable roof. There are designs in which it is not installed. But more on that below.
Puffs. They are not always used, but only on hanging rafters or if the rafter system is installed on a wide house.
Floor beams, which form the ceiling in the room and the floor in the attic.
One of the floor beams, called let's lie down. It additionally serves as a base for the support posts that support the rafters. Not always used.
Support posts, they are also the headstocks that support the rafter legs. They are installed only if the span of the house is at least 6 m.
Struts, they are also diagonal supports. They are used only if the support posts cannot ensure the overall reliability of the rafter system.
There is one more element that is clearly visible in the photo below. These are support posts for the ridge girder. They are installed if the structure of the rafter system is heavy. That is, the entire structure is assembled under heavy roofing material, for example, ceramic tiles.

Layered rafters with support posts under the ridge girder Source: seaside-home.ru
You might be interested! Warm roof– this is an important detail when building an energy-efficient house. From the article at the following link you can find out.
Types of rafters
The roof rafter system (gable) can be assembled from layered or hanging rafters.
Layered
They got their name because their lower ends rest on the walls of the house, and their upper ends rest on the ridge girder. In this case, the rafter elements are subjected to loads that bend them. The design is reliable, durable, with high load-bearing capacity.
The photo above just shows a layered rafter system. It is clearly visible that the legs rest on the ridge at the top. In this case, there are two types of fastening of the rafters themselves in the upper part:
fastening is done to the ridge:
fastening is done to each other with emphasis on the ridge (photo above).
Hanging
It is necessary to immediately indicate that this type rafter system can be used if the distance between the walls of the house does not exceed 12 m. Because the rafters rest with their lower ends on the walls, and their upper ends only with each other (there is no ridge girder in the design). Hence the low load-bearing capacity with a large spread.
Hanging roof rafters have one purely design drawback - a large support load on the walls of the house. To reduce it, strings are installed between the legs to form a rigid triangle. Often the functions of tie bars are performed by load-bearing floor beams.
If it is necessary to strengthen the hanging rafters, racks and struts are installed under them.

Hanging rafters of a gable roof Source postila.ru
Installation of a gable roof rafter system
Two types of rafter systems determine two types of assembly technology. Let's look at each one separately.
Installation of layered rafters
There is a certain sequence for assembling layered rafters.
Two outer support posts are installed under the ridge beam. They will not only support the timber, but will also be the elements that form the gables of the building. They are attached at the bottom to the Mauerlat. In this case, they are strictly aligned vertically, and the upper ends are in the same horizontal plane. To do this, stretch a strong thread between the posts and check it with a level to ensure it is horizontal. If there are deviations, then one of the supports (low) is raised using wooden supports.
Intermediate support posts are mounted along a horizontally stretched thread in increments of 2-2.5 m. To prevent the beams of the posts from moving, they are supported with temporary fasteners: supports or tie-downs.
A ridge beam is placed on the racks, which is also attached to them.
Produced in pairs installation of gable roof rafters. Installation can begin from any side. The fastening is carried out immediately to the Mauerlat and to the ridge. The main thing is to maintain the distance between the legs, which is determined depending on the weight and load-bearing capacity of the roofing material. Usually this parameter is indicated in the house design.
If necessary, intermediate support posts and struts are installed.

Installing rafters on a ridge using a tensioned thread Source kbumb.ru
Installation of hanging rafters
The technology for installing hanging rafters is different. To do this, the entire structure, assembled from two rafters and a tie, is assembled on the ground. That is, roof trusses are prepared in the required quantity, which are then lifted onto the roof. Sometimes craftsmen assemble roof trusses. They assembled one, installed it, and assembled the next one.
It should be noted that such farms have a significant mass. Lifting them manually is difficult and dangerous, so they use the services of a crane. And this increases the cost of construction.

Hanging roof trusses assembled on the ground Source moydom-irk.ru
The most difficult thing is to display the farms. All of them are installed at the installation site with a planned step, where they are temporarily secured with jibs and supports. Then a thread is stretched between the outer trusses. It must be positioned so that, firstly, it is stretched strictly along the horizon, and secondly, along a structure that is higher than the rest.
All that remains is to raise the rafter structures that are below the tension level. And the last thing is the installation of the sheathing, which will secure all the trusses into one rafter system. Please note that in the lower part of the rafters will be fixed to the Mauerlat.
This might interest you! When the installation of the rafter system is completed, it’s time to roofing works. From the article at the following link you can find out.
Calculation of rafters
length of rafter legs;
step of their installation;
cross-section of the lumber used.
With length, everything is simple; for this you will have to use the Pythagorean theorem, which is based on the formula: c 2 =a 2 +b 2, where c is the hypotenuse of the triangle (this is the rafters), a and b are the legs. The latter are the height of the roof and half the width of the house. All parameters can be easily measured.

The length of the rafter is l 2 +H 2 Source remontik.org
The installation pitch is more difficult, because much will depend on the weight of the roofing material and the loads from natural precipitation. The greater both loads, the smaller the installation step. But, as practice shows, this parameter varies from 60 cm to 2 m. The latter indicator is used if corrugated sheeting with large corrugation parameters, for example, H75, is used as a roofing material.
As for the cross-section of the rafter legs, here, as in the case of the installation step, the loads are taken into account, as well as the length of the legs and the step of their installation. Here the relationship is as follows: the greater the load, pitch and length, the larger the cross-section.
Video description
In the video, the installation process of the rafter system:
And one moment. Rafters for a gable roof are laid at a certain angle (indicated by the letter “a” in the photo). The slope is selected based on the choice of roofing material. That is, some coatings cannot be laid on roofs if the angle of inclination is less than the required one. Here are some ratios:
the minimum angle of inclination of the rafter system for slate is 22°;
for corrugated sheets – 12°;
for metal tiles – 14°;
soft tiles– 15°.

Ratio of roof slope to type of roofing material Source arhplan.ru
On our website you can find contacts construction companies who offer turnkey roof design and repair services. You can communicate directly with representatives by visiting the “Low-Rise Country” exhibition of houses.
Generalization on the topic
Gable roofs are traditional designs. But from the article it becomes clear that there are two rafter systems that form the basis for the construction of roofs. The one that fits the size of the house is selected. The loads pressing on them are also taken into account as a selection criterion. Therefore, it is important to correctly correlate everything, taking into account the nuances of construction processes.


