The process of constructing a private wooden house consists of several stages, one of which is related to the construction of the floor structure. Its type is chosen at the design stage of the structure and many factors are taken into account. About what kind of floors there are wooden house, and the features of their designs will be discussed in this article.
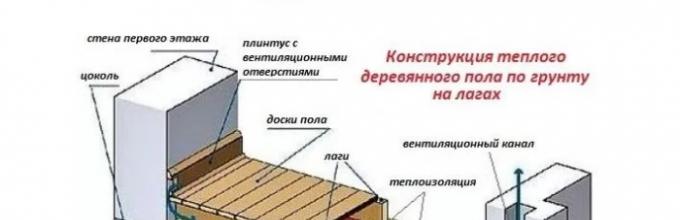
The floor on the ground floor in a wooden house, when there is an unheated basement underneath, has its own characteristics. In this regard, several types of structures can be distinguished:
1. Cold floor construction, installed on an earthen base (without underground). The installation of this type of cold floor is possible only if there is dry soil under the building and a high location of the floors of the lower floor, under which a layer of compacted sand is laid. Another layer of clean, calcined, dry sand is poured on top of it. Logs made of coniferous timber with a thickness of more than 150 mm are buried in the formed soil base and rest against special recesses in the walls of the house. On top there is a single plank flooring, the thickness of which is from 30 to 40 mm.

2. Warm floors with a cold underground are recommended in areas where there is high level groundwater. This design is arranged as follows:
- cleaned sand in a layer of 10 - 15 cm is laid on the ground in the underground and compacted;
- install supports with a height of at least 50 cm. To do this, you can fill concrete mortar into vertically buried pipes with metal frame required height;
- a double layer of waterproofing material and 3 cm thick wooden dies are laid on top of the supports;
- load-bearing beams are laid.
To install thermal insulation, it is necessary to install a subfloor laid on slats nailed to the ends of the joists. For flooring, cut unedged boards are used. Then a layer of vapor barrier and insulation are laid. After this, a plank covering is laid over the beams.

3. The installation of a cold floor with a warm subfloor is recommended where the soil has a low level of soil water. In the same way as in the previously described method, the structure is installed, but the stage of installing a subfloor with insulation is skipped and a clean floor is installed.
What should a wooden house be like?
The floor in a wooden house should be strong, durable, warm and smooth, with an aesthetic appearance.
When performing work on installing a floor in a wooden house independently, they take into account the above requirements, and also determine the procedure for performing the upcoming work, take into account the characteristics of the structure of the building and the individual characteristics of the operation of the house. First we need to consider different variants floors that can be installed in a wooden house, study their pros and cons and, taking into account operating conditions, choose suitable option.

An important criterion that the floor must meet is its evenness. Regardless of the flooring material, it must meet sanitary, hygienic, structural, operational and aesthetic requirements.
Types of floors
Floors in wooden houses are made of wood or concrete - the most common building materials. The technology of installing a “warm floor system” can also be implemented.
Now on construction market There are several types of “warm floors”. They differ in the type of coolant and operating efficiency. We'll tell you in our article.
Concrete floor
A popular way to obtain a level base in a relatively short time is to pour concrete screed. While it may take a month for the screed to dry completely, installing a new wooden one will take longer.

The advantages of concrete floors are as follows:
- A significant reduction in the cost of the finishing coating device.
- After the screed has dried, a flat base is obtained, but which can be laid with any finishing material.
- With an initially high-quality screed, additional leveling before the finishing stage of work may not be necessary, which will save time, physical effort and costs of materials.
- The screed can be installed independently, without the involvement of specialists.
You will learn how to install a concrete floor in a private house yourself in two main options - on the ground and on the floors.
Among the disadvantages, one can note the large weight of the monolithic floor structure and, as a result, an increase in the load on the foundation. That's why necessary calculations foundations are carried out at the design stage of the house. Another nuance is that when the walls vibrate, the screed may crack, which will lead to heat loss. Therefore, when installing a heated floor, it is necessary to perform high-quality thermal insulation of the base.

Wooden floor
Another common material for flooring in a wooden house is natural wood. Its advantages include the following:
- Ecologically pure material with a rich natural pattern.
- Wood is safe as it does not contain harmful additives, it is completely natural and does not emit environment harmful toxins.
- An aesthetic appearance and an organic combination of wood with the rest of the surfaces of the building, while the concrete floor will not look natural.
- When installing a wooden floor, you can refuse other finishing materials. With the help of varnishes, oils, stains and other impregnations, a finished wooden base can become stronger, more durable and acquire an original, noble appearance.
- Wood is very durable and, depending on the species, you can choose a material with certain performance properties and texture.

The undeniable quality of natural wood gives an atmosphere of warmth and comfort, creates an optimal microclimate and comfort in the home.
Important! The wooden floor is repairable. To carry out routine repairs of its fragment, it is not necessary to dismantle the entire flooring; a separate fragment can be replaced. This will require a minimum set of tools and construction skills.

Among the disadvantages of a wooden floor, the high cost of the material and the labor involved in its installation are noted. In addition, it can be quite difficult to obtain a perfectly even base.
Which is better - concrete or wood?
At the design stage of a private house, you must immediately decide what the floor will be - wooden or concrete. To choose the most suitable option, you need to know what the difference is between these floors.
Price
To fill a screed 5 cm thick, you will need 0.5 bags of cement (300 rubles/bag) and 1.5 (50 rubles/bag) bags of sand. Thus, 1 m 2 screeds will cost an average of 225 rubles. If the work will be performed by a hired person, then the cost of the work must be added to this amount - 250 rubles / m 2.

If we take dry timber 10 x 10 cm as a basis, in increments of 40 cm (400 rubles / m 2) and OSB boards(600 rub./m2) 18 mm thick. With the work of a carpenter, the cost will be 1250 rubles/m2.

Communications
IN modern houses The heating, water supply and sewerage system is laid inside the floor structure. In the event of a pipe break, wooden ones can be quickly sawed and access to communications can be gained. WITH concrete floors more difficult - to remove the screed you will have to use a professional tool, and the process itself will take a lot of time and effort.
Deadlines
The screed gains full strength within 28 days from the date of pouring. Moreover, it gains 70% of its strength in the first week. All this time, the solution gives off moisture and nothing can be laid on it.
Wooden floors can be used immediately after installation.

Durability
If the installation of a wooden floor is not carried out by a professional craftsman, then after a couple of weeks you can hear a characteristic creaking sound when walking on the floor. Concrete screed does not have this drawback. Moreover, when work is performed by hired workers, the result and quality of their work can be assessed immediately.

Weight
The weight of 1 m 2 OSB sheet with a thickness of 18 mm is 12 kg, logs per 1 m 2 weigh about 25 kg, depending on the type of wood. Thus, 1 m2 of wooden floor will weigh about 40 kg. And 1 m 2 ties with a thickness of 5 cm weighs 100 kg.
The process of constructing floors on pillars
When constructing such a floor, the following procedure must be followed:
- Prepare the base. To do this, marking and excavation of soil with a plant layer is carried out. The resulting depression is filled with crushed stone and sand on top, which is then compacted.
- Then the brick support pillars are installed, taking into account the basic design requirements regarding the height of the finished floor and the structure below it.
- IN mandatory take into account the ratio of the height of the support column and the section of the brick. So, with a support height of 25 cm and above, the recommended width of the support column is equal to two bricks.
- It is necessary to start installing supports first along the perimeter of the future room, and then within the specified boundaries.
- I lay two layers of roofing material on the upper plane of each column to ensure waterproofing of the structure.
- Then the wooden linings are fixed. Logs made of logs or timber are installed on them. The width of the step of their location relative to each other is chosen depending on the width of the floor boards to be laid.
- Slag backfill, the height of which does not reach the log by 5 cm, is used to prevent the mobility of the floor structure in the cold season when the soil freezes. The remaining free space provides ventilation to the structure.

Laying the floor on top of the installed joists is done using boards, which begin to be laid at a distance of 1.5 cm from the wall. The resulting gap performs a ventilation function, which is very important for the correct and long-term operation of a natural wood floor.
The boards are attached to the joists using long nails driven at an angle of 45 degrees. While the wood is not completely dry, install temporary skirting boards.

Single layer floor
The single floor structure can be placed on poles as described above. Only on top of the supports are beams placed, on top of which the flooring is made flooring from tongue and groove boards.
The second option is to install the floor along beams embedded in the body of the load-bearing enclosing structures of the building. Beams serve as the basis for the floor, and brick supports are no longer required.

Due to the large free distance between the beams, the fastening of the flooring from the boards is carried out along the sheathing:
- The sheathing is made of timber with a square section of 5-6 cm.
- The pitch of the timber in the sheathing depends on the thickness of the floor board. The thinner the board, the smaller the distance between the lags.
- During the installation of the sheathing, it is important to control its horizontal position so that the end result is an even plank covering.
- Fastening the boards begins after all the logs are installed in their places and securely fixed with nails.
- If it is not planned to lay additional flooring on top decorative covering– laminate, tile, linoleum, then it is finished.
- After the single decking is installed, it is covered with two layers of protective varnish.

Advice. If the flooring is rough, then you can use an unedged board for its construction.
When making a single floor, no serious professional skills or significant time and financial costs are required. But its disadvantage is its low thermal insulation properties.
TO optimal solution When arranging a floor in a wooden house, a two-layer structure is used, consisting of a rough and finishing layer. Installation of such a structure occurs in the following way:
- The subfloor is installed from unedged boards up to 4.5 cm thick, treated with an antiseptic compound. In this case, preference should be given to coniferous wood - it is durable, resistant to moisture, dampness and decay.
- The boards are laid tightly next to each other, and a layer of thermal insulation from mineral wool, foam plastic, expanded clay or sawdust.
- In addition to insulation, it is necessary to steam and waterproof the structure to extend its service life.
- The finished floor boards are laid as for other types of structures, leaving a gap of 1.5 cm between them with the subfloor.
A clean floor can serve as a finishing coating or serve as a basis for laying decorative flooring, which will not only decorate the room, but also increase the thermal insulation properties of the floor.

Start of work - installation of the subfloor
A subfloor when installing plank flooring is necessary for several reasons:
- To increase the operational life of the structure due to the presence high-quality ventilation floor.
- It serves as a solid base for laying insulation and finishing flooring.
- Makes the frame of the building more rigid.
Before starting work on the installation of the rough structure, check the following:
- The wood chosen as the material for the construction of the subfloor must have an optimal level of humidity - this will eliminate possible deformation of the structure during its subsequent use.
- The boards should not have obvious defects.
- If an inexpensive board can be used for a subfloor, then for a finished floor it is purchased with a reserve, so that later you do not have to look for material of the same shade.

Preparation
Installation of the subfloor can be carried out both on the ground and on the floors. In any case, it is necessary to carry out a set of preparatory measures:
- The walls of the building must be equipped with ventilation windows, closed from the outside with special grilles.
- All wooden parts are treated with antiseptic compounds to increase the service life of the structure.
- Taking into account the size of the room in which the floor will be installed, calculate the required amount of material.
- Throughout all work, it is important to monitor the horizontal position of the floor structure to prevent the formation of a slope.
- Timber and logs are subject to processing, in which they are cut to eliminate slopes and bevels.

Laying the subfloor
To ensure that the floor does not creak, does not vibrate, is smooth and warm, it is necessary to pay special attention to the laying of the subfloor and, first of all, to the joists.

The logs should be suspended on the beam supports in increments of 60 cm - insulation will be laid in the gap formed. It is not worth saving on beams in order to avoid sagging and vibration of the floor during operation.

Where heavy equipment, such as a stove or fireplace, will subsequently be installed, the floor is reinforced by placing beams in 30 cm increments.

Fastenings in such places are also further reinforced.

At the bottom, beams are nailed across the beams. Between floors, beams are nailed along the beams - this will save the height of the room and, if necessary, use the upper beams as a decorative element in the interior after their additional finishing.

In the gap, an OSB sheet is laid on the beams.

After this, mineral wool slabs are laid in a checkerboard pattern, and on top there is a continuous layer of vapor barrier, which covers the logs and is fixed with construction stapler. The vapor barrier seam is taped.

The second layer of vapor barrier is laid overlapping, and a ventilation gap is formed on top. To do this, use a 40 x 100 mm block, screwed to the floor joists. The finishing floor will be installed on top of these bars.

Important! All wooden elements must be treated with antiseptic compounds.
Video - Insulating a wooden floor
Finished floor installation
To obtain an aesthetically attractive and durable finished floor, it is recommended to use a milled board with a tongue-and-groove fastening.

Table 1. Instructions for laying finished floorboards
| Illustration | Description |
|---|---|
 | The first board is laid with a groove against the wall, leaving an expansion gap. |
 | It must be secured with self-tapping screws so that you can later cover the attachment point with a plinth. There are 2 options for further fastening the boards. |
 | The first option uses self-tapping screws that are twice as long as the floorboard. |
 | Self-tapping screws are screwed into each joist in the center of the board. Subsequently, the caps can be masked using wood putty. |
 | Then take the next board and align the tenon with the groove. |
 | If necessary, the boards are adjusted by hitting them with a mallet through a block. |
 | Or they press it with a chisel. |
 | The second fastening option involves screwing self-tapping screws at an angle of 45 degrees into the tenon. To prevent the board from bursting, you must first drill a hole for the screw. |
 | With this option, the boards fit closer to each other, and the fastening elements are invisible. |
After all the boards are laid, their surface is sanded and coated with wear-resistant varnish in several layers.
Concrete floor in a wooden house
The most common way to install a concrete floor in a wooden house is to pour it over the ground, but with the obligatory condition that the ground must be dry.

Stage 1 – preparation
Preparatory work includes the following steps:
- Using a level, determine the main indicators and calculate the excavation work.
- To prevent soil subsidence and cracking of the concrete floor in the future, the soil is carefully compacted using special devices.
- A well-compacted sand cushion is placed over the ground. The backfill will be denser if you pour material that exceeds the required volume by 25%, moisten it and compact it thoroughly using a roller or vibrator.
- An expanded clay or gravel layer is laid on the sand.

Stage 2 - waterproofing
The next step is to perform , so that it does not absorb moisture from the concrete screed, and it will also protect the floor from ground moisture. For this purpose, roll materials based on bitumen are used. You can use thick plastic film.
The waterproofing material is laid overlapping, extending it onto the wall by 20 cm, and then the joints are taped. It is important that the material is homogeneous and without damage.
An alternative method is the coating method, when mastic waterproofing is applied at the stage of pouring the subfloor.

Stage 3 - pouring the subfloor
The subfloor or technological floor serves as the basis for the hydro- and vapor barrier layer. For its production, concrete of class B7.5 - B10 and crushed stone of size 50-20 are used. There are no strict rules for pouring the rough layer, the main thing is that its thickness is about 50 mm, and the difference does not exceed 4 mm.
Stage 4 – vapor barrier and insulation
A vapor barrier material in the form of inexpensive membranes made of fiberglass or polyester is laid on top of the subfloor. Durable materials that are not afraid of rotting are PVC membranes. Insulation is laid over the vapor barrier - this can increase the energy efficiency of a living space by 20%. The following materials can be used as insulation:
- Mineral wool, the density of which does not exceed 120 kg/m 3. To prevent it from accumulating cotton wool, it is insulated with polyethylene.
- Where the floor is subject to heavy loads, it is recommended to use extruded polystyrene foam, which deforms when compressed and then returns to its original state.
- When using polystyrene foam, it is covered with polyethylene on all sides to give strength.

Stage 5 – final screed
At the final stage, the final screed is performed, which will become the basis for the decorative floor covering. It can be monolithic or dry. In the first case, pouring a solution with a coarse filler in the form of crushed stone, stones, small pebbles or a cement-sand composition (quartz sand) is carried out along the beacons. Begin pouring the screed from the far corner of the room, leveling the solution using the rule. Complete drying of the screed occurs after 30 days.

An alternative is a dry screed based on fiberboard, plywood and asbestos-cement sheets, gypsum boards. The technology is simple and fast:
- Line with plastic film.
- A technological gap of 1 cm is left along the walls, into which soundproofing material is placed.
- Sand backfill is 5 cm thick.
- The sheet material is laid in two layers and securely fixed to each other using self-tapping screws or construction adhesive.
- Perform puttying and sanding of joints.

Finishing materials
The material for finishing the floor in a wooden house is selected depending on the interior design. If the appearance of the house inside retains the color of natural wood, which on the walls and ceiling is not hidden behind other finishing, then the flooring should be organically combined with it.
Table 2. Types of flooring
| Illustration | Description |
|---|---|
| In a wooden house the best solution the floor will be made of natural wood. It will organically fit into the interior with wood paneling walls Wood has low thermal conductivity, it is environmentally friendly and safe. Natural wood flooring is distinguished by a variety of textures and rich natural patterns. |
| A beautiful and natural floor covering for a wooden house can be obtained by laying parquet made of natural wood, which has high aesthetics, a variety of shades and good performance. |
| In rooms with high humidity - bathroom, shower bath, kitchen, as well as in the hallway, laying tiles will be a practical solution. |
| An alternative material to expensive natural wood is laminate, which is highly durable, wear-resistant and decorative. This material imitates many, even rare and very expensive types of wood. |


Prices for popular types of block parquet
piece parquet
A wooden house is distinguished by a special atmosphere of home comfort and warmth, so natural materials look natural in its walls.
At self-construction cottage sooner or later the question arises of how to make the floor. The task is further complicated by the fact that the floor of the first floor is always built on the ground, and few people know the rules and technology for arranging such floors. But you want the floors in the cottage to be strong, warm, reliable, protected from moisture and serve as a support for many years without the need for major renovation. In this case, it is necessary to strictly follow the stages of work and installation technology, and not skimp on protective films and bedding. In this article we will look at how to make wooden and concrete floors, as well as how to install a “warm floor” system on them to ensure comfortable conditions during the cold season.
Flooring in a cottage: options
In total, there are two types of floors that can be installed in a private cottage - concrete and wood. Concrete floors are carried out on the ground if the groundwater level allows, it should be below 4 - 5 m. It is also important that the soil itself should not be mobile, otherwise during movement the concrete floor may collapse and damage the foundation. If these conditions are met and it is planned to year-round accommodation with heating, then you can safely pour a concrete floor on the ground. On the second or attic floor Concrete screed can also be poured on top of the floor slab without any problems.
Wooden floors can be developed on the ground without restrictions, since even in the case seasonal residence and high groundwater levels, the wooden floor elements are ventilated through holes in the underground and are perfectly preserved. On the second or attic floor, wooden floors are made both on a concrete floor slab and on floor beams.
Wooden flooring can be single or double, depending on the planned mode of residence. For a summer cottage, an uninsulated single wooden floor is sufficient, but for living in winter or even temporary “attacks” during the cold season, it is necessary to install insulated floors and, preferably, double flooring.
Do-it-yourself wooden floor on joists in a cottage

For wooden structures For the flooring, coniferous wood is selected: spruce, pine, fir, larch. This is because the resins in coniferous wood protect it from rotting and fungal growth. But more durable and hard coatings are made from expensive oak and ash wood, which do not leave marks from sharp heels. The moisture content of the wood should be no more than 12% so that the floor does not “sink” in the future. It is advisable to treat all elements of the wooden floor with an antiseptic and fire retardant, but this is not necessary; it is enough to treat only the joists and beams.
When making a wooden floor in a cottage with your own hands, do not forget about a well-ventilated underground. To do this, it is necessary to provide vents in the foundation or perform them after pouring. If the winters are snowy, then ventilation pipes with a canopy are removed from the air. To protect against rodents, the ventilation openings are protected with a mesh with 8 mm cells.
Wooden floor base
Depending on the design features In a cottage, the support for the logs of the wooden floor can be the embedded crown of the log house, support beams and support posts.
If the distance between opposite walls is too large to firmly fasten long logs, in the space between the fastenings to the embedded crown or support beam, support columns are installed in steps of 70 to 100 cm. The size of the step depends on the cross-section of the floor joists. For timber 150x150 mm, the distance between the support posts should be no more than 80 cm.
We make support columns for the logs:

- In the places where the joists are planned to be installed, we make marks on the support beams. We stretch the cords along the entire underground in both directions. We will form columns at the intersection points.
- In the places where the support columns are installed, we excavate the soil to a depth of 40 - 60 cm in the form of a square with a side of 40 - 50 cm.
- At the bottom of the excavation we pour 10 cm of sand and 10 cm of crushed stone as backfill for the foundation of the columns.
- We install wooden formwork for each support column.
Important! If the pillars are planned to be made entirely of concrete, then the formwork can be made to cover the entire height of the pillar. If the columns are made of brick, then the foundation under them should protrude 5 cm from the ground.
- For greater strength, the foundation for the posts can be reinforced with mesh or reinforcement.
- Fill the formwork with concrete.
- After the concrete has dried, we install brick columns: if the height of the column is less than 25 cm, then we lay one and a half or two bricks, if the height is more than 25 cm, then two bricks. We fasten the bricks with cement mortar.
Important! On at this stage it is necessary to strictly control the horizontality of the surface of the support posts; they must be in the same plane.
- We waterproof the surface of the support columns: lay roofing felt without sprinkling in two or three layers, coat the top with mastic.
After removing the formwork from the foundation of the support columns, we remove the fertile layer of soil over the entire area of the room, level it, tamp it down and backfill it: first a 10 cm layer of gravel, and then a 10 cm layer of sand. We spill each layer with water, and then compact it with a vibrating plate.
Laying joists for wooden floors
The logs of a wooden floor can be laid directly on the support posts, but if the step between the logs is too small - 40 - 50 cm, then this method is inconvenient. It is better to lay the beams on the support posts, and then attach the logs to the beams. Let's consider this option:
- We take a beam with a cross section of 150x150 mm as support beams. If there is no beam of the required length, you can grind it together by joining the beams in the middle of the support column.
- We lay the beams on the support posts and the embedded crown. We control the horizontal and even position of the beams relative to each other.
Important! You can correct the sagging of the beams on the posts by placing wooden pads under them and firmly fixing them.
- We fasten the beams to the posts using steel corners: we fix the corner to the wood with self-tapping screws, which should go into the beam by 3 - 5 cm, and fasten it with anchors from the side of the supporting post. At the joints of short beams we make a notch “into the paw” or “into half a tree” and fasten the connection with self-tapping screws or a wooden dowel. At the junction of the beams with the embedded crown, we do the same.
Lag section We select wooden floors depending on the layer of insulation that is planned to be laid between them. If the mineral wool layer is 100 mm, then the height of the logs should be 150 mm. If the insulation layer is 150 mm, then the height of the log is 180 mm.
Step between joists calculated taking into account the loads that the floor must withstand, and also depends on the cross-section of the floor boards. The smaller the thickness and width of the floorboard, the more often it is necessary to install logs. The exact data can be found in the table.

- We lay the lighthouse logs first, at a distance of 2 m from each other. We check that they are horizontal and level.
Important! The permissible deviation in the evenness of the logs is 1 mm per 1 m of length. If necessary, remove the excess with a plane, and place wedges or spacers in places where there is deflection.

- We lay all the remaining logs and firmly fasten them to the beams with self-tapping screws, which should enter the beam beam by 4 - 5 cm.
We make sure for the last time that the logs are in the same plane, and proceed to thermal insulation of the floor.
Thermal insulation and installation of the subfloor
Waterproofing and thermal insulation are laid between the joists. To ensure such a constructive possibility, it is necessary to arrange a ramp of boards from below the joist:
- At the bottom, we nail the skull blocks to the joists.

- We lay the boards on the bars. For rolling, we take boards 25 mm thick; the width does not matter much, since we lay it across the joists, and not along them.
- We spread a waterproofing film on top of the roll. We glue the joints of the films with special tape. We place the edges of the film on the walls by 15 - 20 cm.
Important! You should not use regular plastic film, as it is practically vapor-tight. Condensation that will accumulate in the insulation will not be able to escape from it. To avoid getting the insulation between the floor joists wet, we use a vapor-permeable superdiffusion membrane as waterproofing.
- We place insulation in the space between the joists, for example, mineral wool with a density of 30 - 55 kg/m3. You can also use ecowool, mineral and basalt wool in rolls or slabs, sawdust and other materials.

- It is necessary to leave a ventilation gap of about 2 - 3 cm above the insulation. It is impossible to compact the insulation tightly, pressing it with the flooring.
After laying the thermal insulation material on the joists, you can lay a subfloor or a finished floor if the thickness of the board allows. If you plan to lay a 50 mm thick solid floor board, it is not necessary to install a subfloor; the boards can be laid directly on the joists. If the flooring will be made of 20 mm parquet boards, then it is better to pre-arrange the subfloor from sheets of plywood or boards 15 - 50 mm thick with minimal processing. We fit the boards tightly to each other and secure them to the joists with self-tapping screws.
Wood flooring
For flooring we use the highest quality wood with treated edges or tongue and groove floorboard, this will greatly simplify the installation task.
When laying the subfloor and flooring, it is necessary to make a distance of 1 - 2 cm from the walls. Wood is a living and plastic material, picking up moisture and expanding. The gap between the floor and the walls will allow the boards to expand and shrink freely.
We install wooden floors:
- We start laying from the far side of the room. We place the first tongue-and-groove board against the wall, having previously cut it off.
- We fasten the board with self-tapping screws to the joists: from the tenon side we screw the self-tapping screw directly into the board (later the cap will be hidden by the plinth), from the groove side we screw the self-tapping screw at an angle of 45 degrees into the groove.

Important! If the floor boards are the same length as the room, then installation is carried out without displacement. If the boards are shorter, then it is necessary to lay them “in a running start”.
- We insert the next board with a tenon into the groove of the first board. We nail it tightly with a mallet. We fix it with self-tapping screws into the groove.
- Lay and secure all remaining floor boards. Don't forget to screw them to every joist without exception.
We secure the last board with self-tapping screws so as to hide the caps with a plinth.
Modular heated floor in a cottage

Installation of a “warm floor” system for a wooden floor is carried out after laying thermal insulation material between the joists. The next steps are:
- We lay special modules for “warm floors” on the logs, which are chipboard slabs with grooves for aluminum plates and channels for pipes.
- We mount aluminum plates into the grooves.
- We insert the water heated floor pipes into the grooves and snap them into the channels.
Important! The warmest option for laying water-heated floor pipes is alternating warm and cold pipes. This will distribute the heat more evenly.
After installing the water floor pipes, we lay GVL slabs, and on top - lay the finished floor. We connect the pipes to a collector, which is best placed on the wall.
DIY concrete floor on the ground in a cottage

A concrete floor is a strong and reliable foundation, but only if everything is done correctly, in compliance with technology and all stages of work. Otherwise, the floor may be very cold, damp, or even quickly crack.
Preparing the base and forming the bedding
Before making the floor in the cottage, we outline its “zero” level. To do this, make a mark on the wall at the bottom of the doorway, retreat 1 m upward and mark this level along the entire perimeter of the walls. We check the horizontality of the applied level and draw a line along the marks. Set aside 1 m from the line and connect the marks with a line. This will be the “zero” mark - our finished floor level.
We measure approximately 35 cm down from the “zero” level and excavate the soil to that thickness. We compact the soil and fill it with: 10 cm of sand and 10 cm of crushed stone (fraction 40 - 50 mm). We carefully compact each layer and check the horizontal position.
Waterproofing, thermal insulation and reinforcement of concrete floors
In order for the waterproofing material to be laid as smoothly as possible, a layer of “lean” concrete must be poured onto the crushed stone base of the bedding.
We prepare a cement mortar that is slightly thinner than for pouring the floor. Fill with a layer of 4 - 5 cm.
After this layer has dried, spread waterproofing material. It can be roofing felt without topping in 3 layers or other rolled materials.

We lay insulation on top of the waterproofing. For a concrete floor, you can use polystyrene foam, extruded polystyrene foam or basalt wool with a density of more than 150 kg/m3. We lay the slabs in staggered order.
On thermal insulation material We install a reinforcing mesh 100x100x5 mm on special stands 2 - 3 cm high.
Installation of guides
In order for the concrete base to be level, without slopes, it is necessary to install guides or, as they are also called, “beacons”. For this you can use pipes, both round and square, wooden blocks, and special aluminum profiles. So that after pouring the concrete, the “beacons” can be easily removed, we lubricate them with working oil.

We install beacons on concrete “buns” made of mortar. We make the distance between the beacons 1.5 - 2 m. We strictly control their horizontalness and even position relative to each other. If necessary, add the solution to the “buns” or press the “beacon”. The height of the “beacons” should be equal to the thickness of the floor - 7 - 10 cm.
You can fill the floor in the cottage after the solution in the “buns” has set a little.
Pouring a concrete floor in a cottage
It is advisable to fill the floor in one or two passes. We prepare a solution from 1 part cement, 2 parts sand, 4 parts crushed stone and 0.5 parts water. Mix in a concrete mixer. To compensate for the thermal expansion of the concrete floor, we lay a damper tape along the perimeter of the walls to the height of the entire floor.
We begin to fill the floor from the corner opposite the door. We pour the solution between the guides, pierce it with a shovel and compact it with a vibrator to avoid voids.

For leveling, we use a 2 m long rule. We install it on the “beacons” and pull it towards us with left-right movements, distributing the solution and removing excess. When the floor in the entire room is filled, we take out the guides, fill the voids with the solution and leave to infuse and dry for 28 days.
Warm water floor in a cottage: concrete installation system
When laying a “warm floor” system on a concrete base, you must first insulate it by laying out insulation boards (extruded polystyrene foam) and covering it with foil film, which reflects heat into the room. You can immediately use foil insulation for heated floors.
We lay a reinforcing mesh on top. We lay out the water heated floor pipes in any way: snail (spiral) or parallel laying (snake). We secure the pipes to the mesh with plastic clamps.
Important! Sometimes it is recommended to also lay a reinforcing mesh on top of the heated floor pipes. This will strengthen the structure.
We lay it out along the walls corrugated pipes to protect expansion joints.

At this stage, it is necessary to check the functionality of the system before pouring everything with concrete. Hydraulic tests We produce strictly according to instructions within 24 hours. If problems are found, they must be corrected.
The final floor screed in the cottage is filled with cement mortar in a layer of 5 - 15 cm. Then it must dry completely within 28 days. Only after this can you start using the heated floor, gradually increasing the temperature.
The proposed method of installing a heated floor is suitable both if the base is a concrete floor slab, and a concrete floor on the ground. In the latter case, it is possible to install underfloor heating pipes immediately after the stage of laying thermal insulation. Install “beacons” on top and immediately fill the floor with a layer of 10 - 15 cm.
As you can see, making the floor in a cottage with your own hands, although troublesome, is quite possible. Compliance with all stages will ensure the durability of the floor, comfort in the house, dryness and the absence of mold. The final stage of arranging the floor will be laying the finishing coating. This could be a solid floor board, linoleum, tiles, laminate, parquet and other materials that the modern market can offer.
The simplicity of constructing a boardwalk is apparent. And it's not just that the load limit needs to be taken into account; for example, it is different for the floors of the basement of a private house and the attic. Wood is a material that, although pliable in processing, is “capricious” in its own way, as it is easily subject to deformation when humidity and temperature change. In addition, there are specifics of its installation depending on the type of base (overlap). It is possible to install a high-quality wooden floor with your own hands only after understanding all the nuances of this work.

Wooden flooring is a somewhat vague concept. Basically, when it comes to this design of the lower part of the room, it means laying boards on the supporting structure. But if further, “finishing” finishing with another material (laminate, parquet board or something else) is expected, then mainly wood-based products (slabs, sheets) are used - multi-layer plywood, chipboard, OSB, MDF.
The main purpose of such flooring is maximum leveling and ensuring sufficient surface strength. But in such cases there is no need to talk about a wooden floor in a private house; This is its intermediate, “finish” version.
How to choose the right boards? When installing a wooden floor in a private house, you definitely shouldn’t skimp on them. Otherwise, such problems will arise (cracks, grooves in the flooring, deformations of individual floorboards) that subsequent repairs (taking into account the complexity of the work, including the need to empty the room of everything) will be much more expensive.
Board view. Only tongue and groove. Processing it yourself at home is a very complex process, requiring practical skills, appropriate tools (which not every home has), time and a separate room.

There is another option - from glue beams. But this lumber is used, as a rule, in rooms of a private house with increased load on the floor, since it is not cheap.

- Linear parameters (mm). Here you need to take into account that the wood must provide not only high strength of the flooring, but also good thermal insulation bottom of the room. Optimal sizes are considered: total thickness – 45±5 (depending on the specifics of the room), width – around 150.
- Wood moisture content. 12% is the acceptable upper limit of its value. Therefore, you should purchase an industrial drying board. Naturally, it will be quite expensive. But all the recommendations on how to remove excess moisture from wood yourself are nothing more than profanity. It is necessary to select an appropriate place on the site, carry out proper stacking of lumber, organize its protection from moisture, good ventilation, acceptable temperature regime. And what is important is to wait. And this is time. Moreover, a high result is not yet guaranteed.

- Wood grade. And in this regard, purchasing cheap boards is irrational. Not only that, even paint, much less varnish, cannot hide large flaws in the form of knots, chips, and so on. Defects in floorboards will become more and more obvious during the operation of a wooden floor. The cracks will only get bigger; knots will fly out of the boards, and “pits” or through holes will appear in their place.
- Wood species. Here it is desirable to maintain an optimal balance between such properties of lumber as strength, beautiful texture and resistance to changes in geometry under the influence external factors. Experienced craftsmen It is recommended to pay attention to oak and ash. Such boards are expensive, but they are considered the best for wooden floors, as they can bear increased load.

If this factor is not a determining factor, larch, fir, cedar or pine are perfect for flooring.
- Degree of wood protection. In production, more expensive products are impregnated with special preparations to prevent rotting and fire. This can be done (even recommended) with your own hands, but only in terms of secondary (additional) processing. Industrial technology It will not be possible to recreate it at home, and therefore the quality of work will be low.
What kind of logs are used? Here you need to understand that during operation, any materials (even if visually imperceptible) change their geometry. Consequently, the integrity of the structure also depends on the extent to which the deformation coefficients of its elements coincide. Metal profiles (although they are more convenient to work with) are not suitable for constructing a wooden floor, only lumber. The recommended parameters of the timber are 100 x 100. This is universal choice for floors in any room. Smaller samples (for example, 50 x 50) will have to be tightly “fastened” to the screed (otherwise the flooring will “play”), and this is not always possible or rational.
When should you treat your wood floor? Experts consider the best period to be the end of March - the beginning of April, that is, before the end of the heating season. There are several reasons.
- At this time, it is not difficult to achieve the most comfortable conditions for such work. If necessary, effective ventilation can be arranged to prevent wood dust from overcrowding the room. Then technical devices will not be needed.
- The air humidity in the room is optimized. This ensures that the lumber will not absorb water, except in a minimal amount.
- The nuances of arranging the screed are such that you will have to wait for it to completely harden. And the worse the external conditions, the longer.
As an option - in the summer. But you should start installing a wooden floor if weather forecasters guarantee stable dry weather for at least the next 10 days.

Preparatory work
Next are all the stages, regardless of the specifics of the premises in a private building. It is not difficult to understand what needs to be done in relation to the characteristics of a particular room (location in the house, size, degree of arrangement, etc.).
The basis
This can be both the ceiling and the ground, if the floors are installed on ground floor. In any case, a number of events are held.
Assessment of surface condition and elimination of deficiencies
In relation to the ground, it is carefully leveled, compacted (the simplest tamper is easy to make with your own hands), and a sand cushion is arranged (the recommended layer thickness is about 20 cm). It performs two main functions - more accurate planning (leveling) and mitigation of possible deformation of the upper levels when the load changes.

- If we're talking about about a concrete floor (interfloor), then the slabs are thoroughly washed, after which, during the inspection, existing defects are identified. Any cracks or loose joints are sealed. Otherwise, in the future, possible leaks into the lower room and heat loss cannot be avoided.
Waterproofing the base
If the base is soil, then it is advisable to immediately cover it with film. Depending on the size of the room, you can either buy a membrane that will completely cover the floor (it will be more expensive), or make a unique analogue of it by fastening several sheets together by welding (you will need a special device) or with tape, laying them overlapping. The nuance is that the edges of the film should be folded upward, approximately to the level of the intended installation of the baseboards. They will cover the excess waterproofing.

Screed arrangement
This is a separate and rather large topic (mixture composition, ratio of components, mixing rules - there are enough nuances). Therefore, only the main points.
Materials are selected based on the financial capabilities of the owner of a private house and the type of surface. If we are talking about overlapping, then the screed is made thin, using leveling compounds. For a soil base, it is advisable to pour expanded clay onto the waterproofing.

The advantages of this solution:
- Round (relatively) granules will not damage the P/E film under any circumstances. If you use crushed stone, then its breakthroughs will definitely appear in several places;
- Expanded clay is a good heat insulator. Therefore, you can save a little on the insulation material (if it is installed).
The recommended layer thickness (in mm) is from 40 to 100. You should focus on the size of the “pebbles”; the larger they are, the larger the layer required, since gaps form between them, increasing heat loss. Small granules are packed quite tightly, so the layer can be made smaller.
Advice. Costs can be optimized if you purchase expanded clay of different fractions. Then a thickness of no more than 50 - 70 will be sufficient. But only well-dried granules should be laid; they will begin to draw excess moisture “towards themselves” (that is, absorb), additionally protecting the tree from dampness.
It is advisable to install and level the beacons immediately, before pouring the solution. After leveling it, you will have to wait for the screed to dry completely (at least 4 weeks, and only under favorable conditions in the house). This largely explains why experts recommend certain periods for installing wooden floors in a private home.

Accelerate this process artificially (using technical devices in the form of air heaters, heat guns, and so on) is not allowed. Such rationalization will result in the screed drying unevenly throughout its entire depth. The top layer will set quickly and literally clog the surface. This will sharply reduce the rate of moisture evaporation from lower levels. As a result, the strength of such a base decreases and cracks appear.
Installation of logs
In a private house, they can be laid directly on the base, without installing a screed (for example, in a basement). In this case, it is advisable to prepare small brick racks. The main attention here is to the upper sections of such supports. They must be located in the same (horizontal) plane. To prevent the timber from moving, a metal pin or wooden insert is placed in the center of each post. How to fix a lag in one case or another is not difficult to guess.

If the logs are laid directly on the ground or screed, then it is advisable to treat the lower planes of the beam with tar. The work is not difficult, and you don’t need money for it. The advantage of this solution is additional protection of the wood from absorbing moisture from a damp surface.
Sometimes a supporting frame (sheathing) is pre-mounted on the supports, to which the logs are “fastened” with self-tapping screws. As a rule, this is done when laying them directly on the ground or slab, since the cushion may still not provide ideal alignment.

The recommended interval between logs is about half a meter. If more, the strength of the flooring decreases; less - the consumption of materials and the load on the floor increases. In addition, problems will arise with the installation of the thermal insulation layer.
Insulation of a wooden floor
Whether to do this or not is up to the owner to decide. This largely depends on the specifics of the room. But if it is unheated, or residential, located on the ground floor, then additional thermal insulation in the form of expanded clay and the boards themselves are clearly not enough. Optimal choice for insulation of wooden floors - mineral wool. It is sold in various modifications, but products with the prefix “eco” are considered the best for a private home.

The material is elastic, so even if there is a mismatch center lines Lag (curvature of “cells”) mats are quite easy to lay; They compress slightly and are easy to fit into place. And after straightening, they are securely held between the lags, and there are no gaps along the beam - insulation line. Therefore, sealing the gaps is not required.
When choosing mineral wool by thickness, you need to ensure that after installing the mats (slabs) between the joists they are just below their upper cut. This is necessary for the formation under the wooden floor small space, through which air can circulate freely. Natural ventilation helps remove excess moisture from under the flooring, thereby protecting the boards and insulation from dampness.
Installation of finished floor
It is carried out in 1 or 2 rows. Single-row flooring is usually installed in utility rooms, country houses, barns and the like. For most rooms of a residential building - only if a thick board is chosen or a “finish” lining with parquet or laminate is intended.

With a double plank floor, the boards are taken thinner (the main thing here is the total thickness of the flooring). The advantage is that cheap lumber is suitable for the first level; and this gives some savings. Sometimes owners of private houses lay film between the rows, which also partially reduces heat loss and increases the degree of waterproofing.

Features of laying wooden floors
- A small gap (about 1.5 - 2 cm) is left between the walls and the floorboards so that the flooring does not begin to warp when the wood expands due to temperature or gets wet. In addition, this installation scheme guarantees efficient natural ventilation spaces under the floor. Consequently, the risk of mold and mildew appearing on the boards is minimized.
- The first board (from any edge) is rigidly attached to the joists; and self-tapping screws. If you use nails, then problems will arise in the future - individual floorboards will begin to “play”, and the creaking of the boards will constantly be heard in the house.
- Their adjustment is done using a hammer and a piece of board, carefully, so that the tenon fits tightly into the groove along the entire length of the sample. But this is the case with profile boards. If you buy a regular edged one, the technology changes.

First, the outer boards are fixed to the joists. All the others, in turn, are placed between them simultaneously from both directions. Naturally, difficulties will arise in the center of the room; The last floorboards won't fit exactly in place. They are placed in a “house”, and then pressed down, standing on its “ridge”.
The last stage is screwing all the boards to the joists at pre-designated points. A chamfer is first made in each of them so that the head of the fastener is completely “sunk” in the wood.

- It has already been noted that self-tapping screws should be used as fasteners. The nuance is that you need to choose not ordinary products, but ones with anti-corrosion coating. Otherwise, rust spots will appear quite quickly in the places where the boards are fixed to the joists.
- It is advisable to “walk” along the joint lines of the floorboards grinder. If wooden floors are installed in a private house, then it is worth purchasing; it will be needed again, and more than once. Processing the seams will smooth out any existing unevenness between the boards. This is especially true for decking that is supposed to be varnished, which is most often done to preserve the wood texture.
It turns out that when installing a wooden floor in a private house, it is quite possible to do without the services of professionals. Following the recommendations given, all stages of the work can be easily completed with your own hands.
Schemes for installing a floor on the ground in a house, basement, garage or bathhouse
In houses without basements, the floor of the first floor can be made according to two schemes:
- supported on the ground - with a screed on the ground or on joists;
- supported on walls - like a ceiling over a ventilated underground.
Which of the two options will be better and easier?
In houses without a basement, floors on the ground are a popular solution for all rooms on the first floor. Floors on the ground are cheap, simple and easy to implement; they are also beneficial to install in the basement, garage, bathhouse and other utility rooms. Simple design, application modern materials, placement of a heating circuit in the floor (warm floor), such floors are made comfortable and attractively priced.
In winter, the backfill under the floor always has a positive temperature. For this reason, the soil at the base of the foundation freezes less - the risk of frost heaving of the soil is reduced. In addition, the thickness of the thermal insulation of a floor on the ground may be less than that of a floor above a ventilated underground.
It is better to abandon the floor on the ground if backfilling with soil is required to a height that is too high, more than 0.6-1 m. The cost of backfilling and soil compaction in this case may be too high.
A ground floor is not suitable for buildings on a pile or columnar foundation with a grillage located above the ground surface.
Three basic diagrams for installing floors on the ground
In the first version concrete monolithic reinforced floor slab rests on load-bearing walls, Fig.1.
After the concrete hardens, the entire load is transferred to the walls. In this option, a monolithic reinforced concrete floor slab plays the role of a floor slab and must be designed for the standard load of the floors, have the appropriate strength and reinforcement.
The soil is actually used here only as temporary formwork when installing iron concrete slab ceilings This type of floor is often called a “suspended floor on the ground”.
A suspended floor on the ground has to be made if there is a high risk of shrinkage of the soil under the floor. For example, when building a house on peat bogs or when the height of bulk soil is more than 600 mm. The thicker the backfill layer, the higher the risk of significant subsidence of the fill soil over time.
Second option - this is a floor on a foundation - a slab, when a reinforced concrete monolithic slab, poured onto the ground over the entire area of the building, serves as a support for the walls and a base for the floor, Fig.2.
Third option provides for the installation of a monolithic concrete slab or laying wooden logs in the spaces between load-bearing walls supported on bulk soil.
Here the slab or floor joists are not connected to the walls. The load of the floor is completely transferred to the bulk soil, Fig.3.
It is the latter option that is correctly called a floor on the ground, which is what our story will be about.
Ground floors must provide:
- thermal insulation of premises in order to save energy;
- comfortable hygienic conditions for people;
- protection against penetration of ground moisture and gases - radioactive radon - into premises;
- prevent the accumulation of water vapor condensation inside the floor structure;
- reduce the transmission of impact noise to adjacent rooms along the building structures.
Backfilling the soil cushion for the floor on the ground
The surface of the future floor is raised to the required height by installing a cushion of non-heaving soil.
Before starting work on backfilling, be sure to remove the top soil layer with vegetation. If this is not done, the floor will begin to settle over time.
Any soil that can be easily compacted can be used as a material for constructing a cushion: sand, fine crushed stone, sand-gravel mixture, and if the groundwater level is low, sandy loam and loam. It is beneficial to use the soil remaining on the site from the well and (except for peat and black soil).
The cushion soil is carefully compacted layer by layer (no thicker than 15 cm.) by compacting and pouring water onto the soil. The degree of soil compaction will be higher if mechanical compaction is used.
Do not place large crushed stones, broken bricks, or pieces of concrete into the cushion. There will still be voids between large fragments.
The thickness of the bulk soil cushion is recommended to be in the range of 300-600 mm. Compact the fill soil until natural soil still fails. Therefore, the soil will settle over time. A thick layer of fill soil can cause the floor to settle too much and unevenly.
To protect against ground gases - radioactive radon, it is recommended to make a layer of compacted crushed stone or expanded clay in the cushion. This underlying captage layer is made 20 cm thick. The content of particles smaller than 4 mm this layer should contain no more than 10% by weight. The filtration layer must be ventilated.
The top layer of expanded clay, in addition to protecting against gases, will serve as additional thermal insulation for the floor. For example, a layer of expanded clay 18 cm. corresponds to 50 in terms of heat-saving ability mm. polystyrene foam To protect insulation boards and waterproofing films, which in some floor designs are laid directly on the backfill, from crushing, a leveling layer of sand is poured on top of the compacted layer of crushed stone or expanded clay, twice the thickness of the backfill fraction.
Before filling the soil cushion, it is necessary to lay water supply and sewerage pipes at the entrance to the house, as well as pipes for the ground ventilation heat exchanger. Or lay cases for installing pipes in them in the future.
Construction of floors on the ground
In private housing construction, the floor on the ground is arranged according to one of three options:
- ground floor with concrete screed;
- ground floor with dry screed;
- ground floor on wooden joists.
A concrete floor on the ground is noticeably more expensive to construct, but is more reliable and durable than other structures.
Concrete floor on the ground
Floors on the ground are a multi-layer structure, Fig.4. Let's go through these layers from bottom to top:
- Placed on a ground cushion material that prevents filtration into the groundmoisture contained in freshly laid concrete (for example, polyethylene film with a thickness of at least 0.15 mm.). The film is applied to the walls.
- Along the perimeter of the walls of the room, to the total height of all layers of the floor, fix separating edge layer from strips 20 – 30 thick mm, cut from insulation boards.
- Then they arrange a monolithic concrete floor preparation thickness 50-80 mm. from lean concrete class B7.5-B10 to crushed stone fraction 5-20 mm. This is a technological layer intended for gluing waterproofing. The radius of concrete joining the walls is 50-80 mm. Concrete preparation can be reinforced with steel or fiberglass mesh. The mesh is placed in bottom part slabs with a protective layer of concrete of at least 30 mm. For reinforcing concrete foundations it can alsouse steel fiber length 50-80 mm and diameter 0.3-1mm. During hardening, the concrete is covered with film or watered. Read:
- For hardened concrete floor preparation weld-on waterproofing is glued. Or, two layers of rolled waterproofing or bitumen-based roofing material are laid on mastic with each layer placed on the wall. The rolls are rolled out and joined with an overlap of 10 cm. Waterproofing is a barrier to moisture and also serves as protection against the penetration of ground gases into the house. The floor waterproofing layer must be combined with a similar wall waterproofing layer. Butt joints of film or roll materials must be sealed.
- On a layer of hydro-gas insulation lay thermal insulation slabs. Extruded polystyrene foam will probably be the best option for insulating floors on the ground. Foam plastic with a minimum density of PSB35 (residential premises) and PSB50 for heavy loads (garage) is also used. Polystyrene foam breaks down over time upon contact with bitumen and alkali (that's all cement-sand mortars). Therefore, before laying foam plastic on a polymer-bitumen coating, one layer of polyethylene film should be laid with an overlap of sheets of 100-150 mm. The thickness of the insulation layer is determined by thermal engineering calculations.
- On the thermal insulation layer lay the underlying layer(for example, polyethylene film with a thickness of at least 0.15 mm.), which creates a barrier to moisture contained in freshly laid concrete floor screed.
- Then lay a monolithic reinforced screed with a “warm floor” system (or without a system). When heating floors, it is necessary to provide expansion joints in the screed. The monolithic screed must be at least 60 thick mm. executed from concrete class not lower than B12.5 or from mortarbased on cement or gypsum binder with a compressive strength of at least 15 MPa(M150 kgf/cm 2). The screed is reinforced with welded steel mesh. The mesh is placed at the bottom of the layer. Read: . To more thoroughly level the surface of a concrete screed, especially if the finished floor is made of laminate or linoleum, a self-leveling solution of factory-made dry mixes with a thickness of at least 3 is applied on top of the concrete layer. cm.
- On the screed installing finished floor.
This is a classic ground floor. Based on it, various design options are possible - both in design and in the materials used, both with and without insulation.
Option - concrete floor on the ground without concrete preparation
Using modern Construction Materials, concrete floors on the ground are often made without a layer of concrete preparation. A layer of concrete preparation is needed as a base for the sticker roll waterproofing on a paper or fabric base impregnated with a polymer-bitumen composition.

 In floors without concrete preparation As waterproofing, a more durable polymer membrane specially designed for this purpose is used, a profiled film, which is laid directly on the ground cushion.
A profiled membrane is a fabric made of high-density polyethylene (HDP) with protrusions molded on the surface (usually spherical or truncated cone-shaped) with a height of 7 to 20 mm. The material is produced with a density from 400 to 1000 g/m 2 and is supplied in rolls with widths ranging from 0.5 to 3.0 m, length 20 m.
Due to the textured surface, the profiled membrane is securely fixed into the sand base without deforming or moving during installation.
Fixed into a sand base, the profiled membrane provides a solid surface suitable for laying insulation and concrete.
The surface of the membranes can withstand the movement of workers and transportation machines without ruptures. concrete mixtures and solutions (excluding tracked vehicles).
The service life of the profiled membrane is more than 60 years.
The profiled membrane is laid on a well-compacted sand bed with the spikes facing down. The membrane spikes will be fixed in the pillow.
The seams between the overlapping rolls are carefully sealed with mastic.
The studded surface of the membrane gives it the necessary rigidity, which allows you to lay insulation boards directly on it and concrete the floor screed.
 If slabs made of extruded polystyrene foam with profiled joints are used to construct a thermal insulation layer, then such slabs can be laid directly on the ground backfill.
Backfill of crushed stone or gravel with a thickness of at least 10 cm neutralizes the capillary rise of moisture from the soil.
In this embodiment, the polymer waterproofing film is laid on top of the insulation layer.

If the top layer of the soil cushion is made of expanded clay, then you can dispense with the insulation layer under the screed.
The thermal insulation properties of expanded clay depend on its bulk density. From expanded clay with bulk density 250–300 kg/m 3 it is enough to make a thermal insulation layer with a thickness of 25 cm. Expanded clay with bulk density 400–500 kg/m 3 to achieve the same thermal insulation ability, you will have to lay it in a layer 45 thick cm. Expanded clay is poured in layers 15 thick cm and compacted using a manual or mechanical tamper. The easiest to compact is multi-fraction expanded clay, which contains granules of different sizes.
Expanded clay is quite easily saturated with moisture from the underlying soil. Wet expanded clay has reduced thermal insulation properties. For this reason, it is recommended to install a moisture barrier between the base soil and the expanded clay layer. A thick waterproofing film can serve as such a barrier.
 Large-porous expanded clay concrete without sand, encapsulated. Each expanded clay granule is enclosed in a cement waterproof capsule.
 The base for the floor, made of large-porous sand-free expanded clay concrete, will be durable, warm and with low water absorption.
Floor on the ground with dry prefabricated screed
 In floors on the ground, as the top load-bearing layer, instead of a concrete screed, in some cases it is advantageous to make a dry prefabricated screed from gypsum fiber sheets, from sheets of waterproof plywood, as well as from prefabricated floor elements from different manufacturers.
For residential premises on the first floor of the house more than simple and cheap option There will be a floor on the ground with a dry prefabricated floor screed, Fig. 5.
A floor with a prefabricated screed is afraid of flooding. Therefore, it should not be done in the basement, as well as in wet rooms - bathroom, boiler room.
The ground floor with a prefabricated screed consists of the following elements (positions in Fig. 5):
1 - Flooring - parquet, laminate or linoleum.
2 - Glue for joints of parquet and laminate.
3 - Standard underlay for flooring.
4 - Prefabricated screed made of ready-made elements or gypsum fiber sheets, plywood, particle boards, OSB.
5 - Glue for assembling the screed.
6 - Leveling backfill - quartz or expanded clay sand.
7 - Communications pipe (water supply, heating, electrical wiring, etc.).
8 - Insulation of the pipe with porous fiber mats or polyethylene foam sleeves.
9 - Protective metal casing.
10 — Expanding dowel.
11 - Waterproofing - polyethylene film.
12 - Reinforced concrete base made of class B15 concrete.
13 - Foundation soil.
The connection between the floor and the outer wall is shown in Fig. 6.
The positions in Fig. 6 are as follows:
1-2. Varnished parquet, parquet, or laminate or linoleum.
3-4. Parquet adhesive and primer, or standard underlay.
5. Prefabricated screed from finished elements or gypsum fiber sheets, plywood, particle boards, OSB.
6. Water-dispersed adhesive for screed assembly.
7. Moisture insulation - polyethylene film.
8. Quartz sand.
9. Concrete base - reinforced concrete screed of class B15.
10. Separating gasket made of waterproofing roll material.
11. Thermal insulation made of polystyrene foam PSB 35 or extruded polystyrene foam, thickness as calculated.
12. Foundation soil.
13. Plinth.
14. Self-tapping screw.
15. External wall.
As mentioned above, the soil cushion at the base of the floor always has a positive temperature and in itself has certain heat-insulating properties. In many cases, it is enough to additionally lay insulation in a strip along the outer walls (item 11 in Fig. 6.) in order to obtain the required thermal insulation parameters for a floor without underfloor heating (without heated floors).
Thickness of floor insulation on the ground
 Fig.7. Be sure to lay insulation tape in the floor, along the perimeter of the external walls, with a width of at least 0.8 m. From the outside, the foundation (basement) is insulated to a depth of 1 m.
The temperature of the soil under the floor, in the area adjacent to the plinth along the perimeter of the external walls, depends quite strongly on the temperature of the outside air. A cold bridge forms in this zone. Heat leaves the house through the floor, soil and basement.
The ground temperature closer to the center of the house is always positive and depends little on the temperature outside. The soil is heated by the heat of the Earth.
Building regulations require that the area through which heat escapes be insulated. For this, It is recommended to install thermal protection at two levels (Fig. 7):
- Insulate the basement and foundation of the house from the outside to a depth of at least 1.0 m.
- Lay a layer of horizontal thermal insulation into the floor structure around the perimeter of the external walls. The width of the insulation tape along the external walls is not less than 0.8 m.(pos. 11 in Fig. 6).
The thickness of the thermal insulation is calculated from the condition that the overall resistance to heat transfer in the area floor - soil - base must be no less than the same parameter for outer wall.
Simply put, the total thickness of the insulation of the base plus the floor should be no less than the thickness of the insulation of the outer wall. For the climatic zone in the Moscow region, the total thickness of foam insulation is at least 150 mm. For example, vertical thermal insulation on a plinth 100 mm., plus 50 mm. horizontal tape in the floor along the perimeter of the external walls.
When choosing the size of the thermal insulation layer, it is also taken into account that insulating the foundation helps reduce the depth of freezing of the soil under its base.
These are the minimum requirements for ground floor insulation. It is clear that what larger sizes thermal insulation layer, the higher the energy saving effect.
Install thermal insulation under the entire floor surface for the purpose of energy saving, it is only necessary in the case of installing heated floors in the premises or building an energy-passive house.
In addition, a continuous layer of thermal insulation in the floor of the room can be useful and necessary to improve the parameter heat absorption of the floor covering surface. Thermal absorption of the floor surface is the property of the floor surface to absorb heat in contact with any objects (for example, the feet). This is especially important if the finished floor is made of ceramic or stone tiles, or other material with high thermal conductivity. Such a floor with insulation will feel warmer.
The heat absorption index of the floor surface for residential buildings should not be higher than 12 W/(m 2 °C). A calculator for calculating this indicator can be found
Wooden floor on the ground on joists on a concrete screed

Base slab made of concrete class B 12.5, thickness 80 mm. over a layer of crushed stone compacted into the ground to a depth of at least 40 mm.
Wooden blocks - logs with a minimum cross-section, width 80 mm. and height 40 mm., It is recommended to lay on a layer of waterproofing in increments of 400-500 mm. For vertical alignment, they are placed on plastic pads in the form of two triangular wedges. By moving or spreading the pads, the height of the lags is adjusted. The span between adjacent support points of the log is no more than 900 mm. A gap of 20-30 mm wide should be left between the joists and the walls. mm.
The logs lie freely without attachment to the base. During the installation of the subfloor, they can be fastened together with temporary connections.
For the construction of the subfloor, wood boards are usually used - OSB, chipboard, DSP. The thickness of the slabs is at least 24 mm. All slab joints must be supported by joists. Wooden lintels are installed under the joints of the slabs between adjacent logs.
The subfloor can be made from tongue-and-groove floorboards. Such a floor made from high-quality boards can be used without floor covering. The permissible moisture content of wood flooring materials is 12-18%.
If necessary, insulation can be laid in the space between the joists. Mineral wool slabs must be covered with a vapor-permeable film on top, which prevents microparticles of insulation from penetrating into the room.
Rolled waterproofing made of bitumen or bitumen-polymer materials glued in two layers onto the concrete underlying layer using the melting method (for fused rolled materials) or by sticking on bitumen-polymer mastics. When installing adhesive waterproofing, it is necessary to ensure a longitudinal and transverse overlap of the panels of at least 85 mm.
To ventilate the underground space of floors on the ground along the joists, the rooms must have slots in the baseboards. Holes with an area of 20-30 are left in at least two opposite corners of the room. cm 2 .
Wooden floor on the ground on joists on posts
There is another structural floor scheme - this wooden floor on the ground on joists, laid on posts, Fig.5.
Positions in Fig.5:
1-4 - Elements of the finished floor.
5 —
6-7 - Glue and screws for assembling the screed.
8 - Wooden joist.
9 — Wooden leveling gasket.
10 - Waterproofing.
11 - Brick or concrete column.
12 - Foundation soil.
Arranging the floor on joists along columns allows you to reduce the height of the ground cushion or completely abandon its construction.
Floors, soils and foundations
Ground floors are not connected to the foundation and rest directly on the ground under the house. If it is heaving, then the floor can “go on a spree” under the influence of forces in winter and spring.
To prevent this from happening, the heaving soil under the house must be made not to heave. The easiest way to do this is the underground part
The design of pile foundations on bored (including TISE) and screw piles involves the installation of a cold base. Insulating the soil under a house with such foundations is a rather problematic and expensive task. Floors on the ground in the house pile foundation can be recommended only for non-heaving or slightly heaving soils on the site.
When building a house on heaving soils, it is necessary to have an underground part of the foundation to a depth of 0.5 - 1 m.
 |
| In a house with external multilayer walls with insulation on the outside, a cold bridge is formed through the base and load-bearing part of the wall, bypassing the insulation of the wall and floor. |
Photo
Correctly selected floors in a wooden house provide a more presentable appearance and a comfortable atmosphere in the premises.
Scheme of flooring in a wooden house.
In houses made of wood, flooring is made mainly from the same material. It is safe for health, reliable and time-tested.
Selecting material for flooring

Laying solid boards on load-bearing wooden structures.
When making wooden floors in a house, the first thing you need to do is choose the right material. Wooden floors can be installed using wood various breeds. When choosing a specific floor, you need to take into account the climate in the region, the available budget, the type of premises and the expected loads on the floor. For example, in a small residential building it is best to make a wooden floor from coniferous trees. This material is relatively inexpensive and differs good quality. Oak belongs to the middle price category. This wooden floor is appropriate in almost any room. Alder and aspen are very suitable for children's rooms and bedrooms. To lay the floor in a wooden house, parquet boards or solid wood boards can be used. It is recommended to use boards 1.8-2.5 cm thick and 50-200 cm long.
You can use glued parquet board. Appearance and the dimensions of such a product do not differ from its solid counterpart. Performance properties are at the same level. The product consists of at least 3 layers, which are glued together under high pressure. The top layer is made from valuable wood and has an average thickness of 0.5 cm. The remaining layers are made from more inexpensive wood, which reduces the cost of the product as a whole. In addition, parquet can be used for flooring in a wooden house.
Flooring technology in a wooden house

Options for laying floors in a wooden house.
There are 2 main options for laying the floor: without offset and with it. Choose a suitable scheme in accordance with the layout of the room, your personal preferences and your available budget.
Before starting work, prepare the following tools:
- hacksaw with small teeth;
- hammer and axe;
- plane, preferably electric;
- building level and square;
- nail puller;
- sander;
- a circular saw;
- pencil and measuring tape.
The flooring in a wooden house is made in 2 layers. The first is preparatory, i.e. the basis. The wood lies directly on top of it. Flooring can be laid in two ways. In accordance with the first of them, logs are used, and in accordance with the second, floor beams are used.
Before starting work, you need to carefully treat the gaskets, boards and logs with means for fire resistance and protection from various pests, i.e. with an antiseptic. Moisture-proofing material must be laid under the future structure. You can use penofol or thick plastic film. Penofol is more preferable, because it simultaneously protects not only from moisture, but also from excess noise.
How to properly lay a floor on joists?

Scheme of laying boards on joists.
Installation of logs can be carried out directly on the foundation or walls of a wooden house. Bring the logs into the room and leave them there for several days so that the material “gets used” to the surrounding conditions. Next, you need to take 2 logs and place them on opposite walls. A dense thread is stretched between the installed logs in increments of 150 cm. In the future, you will be guided by these threads and will be able to correctly install all other logs. Be sure to fill any voids and gaps with thermal insulation material.
If boards about 40 cm wide will be used to lay the floor, the logs must be installed at a distance of 80 cm from each other. If the boards are up to 30 cm wide, install the logs in increments of 50-60 cm. And if you are laying boards wider than 40 cm, the logs should be installed at a distance of 100 cm from each other.
To adjust the height of the logs, use wedges made of wood or plywood. To strengthen the wedges, use long nails or self-tapping screws. If it is possible to secure the logs to concrete, you need to use anchors or dowels for this. Make the fasteners so that the caps of the elements are sunk approximately 3 mm into the base.

Basic methods of waterproofing a wooden floor.
Checking horizontality is a mandatory installation step. Only after this can you proceed to laying and strengthening the flooring boards.
Step back 15-20 mm from the wall and fasten the boards of the first row, guided by the previously stretched line. Prepare holes for self-tapping screws in advance if you are fastening with them. Place a board on each joist and secure. To hide the gaps between the floor and the wall, use self-tapping screws.
Step-by-step instructions for installing a plywood floor base

Plywood floor diagram.
The floor in a wooden house can be laid on a pre-arranged plywood base. It's pretty a good option arrangement of subfloors in residential premises. The advantage of plywood is that it practically does not deform during operation, so the base is very strong and reliable.
It also makes sense to create plywood flooring in cases where the existing plank floor has deteriorated, i.e., it has dried out, become loose, etc. In the future, you will be able to dismantle the floor covering fixed to the plywood base without any problems.
Another advantage plywood base is the absence of the need to perform additional preparatory work, which saves time. The new floor in a wooden house is laid directly on the plywood. It is highly not recommended to use plywood in a wooden house with high humidity and frequent temperature changes. This material is not suitable for unheated rooms and bathrooms.

Stages of floor installation.
Before starting to level the floor, place plywood sheets on the floor, take chalk and draw a diagram of their placement. In the future, the installation of logs will be carried out exactly according to this scheme. The procedure for leveling the floor, as a rule, begins with the installation of beacons over the area of the room. The surface is divided into many squares with a side of about 30 cm. Self-tapping screws are screwed into the corners of these squares. They need to be set using an electric screwdriver and a building level.
The next step is laying the joists. It is on them that the plywood will be laid. The pitch between the lags is directly related to the thickness of the plywood: the thicker it is, the greater the distance between the bars should be. The average value is 40 cm. In some situations, transverse bars are mounted between the lags for additional strength. They should be installed at a distance of up to 50 cm from each other.
Please ensure that the logs do not sag. If such are present, you just need to take several pieces of plywood, coat them with parquet glue and place them under the sagging joists. To attach the logs to the base, you can use plywood pads with glue, anchors, corners, and self-tapping screws. If anchors are used, their caps should be recessed into the wood by approximately 3 mm. The structure is additionally glued. If this is not done, the finished floor in a wooden house will crack.
Cover the logs with rolled glassine on top. It will protect the wood from the harmful effects of moisture. After laying the protective material, lay down the plywood. Lay it so that the edges of the sheets are on the joists. Leave a gap of 2 mm between the sheets. After the glue has dried, the plywood must be additionally secured with self-tapping screws. One sheet of material takes about 8-9 screws. Sand the joints, they should be perfectly smooth.
If the concrete base is already level, i.e. a screed has been made, the wooden layer can be laid directly on the concrete. However, care must be taken to avoid direct contact of wood with concrete. To do this, use foamed polyethylene or soil mastic. In the case of polyethylene, it must be laid with an overlap. The material is relatively inexpensive, but despite its simplicity and budget, it provides excellent protection.

Wooden floor on floor beams.
Laying floors in a wooden house requires compliance with rules that will allow you to obtain the highest quality and reliable coating. Follow the following step by step guide.
Sand the boards and lay them along the beams to make markings. The floor is laid in such a way that the age-old rings of wood are directed in opposite directions. After preliminary fitting, number the boards to make it easier to lay them in the future. This will save you from wasting time on additional sanding and adjusting the material to size.
Start laying away from the wall. Leave a ventilation gap. In the future, you can close this gap using a plinth. Hammer the nails at an angle, slightly deepening the heads into the material. After the first board has been laid, you need to step back approximately 40-60 mm from the edge and drive staples into the beams with a small gap. Insert the protective strip into the resulting gap. After this, drive a wedge between the rail and the bracket, which is slightly wider than the width of the gap.
Nail the boards and remove the staples. Lay several boards again, press them with a lath and a wedge and nail them to the beam. For fastening wooden boards use nails and a punch. Compact each subsequent board with a mallet and only then secure it with nails.
Incorrect groove of tongues will create difficulties when laying boards. In some situations, you have to file the ends of the boards close to the wall to make the bottom a little shorter than the top. Problems usually arise when installing the last board. To facilitate its installation, you need to level the upper part of the tongue with a plane, preferably an electric one. After leveling, the board is glued and nailed closer to the edge with countersunk nails. In the future, these nails will hide the baseboard, so you don’t have to worry.
After laying the flooring is completed, it is necessary to sand the joints.
To get rid of differences and unevenness even at the installation stage, place roofing felt, cardboard or other similar material under the bars at the joints.
Surface finishing

Floor thermal insulation diagram.
In order for wood to last as long as possible, it needs to be properly cared for. If you do not plan to use any additional covering such as laminate or parquet, the flooring needs to be finished off. It can be sanded, treated with soda, primer, paint or varnish. When applying paint, varnish or impregnation, you need to move in a direction parallel to the grain of the wood.
As a rule, when choosing a material for flooring, people are guided by personal concepts of comfort and beauty, as well as the quality and cost of the material. There are currently many different solutions available on the market, so you are sure to find the option that best suits your needs.
Thus, wooden floors can be laid without special skills, special knowledge, time and money. You just need to do everything according to the instructions and follow the rules. Good luck!


