Perhaps this is one of the most intensively used devices installed in such premises. By some estimates, we open and close its taps about 100 times a day. Therefore, when placing this plumbing device, you need to think, first of all, about the convenience of its operation and repair.
Before dealing with the question of how to install a mixer, it is worth paying attention to some features of choosing a model and determining a place for installation.
What to Consider Before Installing a Faucet on a Sink
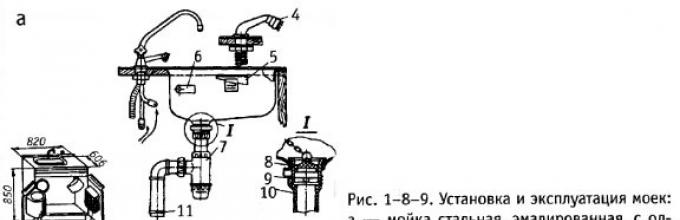
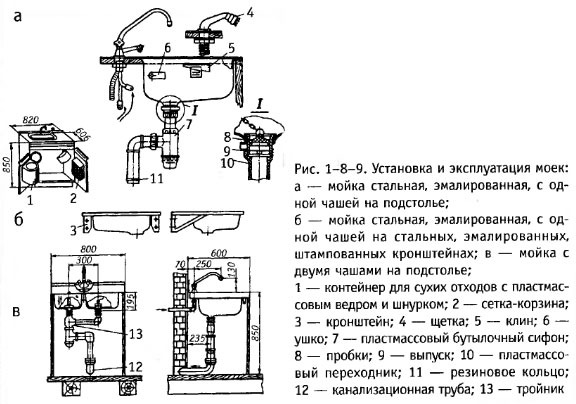
- you can install the mixer in different ways: on the countertop, on the wall, attach it to the sink body;
- the location of the pipes to which the connection will be made (hot and cold water);
- configuration of the drain (sewerage) system;
- when thinking about how to install a mixer, you need to take into account the possibility (if necessary) of its maintenance or repair. It is necessary to provide free access to all its parts, especially to the connection points.
- installation location of the cleaning filter.
Filters are a separate issue, and opinions vary here. Someone thinks that the filter that is installed at the entrance to the house (apartment) is enough. But experienced craftsmen still recommend putting more, directly in front of the mixer, especially if it is an expensive model of foreign production.
The fact is that there is no such quality of water supplied through pipes, as we have, either in America or in Europe. And imported devices are “gentle”, not adapted to our “harsh reality”. Therefore, it is better, of course, to play it safe and put an additional element of water purification.
Having decided where and how to install the mixer, you should prepare the necessary tools and accessories, as well as materials. For example, you need to carefully measure the distance from the installation site of the plumbing fixture to the points of its connection to the pipes. Based on this, flexible hoses are selected, and their length should be slightly longer (so that the installation is not carried out “tightening”).
Most often, housewives choose the option of installing the mixer directly on the sink. So it is more familiar and more convenient for them. Therefore, we will consider just such a method, although, in principle, there is no big difference in which place to put it. The technology is the same, and the features are determined by the Manufacturer, which is displayed in the Instructions.
Video on replacing the faucet in the kitchen
Installing the faucet on the sink
1. You must first study the Manufacturer's installation recommendation, which is attached to each device (unless, of course, it is not counterfeit). The fact is that all models differ from each other - material, design features, spout size and the like.
2. In order to make sure that this "document" is understood correctly, before installing the faucet, it is advisable to first pre-assemble the entire kit. Do not overtighten the nuts and screws. The purpose of this work is to understand the order of operations and make sure that all the necessary parts are present and in good condition.
Firstly, this will allow you to check the integrity of the entire kit even before installing the mixer. Indeed, sometimes a marriage is detected already during the installation process (maybe such), and you have to contact the Seller about replacing the device.
Secondly, the knowledge and experience gained in assembly / disassembly will reduce the time of all operations to a minimum, because in the process of work it will be necessary to leave the dwelling without water for some period.
3. Turn off the water supply before installing the faucet on the sink.
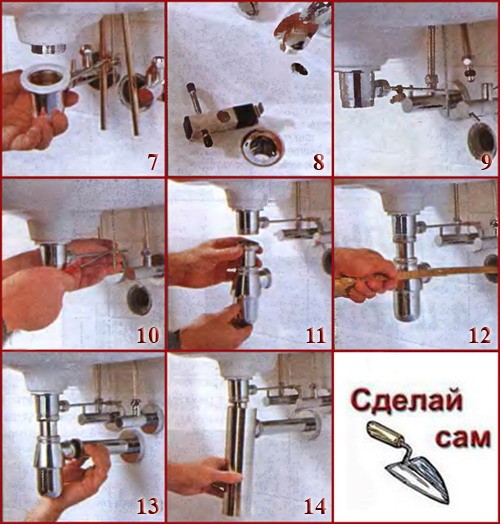
4. Installation of eccentrics. They play the role of connecting elements (adapters) between high pressure hoses and pipes. Usually included with the device. Winding them on the thread, FUM-tape or other special means (linen, tow, etc.) are used as a “winding”.
On the Internet you can find a lot of advice on how to install a faucet on the sink. For example, that for better sealing of joints, a layer of paint should be applied on top. Yes, it will prevent leakage. But the question is, how then to dismantle the connecting hose, when everything hardens “tightly” ???
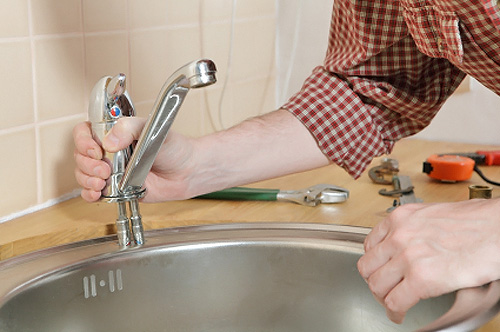
5. Installing the faucet on the sink. The only requirement is that it must be rigidly fixed on its body in order to exclude the slightest fluctuations, as this will gradually lead to depressurization of the joints.
6. Connecting the second ends of the hoses to the instrument. There is only one recommendation here - do not confuse the pipes of cold and hot water.
7. Performance check. It is necessary to open the taps one at a time and make the “strait” of water for some time. During this time, you can detect a leak if it appears.
Working with wrenches, pliers, you can damage the coating of the device body or connecting elements. This not only spoils their appearance, but also contributes to the occurrence of corrosive processes. Therefore, when installing the faucet on the sink, it is advisable to make a “lining” under the sponges of the tool (material, thin rubber or something similar).
When tightening the thread, you should not make great efforts, especially if the pipes are made of plastic. The nut should rotate smoothly, until the first "stop". It is advisable to pre-lubricate the junction with the appropriate composition. This will guarantee that the thread will not “stick” during operation, and if any part is replaced, there will be no problems with unscrewing.
In any set of the device there are various sealing gaskets that are used when installing the faucet on the sink. They are made from different materials. If this is paronite, then it is advisable to first hold such “details” in water for some time (20 minutes) so that they get wet. This will eliminate their possible cracking when tightening the nuts during installation.
If the faucet is installed on the sink instead of the old one, then before closing the inlet fittings (on pipes) on the device, both taps must be opened to allow the remaining water to drain. It should be noted that the use of already standing gaskets is not allowed for the second time, even if at first glance they are intact. Only new!!!


