Before considering how to install a split system yourself, you should know how it differs from a conventional air conditioner. The principle of operation of these systems is the operation of two interconnected blocks. One is installed indoors, and the other is installed outdoors. They can both cool and, conversely, heat the room. All systems are small in size and noise-canceling.
Main nuances when installing a split system

The long service life, as well as the efficient operation of the system, directly depend on how correctly the equipment is installed. You can install the system yourself. The most important thing is to take your time and carefully understand the diagrams. When performing installation work, it is important not to damage the copper tubes that connect the blocks to each other and ensure their efficient operation. These elements are designed for refrigerant - freon.
To begin with, it doesn’t hurt to know how the system works. To cool the air, freon will flow from the outdoor unit to the indoor unit, which is located indoors. When the fan is turned on, it provides a strong flow of cooled air, which normalizes the temperature in the room or office.
To remove the condensate that forms, there is a special drainage pipe extending from the unit located indoors. It is quite possible to take her outside.
Before installing equipment, you need to select it correctly. Like air conditioners, split systems differ in power, so when choosing equipment you must take into account the following factors:
- area of the room in which the system will be installed;
- type of indoor unit - floor-ceiling, wall-mounted, cassette or multi-zone.
- absence or presence of forced ventilation in the room.
Necessary tool
To improve the quality of work, it is advisable to prepare the necessary tools in advance so as not to be distracted during the installation process. So, in order to install the outdoor unit, as well as the internal unit of the device, you will need:
- copper tubes having a diameter of 0.25 and 0.5 inches;
- electrical cable, cross section 1.5 mm;
- drainage hose – diameter 16mm;
- insulation for connecting copper pipes;
- dowel nails;
- plugs;
- perforator;
- Vacuum pump;
- drill with a diameter of 55 mm;
- rolling

The first stage of device installation
Before starting installation work, you need to decide where to install the split system. To determine the most optimal location, it is worth considering some factors.
- Under no circumstances should the indoor unit of the system be installed where air circulation is limited. This is possible due to closely spaced cabinets, curtains or partitions.
- The distance between the equipment and the nearest obstacle should not be less than 1 meter, since cold air, reflected from it, will quickly return without changing its temperature. Because of this, the system will quickly turn off, considering that the desired temperature has been reached.
- It is advisable to locate the internal unit of the system away from the place where people spend most of their time.
It is not difficult to install a split system yourself, the main thing is to observe the correct operation during installation. So, when fastening the outdoor unit, you need to carefully ensure that:
- it was located on a flat surface, and there were no sources of heat or steam nearby;
- the block was installed strictly horizontally, so when fastening it to the surface it is advisable to use a building level;
- a unit located outside cannot be mounted close to the wall. The distance between the device and the wall should not be less than 10 cm. Air should circulate freely in the space left.
When installing the indoor unit, the following rules should be followed:
- When installing the unit, be careful. so that it is located strictly horizontally, without slopes;
- try to maintain the distance between the outdoor and indoor units;
- Do not install the equipment close to the ceiling or near sources of steam or heat.
So, when the location has been chosen, you can proceed directly to the installation work. You should start with the electrical wiring. The split system should be connected to the electrical network via a separate line specially designated for this equipment, with the obligatory installation of an additional circuit breaker in the electrical panel.
It should be borne in mind that if a house or apartment was built a long time ago and the wiring has not been changed, it may require a complete replacement, since the split system is powerful equipment, and the old wiring may not withstand the power and this will lead to permanent traffic jams. fly out."
The second stage of installing a split system
It is very important to install the indoor unit correctly, since the quality of operation of the entire system directly depends on it. The best option is to fix the device on the wall with self-tapping screws; if the walls are finished with gypsum board, then you should definitely insert plastic spacers into it, since such material is quite loose and vibration will quickly cause the self-tapping screws to become loose.
If the wall is made of brick, then wooden or plastic “caps” are inserted into the holes drilled for self-tapping screws, and then the plate for the block is attached with self-tapping screws. Be sure to check the evenness of the plate fastening using a building level.
The next step is to use a hammer drill to drill a through hole in the wall for the cold pipe. Be sure to provide a slope of at least 15 degrees. It should be outward, not inward.
Next, you need to connect the copper tubes to the internal structure of the air conditioner, as well as the drainage tube to a special hose on the device. Now you can connect the electrical cable to the equipment located indoors. For split systems with a cooling capacity of no more than 4 kW, you should use a cable with a cross-section of at least 1.5 mm (5-core).
The third stage of system installation
At the last, final stage, it is necessary to connect the internal and external units of the system. To do this, do the following.
- First you need to measure the distance between the block taps.
- Place special thermal insulation on the copper connecting tubes. Trim to required length. It is equal to the measurements taken earlier.
- Be sure to secure plugs at the ends of the connecting tubes to prevent dust from getting inside.
- And the last step is to wrap the electrical cable and drainage system with protective sheaths.
How to avoid installation mistakes?
It is not enough to know how to install a split system; you should avoid mistakes that can lead to failure of the device. That is why it is not necessary to allow frequent kinks of freon tubes at a short distance, and it is also unacceptable to loosen the connections between them. Subsequently, all this will lead to a freon leak.
It is important to ensure that the connecting tubes are not twisted into a ring whose radius is less than 100 mm. This will make it difficult for the device to pump refrigerant.
Conclusion
Now you know how to install a split system yourself. Never forget that there are no insignificant factors when installing it. And everything that is done poorly or not completed to the end, for example, poor-quality rolling, loose nuts, bent tubes, dirt in them or moisture - all this will ultimately lead to system failure.
A split system is a complex electrical device. If it is connected incorrectly, the board in it may burn out due to a failure in the electrical network. Therefore, make sure that a voltage relay is installed.
For preventative purposes, for high-quality and long-term operation of the device, clean the filters in the system monthly. Do not run the device in winter unless it is equipped with a winter kit for operation at sub-zero temperatures.
Before starting the device, check the drainage system. Usually they pour water into the air conditioner; if there are no leaks under the block, then everything is in order.
With proper use and timely maintenance, the split system can easily last for more than one year. Therefore, if your neighbors claim that all air conditioning systems are designed for a short period of time, then perhaps they simply do not know how to use them correctly.
Installing a split system (or, simply put, an air conditioner) is a labor-intensive procedure, but not as complicated as you might think. In principle, even someone who has never done anything like this before can cope with such a task. To do this, you will need a little theoretical knowledge, which you can glean from this article, patience and desire. Let's talk about how to install an air conditioner yourself.
Some general information
Our main goal is to install the air conditioner without damaging it. But, in addition to this, it is necessary to correctly install both the indoor and outdoor units. Otherwise, the performance will be much lower, if the device functions at all.
To start work, you will need a special tool: a hammer drill and a vacuum pump, a pressure gauge pump, a building level. As for consumables, the installation of a split system is carried out with a standard kit, which should be included in the kit. This is insulation, drainage hose, dowels, brackets, etc. If this is not available, then you need to buy it, and only after that start installing the air conditioner.

Installation of the indoor unit panel
In this case, you must follow one simple rule, which applies to all air conditioners, regardless of brand and manufacturer. It consists in the fact that it is necessary to retreat at least 10 centimeters from the ceiling. If this rule is not followed, the air conditioner will constantly become clogged with dust. In addition, poor air intake will reduce performance, which can affect the longevity of the device as a whole.
You also need to step back a little from the corner of the wall. The distance from the panel to the curtain should be at least 10 cm. This is necessary so that the curtain does not flutter during operation of the air conditioner. Next, the panel is secured using dowels and a level. It must be placed strictly horizontally. This is necessary to prevent condensate leakage. Next, we temporarily hang the indoor unit.

Installation of cable channel
The cable must be laid with at least a slight slope. This is done to prevent condensation from appearing. Be sure to take this into account during installation. First you need to drill a hole with a minimum diameter of 55 millimeters. Do not forget about the slope, which will prevent the appearance of an air lock in the drainage hose. After the through hole is made, we stretch the box, trim the ends, and adjust the whole thing.
The next step is to cut the route. It is extremely important to understand that using a regular hacksaw is simply unacceptable. This is due to the fact that small shavings, dirt, etc. debris will remain in the copper tube. If all this gets into the compressor, it will soon fail. Therefore, use special pipe cutters, which today can be found in any specialty store or rented from a neighbor. Despite the fact that there are different types of climate control equipment, the installation of air conditioners is approximately the same. There are currently a large number of split systems, but the operating principle is the same, and installation is carried out according to general rules.

Laying the route in the box and installing brackets
At this stage, you choose the sequence of actions yourself. You can first hang the block on the panel, and only then start laying the route in the box. You can do the opposite, lay a route, then attach the block. The main requirement is not to bend the copper tubes. If this happens, the compressor will soon break down.
Next, you need to get insurance and go outside, since the next stage is carried out there. Whether it is installing a multi-split system or the most ordinary one, it is necessary to fix the brackets on the wall. They must be located in the same horizontal plane, so use it. It is advisable that the work be carried out by two people, since the outdoor unit has an impressive weight. After securing the brackets, the external block is put on them and additionally secured with bolts.

Rolling and vacuuming of the route
The essence of rolling is to expand the copper tubes at their junctions. For this purpose, a special rolling machine and nozzles are used. Before rolling the tube, put a nut on it, because after it expands you will not be able to do this. It is extremely important to ensure a reliable connection through which freon does not leak. To do this, tighten the nuts at the joints as much as possible, but do not overdo it.
Vacuuming is necessary to remove residual dust and moisture from the route. To do this, you will need equipment for installing split systems, such as a vacuum pump. It turns on, and at the same time the port on the pressure gauge opens. When the arrow goes into vacuum, you need to turn off the pump and close the port. If the arrow does not go down, it means that one of the connections is leaking air, tighten the nuts more tightly. If this does not help, then it is worth checking the quality of the rolling. If this is not done, then there is a high probability that the compressor will burn out after just one winter.

Installation of a split system: instructions for starting freon
Once you have successfully vacuumed, it's time to add freon to the system. To do this, use a hex wrench to unscrew the supply hose (this is a thin tube). It is important not to confuse it with a thick suction tube, as it may get damaged, which is not good. The sequence is important here, so the supply opens first and then the suction. At this stage, record the freon pressure in the system and check all electrical connections. If everything is in order, then you can carry out a test run.
If the compressor does not turn on immediately, do not be alarmed, this is a completely normal phenomenon, there is nothing wrong with it. Record the pressure and tension. If everything is in order, then the air conditioner is at maximum. So it should work for 10-15 minutes. During this time, freon will pass through the system, and the oil will have time to return.
DIY split system installation: important points
It is necessary to understand that there should be no air in the system, which is why evacuation is a mandatory procedure. As noted above, all connections must be reliable and durable. It is advisable to do several checks using a vacuum pump. Only after you are sure that everything is in order can you carry out a test run.
It is safe to say that the installation of the interblock route and its sealing are the most complex and time-consuming stages. As you can see, you cannot do without an assistant. This is due to the fact that installing the outdoor unit yourself is very difficult and unsafe. In general, there are no impossible tasks here. We maintain the horizontal position, seal the joints, do not use a regular hacksaw - and everything will be fine.

Conclusion
So we figured out how split systems are installed. Dismantling/installation should, as a priority, be carried out by specialists with experience and high qualifications. This way the equipment will last for many years. But it is extremely important not to forget to service it periodically.
By the way, during this there is a risk of bumping into fittings or wiring. Therefore, first check for hidden communications, and only after that start working. The event is quite noisy and dusty, so prepare the room in advance. In general, there is nothing complicated here, the main thing is to follow all the above rules. But one way or another, self-installation should only be carried out if you are confident in your abilities. But it is better to call specialists. If the installation is carried out incorrectly, then at least there will be someone to file a claim against. That's all that can be said about the installation work.
Problem: The main difficulty faced by the buyer of a split system is the problem of proper installation. Installation determines 90% of the quality and service life of the air conditioner. If errors are made during installation, it is very difficult to correct them later.
Solution: Installation must be carried out by specialists licensed to install air conditioners, in compliance with the instructions and using special equipment. After installation, there should be no debris, dust, or boxes left in the room. The word “air conditioning” has taken root only in our country. This is actually a piece of the phrase air-condition, which translated from English means “condition of the air.” The air conditioner serves to maintain the desired temperature and humidity in the room. By ventilating the air, the air conditioner cleans it by passing the air flow through special filters.
Today we will talk about installing a more modern type of air conditioning system - a split system. What are the advantages of a split system over a “regular” air conditioner? The split system does not block natural light, like a “window” that is cut into the window frame. This is the first difference. In addition, it does not depend on the general air conditioning system of the house, if there is one (this is when one hefty unit stands somewhere in the basement and circulates air throughout the house). And it differs from a “regular” air conditioner in that it consists of two blocks - external and internal. If there are more than two indoor units, then this is already called a “multi-split system”.
But let’s agree: for simplicity of presentation, I will talk about the split system, calling it the word “air conditioner” that is more familiar to our ears.
First - repair, then - split
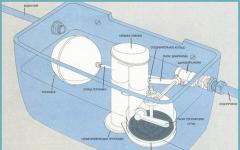
So, a split system (from the English word split - “split, split”) consists of two separate blocks: internal (evaporator) and external or external (condenser). The blocks are connected to each other by electrical wires and two copper tubes through which refrigerant (freon) flows. A thin plastic tube (drainage) also extends out from the indoor unit to remove condensed moisture. Ideally, it should be connected to a drain (sewer) pipe or to a special tank, but often it is simply taken out into the street, and then drops of water fall on the heads of passers-by (see below for information on how to properly make drainage).
The operating principle of a split system is as follows. If the room needs to be cooled, freon flows from the heat exchanger of the outdoor unit through one copper tube to the heat exchanger of the indoor unit. There it is blown by a fan, as a result of which cold air comes out of the indoor unit. If the air in the room needs to be heated, then with the help of a heat pump the external condenser turns into an evaporator, and the evaporator becomes a condenser. In addition to the condenser and evaporator, the split system includes a compressor, which is installed in the external unit. The main function of the compressor is to compress freon to give this gas properties that significantly increase the efficiency of the air conditioner.

Split system:
1 – outdoor (external) unit
2 – internal wall block
The indoor unit operates almost silently (for Daikin models, the noise level of some indoor units is 28 - 31 dB, and for Mitsubishi, when the engine is turned on at the lowest speed, it is 26 dB; the same noise level is created by a flying butterfly). But the fan and compressor of the external device can “buzz” and become louder.
Depending on the method of fastening, indoor units can be wall-mounted or floor-ceiling (floor-ceiling are so called because they can be attached to both the ceiling and the floor). There are also cassette and multi-zone indoor units, but we will talk about them next time.
In apartments, wall-mounted indoor units are most often installed. With the help of movable blinds on the wall unit, you can change the direction of air flow. But the power of wall-mounted units is specially limited - otherwise a strong stream of cold air will simply “blow away” everything in its path. But if a more powerful air conditioner is required in a room (for example, in an office), a floor-ceiling unit is installed. It will allow you to direct a strong jet along the wall or ceiling and thus ensure uniform temperature distribution in the room.
Our advice: if the length of the room significantly exceeds its width, it is much more effective to install a floor-ceiling air conditioner!
Split systems vary in power (cooling capacity) and design. The choice of design is at the discretion of the buyer. But about power, you should definitely consult a specialist. In doing so, you need to know:
1. Area (volume) of your premises.
2. The size of the window, the direction of the world it faces.
3. Presence (absence) of blinds on the windows.
4. The amount of constantly working equipment that generates heat (TV, computer, etc.).
5. Number of heating radiators in the rooms.
6. The number of people constantly present in the room.
7. Is there forced ventilation?
Another piece of advice: if the company where you want to buy an air conditioner didn’t ask you anything about it, then it’s better not to buy from them. Because there is a danger that you are being offered something that is “not typical.” In reputable companies, before selling an air conditioner, a consultant, as a rule, goes to the site where the device is supposed to be installed, takes measurements and finds out all the necessary details. Then all this data is entered into the program, and only after that the computer selects the optimal model. For example, they work at the Aeroprof company, which specializes in Carrier air conditioners (USA), at the Meteomarket company (Daikin air conditioners) and at the KlimatSS company (Hitachi air conditioners) ).

This is what the distribution of air flows from a wall-mounted indoor unit looks like
What else do you need to know? Experts advise INSTALLING A SPLIT SYSTEM BEFORE or DURING REPAIRS, and not after all the repair work has already been carried out. Then you won’t have to hammer and drill freshly painted and leveled walls in order to lay electrical wiring for the air conditioner and strengthen the brackets for fastening the indoor unit. You can, of course, hide communications in external boxes, but this will not decorate the interior.
Moreover, installation work in a freshly renovated apartment is much more expensive, especially after European-quality renovation.
Now about other possible “ambushes”. Very often, mistakes begin when purchasing an air conditioner. Wanting to save money, we go to the nearest store (or even to the market) and buy an air conditioner. And what? And that’s it: we’re one on one with him. In the best case, after carefully reading the instructions, we undertake to install it.
Meanwhile, installing a split system in an apartment is not at all the same as installing a refrigerator or TV: they say, you bring it home, put it in the chosen place, turn it on and - it works! This number will not work with air conditioning. The air conditioner requires proper installation. This is exactly the case when you can’t skimp on installation. The better it is installed, the longer it will last. It is no coincidence that installation work accounts for 18–30% of the cost of the unit.
I remember how one experienced and reserved-looking installer, answering my quite innocent question: where to start installing an air conditioner, suddenly became agitated and shouted: “People! You are all literate! Each air conditioner comes with instructions in Russian, in which both installation and operating rules are described “for fools,” point by point. Read it, damn it, before you stick your hands in! Better yet, call the specialists.” And, alas, he is right.
Installation: where to start?

Split system installation diagram
1. Communications (in the groove)
2. Drainage (in the groove)
3. Sewerage
4. Siphon
5. Electrical wiring - to the panel (in the groove)
6. A hole in the wall, punched with an inclination of 1–3°
First stage: separate electrical wiring is carried out
Any, even low-power (1.5 kW) air conditioner must have separate electrical wiring and a separate circuit breaker installed in the electrical panel. Because the old wiring may not withstand the load and, God forbid, will catch fire. If specialist installers install separate wiring for the air conditioner, the possibility of a fire is reduced to almost zero.
Be especially vigilant if your house is older than 1990. In old houses, the wiring, alas, is not designed to withstand the loads caused by the use of powerful electrical equipment. Installers remember a case when the owner of an apartment was forced to replace all the wiring because of the air conditioner: the old one simply could not stand it and constantly knocked out the plugs.
Second stage: installation of the outdoor unit
To do this, installers drill holes for brackets, onto which they then install the external unit.
If you place it on an open balcony, then there are no problems: you attach it with bolts, the breeze blows through it - and everything is in order (if the balcony is glazed, then the device will not have enough air to work and it will soon break). If you want to attach the block to the wall, then you cannot do without durable brackets. Moreover, they must withstand a weight several times greater than the weight of the block. On high floors, the “outdoor” is mounted from a machine equipped with a sliding staircase. Or they call climbers (if the installation goes above the 5th floor). Such calls are paid separately and cost from 60 to 150 dollars. And sometimes both equipment in the form of a machine with a fire escape-boom and a climber are required.

External and internal (wall-mounted) units of the Carrier split system
If you live on the upper floors, then the outdoor unit can be placed on the roof. But keep in mind that the difference between the indoor and outdoor units in height should not exceed 3–20 meters (depending on the brand of air conditioner and model).
If your apartment is located on the ground floor, I strongly recommend hanging the external unit higher than 1.8–2 meters above the ground and “hide” it in a cage. Or they might steal it. At one of the companies they told us a story. A man came and ordered only an external unit. The managers were surprised: “Why don’t you want a complete split system.” “Yes, I have an air conditioner inside, but the outer “box” was cut off yesterday. On the first floor, hanging under the window.” Regardless of the height at which the external unit is “screwed”, you need to make a metal canopy over it. This will save the block from snow and icicles, which in the spring tend to fall from the roofs, breaking everything in their path.
In general, installing an external unit is a responsible undertaking. If it is loosely secured, it might fall... on someone. During the warranty period, the company that installed the air conditioner is responsible for the consequences of this. And then you will answer for yourself.
What cannot be done with the external (outdoor) unit?
There are space restrictions for installing an external unit:
1. The surface of the wall on which the block will be installed must be strong (otherwise it may collapse under the weight of the block) and smooth (otherwise the block will vibrate and deform).
2. Do not bend the tubes with refrigerant (freon) several times in a small area and unscrew their connections (this will lead to refrigerant leakage). If the tubes are twisted into a ring with a radius of less than 100 mm, then it will be more difficult for the compressor to pump freon.
Third stage: installation of the indoor unit

Air conditioner control panel
Installers fasten special brackets with screws to the wall (if the block is wall-mounted) or the ceiling (if the block is ceiling-mounted) and install the blocks on them. After this, be sure to check the strength of the fastening (is the structure wobbly? Does it vibrate when the air conditioner is turned on?). Otherwise, sooner or later the entire structure may simply collapse on your head.
But for the floor block, no special fasteners are required. He, as they say, “will stand on foot.” You just need to immediately choose a place for it (when choosing a place, make sure that the unit does not blow on the curtains or the wall and is located away from the heat source). And although the block is not attached to the floor, after all communications have been laid, it can no longer be moved from place to place.
So, the indoor unit cannot be installed:
1. ...above a heat source (for example, above a battery). Otherwise, the air conditioner will work on cooling “until it loses its pulse” and will very quickly fail. Imagine that you opened the door of the refrigerator, and it will cool not only the camera, but the entire room. It will “work” and fail by the end of the day. The same thing will happen with the air conditioner. In addition, the heat emanating from the room battery can cause the plastic housing of the unit to become deformed.
2. ... in rooms where devices with high-frequency electromagnetic oscillations (for example, a drill, a drilling machine) are constantly operating. High-frequency vibrations can knock down the chip (processor) installed inside the air conditioner.
3. ...directly above the bed or workplace, otherwise there is a danger of constantly catching a cold or, worse, getting pneumonia.
4. ...where air circulation will be difficult, for example, behind curtains, etc. The distance to the obstacle should not be less than 3 meters. Otherwise, the air conditioner, which maintains the set temperature automatically, will fail. The cooled (or heated) air flow from the air conditioner will be reflected from the obstacle and will return back at the same temperature with which it “came out”. The air conditioner will decide that the work has been done, the desired climate has been set and will turn off. This is exactly what happened to my friends. Their air conditioner constantly got tangled in the curtains and turned off before it could bring the room temperature to the set temperature. I had to call specialists and reinstall the system.
5. ...with a skew - then water (condensation) will flow out of it onto the floor, which, according to the installation rules, must be drained through a drainage tube into a special tank (see our certificate on drainage). Stage four: gating walls or floors
In order to connect electrical wires and freon tubes between air conditioner units, installers punch gutters in the walls or ceiling (or, as the installers say, you need to “drill the line”). This is done if you want to make a hidden highway. Sometimes you have to “drill”, for example, not the walls, but the floor of the apartment.
Don't want to dabble? Then you can hide the wires in decorative plastic boxes (sometimes the boxes are hidden under the baseboard). But before doing this, installers will need to connect two copper pipes (for the refrigerant) and the “ends” of the wiring between the outdoor and indoor units. Make sure the installers do this using the connecting fittings. And a “waterproofing cup” with a connecting hose was placed into a pre-punched hole in the outer wall.

Installers arrive on site with all the necessary equipment, communications are laid in the groove, the drainage pipe is placed in the groove at an angle
After this, they must carry out the so-called vacuumization of communications, and always within 50 minutes (it is during this time that “extra” air and moisture will come out of the communications). This manipulation must be done using special equipment.
Please keep in mind that, as a rule, a separate hidden line is made for the drainage pipe (in the wall or under the floor).
Fifth stage: checking the operation of the system using a special program
At this stage, installers must turn on the split system (air conditioner) by setting it to the test program. If everything works and the case does not vibrate, then everything is in order. The work is almost finished. By the way, we recommend that you independently conduct such a check of the system’s operation every year (using the same test program).
Stage six: garbage collection
I must warn you: laying the main line and other installation procedures involve dirt, dust and noise. But good installers (with a license to install air conditioners) will arrive with special tools (including a metal detector to examine walls for fittings and hidden communications).
In addition, installers should have a vacuum cleaner and other cleaning equipment. With their help, after finishing the work, they must remove all the garbage themselves. If installers try to dodge “dirty” work, strictly demand that “cleaning up the area” is included in the payment for installing an air conditioner. In addition, you can enter into an agreement with a reputable company for preventive maintenance of the split system. Then you won’t have to risk your life, leaning waist-deep out of the window, to clean the outdoor unit with a vacuum cleaner or call climbers at your own expense. When concluding such an agreement (it also includes warranty repairs), of course, you will have to pay a certain amount, but believe me, it is worth it. By the way, we hasten to announce a pleasant detail: the Meteomarket company, which sells Japanese Daikin air conditioners, will replace your air conditioner with a new one free of charge after the three-year term of the service contract. However, if you are satisfied with the old unit, you can not change it for 20 years. The company guarantees its uninterrupted, good operation. By the way, in the well-known building on Lubyanka, Daikin air conditioners have been installed since the days of the “corn secretary general” Nikita Khrushchev and are still working properly.
The outdoor unit must be regularly cleaned of dust and dirt. A particularly difficult period for the outdoor unit is the time of flowering of poplars. The fluff instantly clogs the filters, and the air conditioner (if it is not cleaned right away) breaks down. Of course, you can clean it with a vacuum cleaner if you are not afraid of heights. But it’s better not to risk it and call the “air conditioner rescue service” - that is, a service company.
At temperatures below –15°C, the air conditioner may refuse to work “heat”, and then low-temperature equipment (heat pump, compressor heater and even drain tube heater) will be needed. By the way, some models already include these devices (see table).
What did the installers say?
Experienced installers do not recommend buying air conditioners “from anyone,” on the market or second-hand.
“How many times has it happened that some kind of illiterate whiner will carry out the installation, and then people call us and beg us to help,” one experienced installer from a very reputable company told me. “It used to be that such would-be installers would bring with them a copper pipe for freon, but it didn’t have plugs. If there are no plugs, then moist air will get inside. And humidity is unacceptable for an air conditioner: when it combines with the insides of the entire system, it forms an acid that corrodes the air conditioner mechanism from the inside! And instead of serving properly for many years, such an air conditioner is, of course, sent to a landfill after three years.
The installers told me that sometimes they come across particularly stubborn customers, saying, “I’m paying, do as I say!” What should I do? There was a case recently. The client ordered that the outdoor unit be installed not from the street side, but inside the apartment, and in the children's room. He motivated this with a strange statement that his children, they say, would live at the dacha for another two months. He ignored all the persuasions and arguments of the installers that the outdoor unit cannot be installed in a closed, and especially in a residential area. It is clear that after two months the stubborn buyer called the installers to reinstall everything.
Or here's a case. The client wanted the indoor unit to blow directly onto the bed and the air temperature to be 18°C. They tried to prove to him that it would be cold, and that a directed flow of cold air could cause a cold. "No! I won't catch a cold! Place it!” There is nothing to do, they set it. The next day they came to install the air conditioner in another room, and they saw that the temperature on yesterday’s split was set to 22°C.
- What's wrong? - they ask.
– It’s true, guys, I froze at night.
In general, when the air conditioner is working properly, a person should not feel that something is cooling or heating him. Just comfortable – that’s all! One day a friend called the company and asked to come. He says: “I didn’t buy it from you, though.” Okay, let's go. They opened the block, and there was a dead rat.
That's it. Hence the conclusion - it’s not enough to buy and install a split system. The main thing is that professionals do this for you.
Split system installation procedure
1. Wiring a separate electrical wiring for the air conditioner and installing a separate “automatic circuit breaker” in the distribution panel.
2. Installation of the external (outdoor) unit:
3. Installation of the indoor unit:
4. System wire connection:
5. Test activation of the system:
6. Cleaning the premises (by installers).
How should proper drainage be arranged?
To do this, installers must:
1. Groove the highway.
2. Shut off the water in the apartment.
3. Drill a hole in the sewer pipe.
4. Firmly insert a drainage plastic tube with a siphon into the hole. A layer of water in the siphon will trap the smell coming from the sewer.
Attention! The drainage tube through which accumulated moisture is removed must be inclined at an angle of 5–10 mm so that there is a natural flow of water. If the tilt cannot be done for some reason, you must install a special pump for “forced suction of moisture.” But! This pump is not included and must be purchased separately. The purchase will cost between 70 and 190 dollars, depending on the pump model you choose.
The main problems that arise when operating an air conditioner
Problem 1: The air conditioner blows directly at you, creating a drafty feeling.
Solution: You need to turn on the auto-oscillation function of the horizontal blinds (then the draft will turn into a light breeze) or fix the horizontal dampers in a more favorable position. If this does not work, you need to turn the air flow to the left or right using the vertical air flaps. In most air conditioners, this operation is done manually, but in some models it can be done using the remote control.
Problem 2: On hot days, the air conditioner does not create the necessary coolness, despite the fact that it is constantly running.
Solution: In this case, you should check whether the filters are clogged, whether the windows and doors are closed, and whether additional heating devices (boilers or toasters) are operating in the room. It can be recommended to hang thick white blinds on the windows, which reflect heat and light well, thus reducing the heat gain through the windows by almost half. If this does not help, the model must be replaced with a more powerful one.
Problem 3: Water is dripping from the indoor unit of the split system.
Solution: The drainage line appears to be clogged. Most often, this situation occurs when an air conditioner with a drainage pipeline exposed to the street is turned on for cooling at sub-zero temperatures. In this case, condensation can turn into an ice plug. To avoid this, it is necessary to heat the drainage pipeline to +5 °C using a special cable. If an ice jam does occur, then you should wait for a thaw, and until then, do not turn on the system for cooling.
Problem 4: Reduced air flow.
Solution: Clean the air filter. This can be done with a vacuum cleaner or washed with a soft sponge in warm water. It is not recommended to operate an air conditioner without a filter, since it protects not only your lungs, but also the heat exchanger of the indoor unit. When the latter becomes dusty, the efficiency of the air conditioner decreases.
Problem 5: Icing of the external unit when the air conditioner is operating for heating in conditions of low negative temperatures and high humidity.
Solution: If your air conditioner does not have an automatic defrost system, try turning it on in cooling mode. In this case, the external unit begins to give off heat to the street, heats up and gradually thaws.
Problem 6: Premature failure of the air conditioner.
Solution: To avoid this, do not operate it at temperatures below – 10-15°C. At lower temperatures, the oil in the compressor thickens and its wear increases many times over. There are various rumors about the dangers of air conditioners. But at the press center of the capital’s SES they told us that there is nothing to be afraid of: if the filters are replaced in a timely manner and if the operating rules are followed, the split system does not pose any harm. At least there were no complaints to the sanitary and epidemiological inspection.
After the onset of spring, it becomes necessary to cool the apartment. There are several ways to do this. One of them is to open the window. But in this case, you will most likely not fall asleep at night due to the noise of traffic and the buzzing of mosquitoes over your ear. So it’s better to choose the second method - buy a split system. But we all know that installation costs are often unreasonably high. So let's look at how to install an air conditioner yourself. This is not easy to do, but it is quite possible.
Some general information
We are faced with a serious, but quite feasible task. Almost any man who has done repairs at least several times in his life will be able to cope with the installation. Yes, and a beginner, with the right approach, will be able to install an air conditioner at home. I would like to immediately note that all this is necessary for significant cost savings. Installation, depending on the type and power of the split system, can cost from 4,000 to 10,000 rubles, and this, you see, is a lot. We will not talk again about how the air conditioner works; the same applies to its characteristics. Now we are exclusively interested in installation.
The first thing you have to decide on is the installation location. If you bought a window air conditioner, then its placement area is limited to window openings and vents. If you want to install it away from the window, you will need a fairly long outlet pipe (corrugation). You will have to pay a lot for each meter. We'll talk about this later, but a little later. As for a conventional, wall-mounted or sub-ceiling split system, here you need to follow a few simple rules: the distance to the ceiling should be more than 100 millimeters, there should be no objects (cabinets, etc.) 2 meters in front of the air conditioner, this necessary for normal air circulation and temperature maintenance. As for the external unit, it needs to be installed slightly above the window level. It is mounted on special brackets at a distance of approximately 20 centimeters from the wall. Well, now let's talk about how to install an air conditioner yourself and what tools you will need for this. The list will be quite large.
Finding the right tool
In order for our split system to be installed efficiently and reliably, we need to do the job correctly at all stages. To do this you will have to use quite a lot of equipment. First you will need a hammer drill with a set of chisels. We will have to drill a hole in the load-bearing (main) wall with a diameter of 100 millimeters. In addition, there must be a reinforcement detector. Of course, if you hit iron with a hammer drill, then all the work will have to be done again, and this is not very good both for the wall and for you. We will also need a pipe cutter. A simple household model will be enough. Do not forget that it is simply impossible to properly install an air conditioner in an apartment without having a device for cutting pipes. This is due to the fact that the compressor is very sensitive to any foreign objects. Copper shavings that remain in the gap of the hacksaw field will quickly disable it.
If you are planning to flare pipes using improvised means, then this is a very bad idea. This way you will not be able to achieve 100% tightness, which is necessary. For this simple reason, you need to buy a special flaring kit. It is also advisable to have a reamer on hand - a device for stripping cut copper pipe. A file is not suitable as it leaves crumbs. We will also need a regular pump, which can easily check the tightness of the entire system. A vacuum pump is necessary to remove moisture from the system and evacuate it. It is advisable to have a pressure gauge and a simple tester on hand for working with electrical circuits. How to install an air conditioner in an apartment yourself? Let's talk about this in more detail now.

Step 1: Purchasing, cutting, scraping and flaring copper tubes
One of the most important points is the purchase of tubes for circulating refrigerant. It is highly recommended that you purchase the whole set, you will likely have some left over, but it is better than running out of a piece. As noted above, a cut piece is not a good thing, so try to do as little work as possible with the pipe cutter. As for the rolling, it should be factory-made in the coil. Pay attention to the absence of defects on the copper tubes (abrasions, cracks, chips, etc.), as this can lead to depressurization of the system during operation. If the length of the pipes is quite long, then it will be possible to lower the outdoor unit slightly.
As for cutting, everything is quite simple. The most important thing is to make an even cut along the entire diameter. As for flaring, it is better to practice first, since it is unlikely that you will succeed the first time. To do this, buy a small piece of copper pipe on which you will train. The inner surface should be smooth, and the flaring itself should be uniform and symmetrical. Cracks and distortions are simply unacceptable. After you have done everything, you can begin the actual installation. In order to install an air conditioner in an apartment and do it correctly, you need to start with the outdoor unit. However, there are several nuances and important points here, for example, the Ministry of Health does not recommend carrying out installation yourself on the second and upper floors.
How to install the outdoor unit?

If you do not live on the ground floor, experts advise installing it on a balcony or loggia. In this case, you are unlikely to fall, and it will be much easier to maintain the unit in the future. Please note that the balcony canopy should protect the air conditioner from sunlight; of course, this is not necessary, but it is desirable. We will use small or medium brackets, no more than 20 centimeters. As you know, it is necessary to install on the south side. As practice shows, installing the unit yourself is quite difficult, so invite a friend or neighbor to help you. The only inconvenience that you may experience during installation is removing the balcony glazing, if any. To install the air conditioner yourself, you will need shallow brackets. We will attach them to the frame.
Pay attention to the bottom of the frame; this is where the root parts of all existing brackets will have to be driven. If you can bend the root parts down, then it is quite possible to do without compromising the integrity of the balcony cladding. Don't forget that secure fastening is very important. Agree, an outdoor unit falling from the second floor can injure or even kill a person. To perform correct installation, you must use a level. Horizontal position will ensure proper operation of the compressor. Take a look at the product data sheet; modern models have their own standards. All indents must be observed.
Indoor unit and electrics
First, let's talk about places where it is strictly forbidden to install a split system. In close proximity to heating radiators, as well as near other heat sources (convector, etc.). In addition, the indoor unit should not be exposed to electrical noise from microwave ovens, powered tools, etc. Curtains should not interfere with normal air circulation. From this we can draw a simple conclusion that you cannot install an air conditioner in the kitchen, since it has its own ventilation. You probably ask: “Where is the best place to install an air conditioner?” A living room or bedroom is ideal for this. Of course, you can choose any other place, as long as there are no obstacles.
As for the electrical wiring, there is nothing complicated here. Currently, the simplest models of air conditioners have a power of 1.3 kW. For normal operation of such a device, you will need additional wiring with a cable cross-section of at least 1.5 square meters. mm, you can take it with a small margin. We will also install automatic shutdown, for example, like on a washing machine or boiler. When you get to work with the shield, connect the yellow wire to zero (neutral). Do not forget that in some cases non-standard wire colors are used, so you must enter your own phase and zero designations. After we have figured out where to install the air conditioner and done the electrical work, we move on to the next stage.
Properly installed pipeline is half the battle

We have already talked about how to prepare copper tubes for use, and now about installation itself. Firstly, always leave a margin of 1-2 mm, which will go into bends. By the way, you need to bend the tubes extremely carefully; the appearance of kinks (depressurization) and wrinkles (increased resistance to refrigerant) is unacceptable. In order to understand where to install an air conditioner in an apartment without violating the integrity of the fittings, use a special device - a fitting finder. After the tubes have been bent in the right places, it is necessary to put thermal insulation on them. Often, special hoses made of polyurethane foam are used. Then we put on the flanges and flare the tube. Next, you need to connect the pipelines to the fittings. It is important here not to confuse the inputs and outputs, for example, a cold indoor unit with a hot outdoor one, and vice versa. Modern models may have different diameters of fittings, so doing something wrong will not work.
At the final stage, tighten the nuts. Do not forget that you are dealing with copper, and this is a very soft material that cannot be subjected to much force, so do not pinch the flanges. Final tightening will be required during sealing. Up to this point, you should already decide where to install the air conditioner, since redoing everything is very costly and time-consuming. Move on to the drainage. To do this, you will need a plastic tube that is connected to the drain pipe.
Mobile air conditioner: how to install and where to do it
Everything here is somewhat simpler than in the case of other types of split systems. The fact is that mobile air conditioners practically do not require additional tools for installation. You only need a piece of a special pipe that will go outside. But it is not ordinary, but two-layer. Air for conditioning flows through one circuit, and exhaust air comes out through the second. If you don’t know which air conditioner to install in an apartment with a small area, then definitely choose a mobile one. It does not take up much space and can stand on the floor; special wheels allow you to move it.
Almost always the pipe goes out the window, and there is no need to drill or chisel anything. For example, you can display it through a window, which is especially important. You can even install it in the kitchen or bathroom if required. Do not forget that the tube must be free of defects. One end is connected to the outlet in the split system, the other goes outside. It is worth drawing your attention to the fact that no external units are needed, but you will have to sacrifice power. That’s probably all that can be said briefly about what a mobile air conditioner is, how to install it and where to do it.

A few words about which split system to choose
Currently, there is a large selection: column, ceiling, multi- and other air conditioners. However, for the average person, a wall-mounted unit will suffice. However, consider the power of the unit. It should be selected with a margin of 5-10%. For the bedroom, it is important to install split systems that operate almost silently, which will not disturb your sleep. What kind of air conditioner should I install in an apartment in a children's room? In most cases, it is advisable not to do this at all. And if this is simply necessary, then you should give preference to a low-power model with a fine air purification function.
As for the manufacturer, the leaders today are companies such as LG and Samsung. Despite the high prices, you will receive a quality product that will delight you for many years. Choose a device with remote control, it is very convenient and saves your time and effort. For apartments of 30-35 square meters, a split system with a power of 1.5-4.7 kW is quite sufficient. We figured out which air conditioner to install in the apartment. Now we can talk about completing the installation yourself.

Install an air conditioner yourself: vacuuming and sealing
To ensure proper sealing, do the following. Buy half a liter of distilled water and add a spoonful of soap shavings. Then mix everything thoroughly until you obtain a soap solution. All this can be done after you have decided where to install the air conditioner in the room. Next, you need to open the outlet nipple and connect a pump, maybe even a bicycle one. It is necessary to inflate until air stops escaping. To understand when this moment comes, you need to apply a little soap solution to the pipe. When finished, tighten the threaded connection 1/8 turn. You have probably noticed that installing an air conditioner with your own hands is not so difficult, especially since almost the entire path has been completed.
Vacuuming is performed as follows. A vacuum pump is placed on the nipple, which should pump for an hour. During this time, all moisture and dust will be removed from the system, which is what we actually need. The air that got there during installation will also be removed. That's all, you were able to install a split system without the help of specialists. All that remains is to fill it with refrigerant. It is necessary to fill it up to the green mark on the pressure gauge, however, before doing this, look at the instructions, everything is indicated there. Now you know how to install a window air conditioner, as well as a wall-mounted split system.
Conclusion

So we figured out where you can install the air conditioner. But don’t rush to choose a place, since redoing everything later is long and difficult. After reading this article, you might understand how to install an air conditioner yourself. The main thing is to follow the sequence of actions and use a quality tool. The use of files and saws for metal when working with tubes is not allowed. Because this will lead to breakdown. By the way, it is worth noting that after completing the work you need to perform testing, that is, verification. This will let you know if everything was done correctly.
Testing is extremely simple. You can do everything via the remote control, there is a corresponding button. This option is also available directly on the split system housing. The air conditioner should enter test mode, but if this does not happen, then something is wrong. Perhaps it's an electrical issue, a sealing issue, or a vacuum issue. There could be a lot of reasons. Another important point: if you install it yourself, you risk losing all warranties on the product, and this is very, very bad. For this simple reason, think twice before doing anything yourself. In some cases, it really makes sense to install, for example, an inexpensive split system yourself. If you purchase expensive and powerful equipment, then do not spare 6 thousand to call the experts. In this case, the installation will be carried out correctly, and if problems arise, you can call the organization that installed the split system and solve them.
The question of whether it is possible to install an air conditioner with your own hands worries the minds, first of all, of owners of brand new split systems who have already managed to get acquainted with the prices for installing climate control equipment. Indeed, numerous air conditioning installation companies rate their services quite highly, citing the complexity of installation, the need to use expensive highly specialized equipment and the mandatory high qualifications of specialists. You can't argue with the last statement. Only new owners of air conditioners are still interested in the possibility of self-installation, firstly as the prospect of real savings on installation services (we are talking about a considerable amount), and secondly, as an opportunity to consolidate their own skills and learn something new. Is it possible to blame our man’s desire to get to the bottom of the issue in order to understand how to install an air conditioner on his own and do the installation himself, no worse than a real master? If aspiration is accompanied by the ability to realistically assess the level of one’s skills and capabilities, then it has no price! The information we have presented on how to properly install an air conditioner will help you realistically assess the amount of installation work and balance your skill level with the required one.
Before you begin to study the detailed installation instructions, please review the list of required equipment.
Required tools and equipment
- Hammer with drills.
- Electric drill.
- Vacuum pump.
- Pipe cutter
- Rolling.
- Reamer (beveler).
- Level.
- Torque wrench.
- Gauge manifold.
Using a vacuum pump, remove moisture and air from the system
Plumbing tools for installing air conditioners will also be useful (pliers, screwdrivers, hammer, etc.)
Choosing a place for installation
When choosing an installation location for both indoor and outdoor units, consider the following points: it is important to consider the possibility of free access to the device (for ongoing work on cleaning and replacing filters).
Also take into account the feasibility of the shortest communication between the indoor and outdoor units (the point is not so much the economic benefit from using fewer consumables, but rather the reduction in the efficiency of the entire system as the length of inter-unit communications increases). Do not place the indoor unit above a cabinet or tall furniture (obstructing the flow of cooled air will cause the unit to operate less efficiently). For the same reason, maintain a minimum distance from the ceiling and walls (15 cm). Coordinating the installation of the air conditioner with your neighbors is also very desirable, in order to avoid misunderstandings in the future. The installation of an external unit does not create any particular problems for residents of neighboring apartments, but it is very likely that someone may not like the noise of a running fan or dripping condensation. And the last point, the most obvious, is that the flow of cold air should not create discomfort for people in the room, so take into account the direction of the air flow during installation. Once the locations of the blocks have been determined, we begin installation work.
- installation of the indoor unit;
- mounting the outdoor unit;
- drilling a channel in the wall;
- laying and connecting connecting communications;
- vacuumization of the circuit;
- connecting the air conditioner to the electrical network;
- system startup.
Correctly installing the indoor unit
The internal unit of the split system is mounted on a special plate supplied with the device. To ensure reliable operation of the unit and prevent condensation from leaking out of it later, it is very important to secure the plate level. Therefore, to determine a strict horizontal line when marking, you must use a level. In the marked places, dowels are driven into holes pre-drilled with a hammer drill. Then, using self-tapping screws screwed into dowels, we attach the mounting plate and install the indoor unit on it.

A mounting plate is attached to the installation location of the indoor unit
Installing the outdoor unit
The outdoor unit is placed on pre-installed brackets on the outside of the building, usually under or to the side of a window for ease of maintenance. For effective airflow, the distance from the block to the wall must be at least 10cm. If it is not possible to secure the brackets from the window, then to carry out the work you will need to rent an aerial platform or use the services of climbers.
Interblock communications - how to do it?
A hole in the wall for the passage of communications is drilled using a hammer drill with a drill with a diameter of 4-5 cm. If the interblock route includes a drainage pipe for condensate removal, then the channel must be made with a slope (5-10 degrees towards the street). It is advisable to hide the section of the route from the indoor unit to the point where it enters the wall in the wall. When gating, a lot of dust is generated, so if renovations have already been made in the room, then it is better to lay the route outside, subsequently covering it with a decorative box.

Interblock communications can be hidden in a decorative plastic casing
The inter-unit communication route includes copper freon pipes, power supply and equipment control wires, as well as a drainage pipeline (according to the rules, condensate from the indoor unit must be drained into the sewer system, but many simply drain it outside). The required length of wiring and pipelines is determined by measuring the total length of the route (plus a small margin of 30-50 cm).
To cut copper pipes, you must use a pipe cutter, not a grinder or a hacksaw, to avoid the formation of sawdust, which can subsequently lead to breakdown of the air conditioner. Before installation, the pipelines are placed in a heat-insulating shell; to prevent debris from entering, the pipeline openings are closed with plastic plugs. All components of the route are laid together, rewound with vinyl tape, after which the route is installed in place.
After laying the interblock communications, they begin to connect the wires and the freon line. The installation instructions for the air conditioner must contain a wiring diagram that must be followed during operation.
The length of the tubes is adjusted (we cut off the required size), then it is necessary to remove the burrs (we remove the chamfer using a reamer). After threading the nut, each edge of the tubes is flared by rolling. Then the edges are connected to the fittings of the indoor and outdoor units, tightening the nuts with a torque wrench (the connections must be absolutely tight).

After checking the tightness, air is removed from the line using a vacuum pump; a manometric manifold makes it possible to control the pressure
Having finished connecting the route, check the tightness of the line and “vacuum” it (remove moisture and air) using a vacuum pump. To do this, a vacuum pump is connected to the service port of the outdoor unit through a manometric manifold, which, by pumping air out of the system, creates a vacuum in it. This process lasts about 20 minutes (depending on the volume of the circuit). After turning off the pump, observe the change in pressure for half an hour; if the pressure gauge needle does not deviate, then the system is sealed. Only after a thorough check of the tightness is it possible to open the taps of the outdoor unit and fill the circuit with freon. Attention, a freon leak can cause a compressor breakdown, but more important is the extremely harmful effect of freon on the human body.
So, the system is assembled and filled with refrigerant, all that remains is to connect the air conditioner to the electrical network and check its operation. The connection diagram for the air conditioner is simple; in most household split systems, the power supply is connected to the indoor unit; to do this, you just need to connect an outlet to it.
Now you have a general idea of how to install an air conditioner yourself. We were talking about installing a split system as the most efficient type of household air conditioners. The video instructions below will help you figure out how to install an air conditioner.
Installation of a mobile air conditioner does not require the intervention of highly qualified specialists: you just need to place the device within 2 m from the window (to remove hot air), and then connect it to the network.