When winter comes, you can try making a snow blower out of a chainsaw with your own hands. This will save a man from monotonous work using a shovel and speed up the cleaning process several times. To create such a snow blower, you do not need large financial expenses, especially if you already have a chainsaw in the house.
A chainsaw snow blower will significantly speed up the daily work of clearing snow from the area.
In order to make a primitive snow blower, you must correctly choose the main method of removing snow mass. It depends only on the ingenuity of the home-made worker what he will use as a working tool: a rotor, a fan or a simple blade (like a bulldozer).
Getting started on the device

If you have a chainsaw and parts from an old car, then you can start designing a snow blower. In order for snow clearing to be carried out efficiently, it is better to work a little and make a rotary apparatus. It is known from practice that units of this type are superior in efficiency to machines of other types.
In order to make a snow blower, you will first need a chainsaw, for example “Druzhba” or “Ural”. You also need tools and parts, the list of which is given below. It is not recommended to make a complex device: a homemade snow blower must have high maintainability, that is, if it breaks down, there must be access to any of its parts. Return to contents
Rotary snow blower made from a chainsaw
This device works as follows:
- A moving auger, which has two input turns, moves the snow mass to the blade.
- During operation, this part throws snow to the side through a pipe.
Such a device is capable of capturing layers to be removed over an area of 50 x 40 cm. If you need to increase the productivity of the unit, you can slightly increase the size of the rotor (by 30%) and make corresponding changes to other parts. The assembly technology is as follows:

- A box of the required size must be welded from a sheet of iron or steel. They should be chosen so that the box is larger than the calm. If this is not done, then during operation the machine will rumble due to friction of parts.
- A hole 16 cm in diameter is made in the box. It is needed to remove the pipe. If you make a lead of a smaller caliber, it may become clogged during operation.
- For the auger shaft, you can use a ready-made steel pipe, which you buy at construction market. Tubes of the front pillars from a passenger car, for example, a VAZ 2210, are also suitable. You need to weld two blades (metal) measuring 14 x 10 cm onto it. On both sides, next to them, screw 2 blades, which are made in the form of a spiral with two links. They can be purchased on the construction market or made from a sheet of steel 2-3 mm thick.
- The shaft must be made composite, of two halves. It can also be made from corners that are welded along the fold line. but using cut pipe gives better results.
- The finished auger must be installed on bearings of the appropriate diameter.
- All moving parts should be located under removable elements, which will make it easier to clean the mechanisms after finishing work.
- The main, driving auger and motor are electric, so to protect them, the rotor must rotate in sealed bearings.
- The blades must be installed in the pipe hole, and the auger in the box. Now they are connected by an asterisk, which can be removed from the bicycle
- Now you need to connect the resulting device to a gasoline saw. When carrying out this operation, you cannot rush - you need to correctly calculate the gaps.
- The main frame is being welded. An electric motor is installed on it using channels and bolts and connected by a chain to the auger sprocket. Then attach a gasoline saw to the base. The terminals of its generator are connected to the electric motor. You can also make a direct output from the chainsaw - then its sprocket must be connected by a chain to the gearbox, which, in turn, is connected by a chain drive to the auger shaft. The choice depends on the person working on the device and the ability to purchase or obtain the necessary parts.
- Sidewalls made of thick plywood cover all the main mechanisms of the device. A chipboard sheet 1-1.5 cm thick is suitable for this.
- Align the auger, check with your hand that the shaft and blades rotate easily in the pipe hole.
- You can install a homemade snow blower on wheels, but they can get stuck in deep snow. Therefore, it is best to install the unit on skis. They are made from two pieces of wood and secured to the sides of the apparatus. To make them glide better, you need to put thick plastic pads on the boards. They are made from electrical wiring boxes.
- Now we need to take care of appearance made unit. It can be painted in any desired color.
- After this, you need to install the pipe in place and pour gasoline into the tank. The apparatus is activated and, slowly bringing it to the snowdrift, the auger is allowed to enter deep into the snow mass. Snow dust should fly out of the pipe to the side.
- If everything is in order, then you can start clearing the road of snow drifts.
Devices for snow removal are quite in demand today. They may differ in their design and the way the work is performed. If you wish, you can make a snow blower with your own hands from a chainsaw; such a machine will do an excellent job of clearing paths.
Design and operating principle
To make a snow blower, you must first complete the diagrams of the components and make calculations. The frame and body are made from a used chainsaw. It must have a working motor, and the more powerful it is, the more productive the snow blower will be. In addition to the motor, the frame needs to be welded for the device. To make the unit move itself, it can be equipped with a drive and wheels can be installed. It would be better to make skis from below. Then the chainsaw snow blower can be pushed and it will go through the snow.

The body is made from metal sheet. The auger scoops up snow using discs, crushes it, and then two blades push the mass through the sleeve through rotation. You can equip homemade snow blowers with a rotary attachment. Then they will function like a vacuum cleaner.
The rotor is made of wings with welded blades. The nozzle is placed in the housing, and then attached to the back of the screw mechanism assembly. As the rotor rotates, it sucks in snow that comes from the auger. Then, with the air flow, the snow comes out through the sleeve. The driver regulates the snow release with a visor located on the sleeve. For ease of use, you can make a device that can be rotated.
Preparation of tools and materials
Materials and tools:
- metal pipes;
- bearings;
- aluminum pipes;
- Metal sheet;
- chainsaw engine;
- welding machine;
- screwdriver

Creating a Snow Blower Frame and Auger
To make a snow blower from a chainsaw, you first need to make a frame and an auger. The operation of the entire structure depends on the strength of the frame, since other systems are welded to it. It is necessary to use pipes of the same width.
In the territory Russian Federation falls in winter a large number of snow. In some places the precipitation reaches a height of a meter or more. It is in such conditions that a snow blower is simply an irreplaceable thing. The market offers a wide range snow removal equipment different power household and semi-professional types. However, not everyone will be able to allocate a sufficient amount of money to purchase expensive foreign cars. One of the options for receiving snow blower can be homemade version made from a chainsaw.
How to assemble a snow blower with your own hands?
Having understood the design of snow blowers and familiarized yourself with the drawings from the Internet, you can build a snow blower with your own hands using a chainsaw. Even a beginner can easily master this homemade product. Having a number of necessary components, tools and spare parts on hand, you can construct a homemade snow blower.
The only difficulty you may encounter is finding a power unit. However, any motor of domestic or foreign chainsaws is suitable for these purposes. On forums and on many websites you can find various schemes and drawings that show what components are needed and how to connect them together.
Choosing a chainsaw for a homemade snow blower
The power and performance of a snow blower directly depends on the engine you choose. This main element is removed from the chainsaw. The higher the power of the saw, the better. The engines in household models are two-stroke, power varies from 2 to 10 horsepower. For a homemade snow blower, 5 horsepower will be quite enough. Below we will look at the most popular brands of chainsaws that are often used for homemade snow blowers.
Chainsaw “Friendship”
This chainsaw was developed during the USSR, in 1950, after which it began to be produced en masse in the Soviet Union. Since then, the technical indicators and characteristics of the saw have become significantly outdated. The weight of the unit is 12 kg, in addition, the saw has large dimensions. Experienced owners say that the first saws, which were assembled in the first decade of the plant’s existence, still work properly.
However, chainsaws produced after 1990 are characterized by frequent defects, regular breakdowns, malfunctions and a short service life.
Gasoline saw “Ural”
Another representative of the domestic production of chainsaws. “Ural” tools can be called a kind of improvement on “Druzhba” saws. With the same weight, the Ural has more power from a two-stroke gasoline engine (5.5 horsepower) and smaller dimensions. In this regard, the performance of these devices is much higher.
German chainsaw “Stihl”
Imported sawing equipment is often much better in quality and performance. Foreign factories, such as the German concern Stihl, always try to produce technological innovations. Of course, this also affects the cost of the equipment. Shtil is one of the most popular companies among the Russian population because it has high power, excellent quality, long service life and a relatively low price.
What does it take to make a snow blower?
Next, using an example, we will look at assembling a snow blower with our own hands based on a Ural chainsaw. The fact is that in this particular chainsaw the inertial clutch in some cases acts as a kind of fuse, protecting the rotor from breakdowns and malfunctions. The equipment motor is equipped with a 1:2 reduction gearbox.
Our goal is to create reliable and productive snow removal equipment with our own hands on a budget.
To do this, we will try to use accessible and cheap materials:
- aluminum and metal pipes;
- metal sheets;
- bearings and fastenings;
- chainsaw motor;
- welding;
- improvised tools.
The assembly process itself is not particularly difficult, so every man could successfully make a snow blower with his own hands at home. You don't need any special skills to do this. If you don’t know how to properly operate some tools, you can watch a couple of video lessons on this topic.
Schemes, drawings and principles of assembling a homemade snow blower
On the Internet, on forums and discussions, you can find many drawings of a snow blower made from a chainsaw with your own hands. In our example, consider the following diagrams:
The engine itself must be placed on the longitudinal axis for reliability and quality of operation. In addition to the motor, use a fuel tank from a Ural chainsaw, securing it to the steering support with two bolts. The control handles can be taken from the motorcycle. To create a bucket, you will need pipes with a square cross-section of 20x20x1.7 mm, from which a frame is designed and covered with a sheet of tin, the thickness of which is at least 0.5 mm.
Below are drawings for assembling the most important part of the snow blower - the auger rotor.
You can make an auger with your own hands from the following parts:
- shaft in the form of a ½ pipe;
- a driven sprocket mounted on the shaft;
- two bearings mounted on the housing;
- rotor wing 30x4 mm;
- rotor blades, 2 pcs;
- auger blades, 8 pcs;
- wings for blades, 4 pcs;
- support corners, 2 pcs.
The blades can be made from duralumin sheet, the thickness of which is 4 mm. Using jigsaws you cut out a kind of horseshoe. You will make the fastening process much easier if you cut them individually rather than as a single piece. Below are drawings of the rotary auger blades.
As described above, when creating blades, it is better to cut them separately, in the form of horseshoes, and attach them to the shaft. However, some users cut out rings from a metal sheet using a grinder and a jigsaw, and then stretch them into a spiral with a vice. This method is more effective, but significantly more difficult in terms of physical activity.
Video reviews and lessons on how to make a snow blower
Prices ready-made models snow removal equipment forces many to take up a shovel and clear paths by hand. To mechanize the process with minimal financial costs, you can design a snow blower with your own hands. The first step is to evaluate your own strengths, available materials and equipment. Based on the conditions - select optimal project implementation, develop a drawing, study manufacturing technology and draw up a snowplow assembly plan.
Manufacturing technology of auger snow blower
A manual auger-type snow blower is distinguished by its simple design and the possibility of self-production. To operate the mechanism, it is equipped with an engine from a walk-behind tractor, chainsaw, rotary hammer or drill. The type of engine determines the power supply of the unit: electric or fuel.
Homemade auger-type snow blower
Design and principle of operation of the equipment
Auger snow removal units perform a single-stage intake and discharge of snow. The shape of the snow blower's working mechanism resembles a shaft mechanical meat grinder. The auger is located at the front of the machine; the rotating element is closed on the sides and top by a bucket body.
The monolithic device rotates around its axis, grinds the snow and transfers it inside the equipment, and then throws it into the distance through a bucket. To improve the removal of compacted snow and ice, the snow blower is additionally equipped with a knife or augers with a serrated edge are used.
In addition to the rotating shaft, the homemade snow blower is equipped with:
- engine;
- outlet chute;
- box;
- wheels or tracks;
- handle for movement.

Construction of auger snow blower
Preparation of tools and materials
Before you make a snow blower with your own hands, you need to draw up a drawing, calculate the consumption of materials and prepare the tools.
To make small snow removal equipment with a working width of 50 cm, you can use the engine from an existing walk-behind tractor. It can be replaced with any engine with a power of about 1 kW. To create the remaining components you will need:
- The auger body is roofing sheet iron, the sides are thick plywood 1 cm thick.
- The design of the auger, as can be seen from the do-it-yourself snow blower drawing, includes the following elements:
- the central axis is a metal pipe with a diameter of ¾ inches;
- spatula – metal plate 12*27 cm;
- two-way screw rotation system - conveyor belt or sheet metal;
- sealed bearings 205;
- auger drive – belt or chain.
- Frame – metal corners 5*5 cm, crossbars – corners 2.5*2.5 cm.
- Platform for engine installation – metal corners 5*5 cm.
- Snow chute – sewer PVC pipe with a diameter of 16 cm.
- Ski track – wooden beams with plastic covers.
- The control handle is a half-inch metal pipe.
- The transverse corners and the handle are fastened with M8 bolts.

Assembly diagram for auger snow blower
Tools you will need:
- welding machine;
- drill and grinder for metal;
- hammer and square;
- jigsaw or saw;
- metal clamps.

Schematic illustration of a snow blower frame
Creating a Snow Blower Frame and Auger
The frame itself resembles a regular sled - all structural elements are placed on two runners. To save time, you can use an old sled with a metal frame.
Making a homemade frame with dimensions of 70*48 cm:
- According to the drawing, prepare parts of the required length from the corners.
- Connect them together and weld them.
- Make holes in the side posts for mounting the bucket, handle and wheels.
The technology for creating a snow blower auger with your own hands is more complex. The blades of the working element can be made from old tire, conveyor belt or sheet metal. The latter option is more reliable and provides better cleaning snow.
Important! The double-sided blades should be angled toward the center, allowing rotational energy to be converted into linear energy. The blades rotate and push the snow masses in a straight line towards the bucket.

Making a blade from a tire
The general algorithm for creating a screw does not depend on the material used:
- Cut 4 circles from metal, the diameter of which is less than the semicircle of the bucket. According to the example under consideration, the diameter of the rings is 28 cm.
- In the center of the circles, cut holes corresponding to the diameter of the axle, that is, ¾ inches.
- Cut each circle on one side and stretch it, forming a spiral.
- Weld a metal plate in the center of the auger shaft. This paddle will feed the snow to the bucket.
- Weld the prepared spirals to the shaft.
- Attach a sprocket or pulley to one side of the shaft - the choice depends on the type of drive (chain or belt, respectively).
- Put on the drive and install the bearings.
The next stage is making the bucket:
- Bend a sheet of sheet metal 50 cm wide into a semicircle, the diameter of the arc is 30 cm.
- Cut out the sides of the plywood and prepare holes for the shaft in them.
- Connect the bucket parts, move the installed bearings to the end walls and attach them.

Attaching the auger shaft to the bucket
Assembling the structure and starting the unit
To put a self-made snow blower into operation, you need to assemble the structure together:


- Attach the finished bucket with the auger to the “sleigh”.
- Install the engine by putting the drive, which is removed from the auger, onto the pulley or sprocket from it.
- Attach a handle to the frame and display engine controls on its panel.

Ready unit before start-up
Before starting, it is necessary to check the strength of the welds, the reliability of the fastenings and the movement of the blades - they must rotate freely.
Video: DIY snow blower based on a walk-behind tractor engine.
Making a snow blower attachment for a walk-behind tractor
IN winter time year, the walk-behind tractor can be converted to use as snow removal equipment. You don't have to buy expensive attachments for this. Having experience working with metal, you will be able to independently transform the walk-behind tractor into an effective snow blower.

Design of an auger-rotary snow blower
Rotary mounted “snow blower” for walk-behind tractor
Rotary nozzle - a two-stage model, the most complex in self-production. A snow blower for a walk-behind tractor of this type consists of two working elements: an auger and a screw. Rotating auger blades transfer snow masses to a high-speed impeller, where they are further crushed and thrown through a bucket. This principle of operation increases the productivity of the equipment and the range of snow throw (up to 12 m).

Rotor shaft diagram
The entire creation process is divided into two stages:
- Manufacturing a bucket with a working mechanism.
- Connection between walk-behind tractor and snow blower.

Drawing of a rotary snow blower: side view
Sequence of manufacturing a rotary canopy:
- According to the drawings of a snow blower for a walk-behind tractor, prepare the parts of the box, drum for the rotor and pipes from sheet metal.
- Make a casing from metal 1.5-2 mm thick to accommodate the auger. The bucket is assembled from a curved central part and end cheeks. Cut holes on the sides for the auger shaft. The impeller casing will also serve as a support for the drum and rotor.
- Make a screw shaft.
- Cut 8 half-disks from 2 mm thick steel.
- Weld the spiral augers to the metal pipe.
- Place the shaft with the augers on ball bearings 203.
- Creating and attaching the rotor:
- As a drum, you can use a 20 liter aluminum boiler or a metal cylinder made of sheet metal.
- Connect the prepared drum to the snow blower body.
- The rotor is assembled by welding from profiled metal strips, a disk, a shaft and bearings, as shown in the diagram.

Rotor assembly diagram
Designations:
- 1 – side;
- 2 – rotor disk;
- 3 – stiffener;
- 4 – bushing;
- 5 – glass;
- 6 – ball bearing;
- 7 – cover;
- 8 – pulley;
- 9 – rotor shaft;
- 10 – bolt fastening;
- 11 – ring;
- 12 – screw connection;
- 13 – drum – rotor housing.

Homemade rotor for a snow blower
The design of a self-made rotary snow blower is attached to the walk-behind tractor using a profile and a bolted angle. The torque is recreated through a V-belt connection. The A-100 belt is suitable for this purpose.

Connection of walk-behind tractor and snow removal attachment
Creating a bulldozer-type blade
It is much easier to manufacture a bulldozer-type blade or a snow shovel for a walk-behind tractor. The homemade unit operates in three positions: forward, left and right at a slope of 30°.
To create a blade with a working width of 850 cm you will need:
- steel barrel 200 l;
- square pipe with a cross section of 4*4 cm - 85 cm;
- iron sheet 3 mm thick, size 85*10 cm;
- M8, M10 and M12 bolts, nuts and washers;
- tools for working with metal (welding machine, grinder, pliers, etc.).

“Cut” the barrels into three segments
Work order:
- Cut off the bottom and lid from the barrel.
- Cut the resulting cylinder into three equal segments.
- Fold the two segments together and weld around the perimeter - a rigid sheet 3 mm thick is formed.
- To strengthen the lower part of the blade, attach a knife - a strip of steel 5 mm thick. The cutter fixation step is 10 cm. homemade knife put on rubber gaskets.
- Weld a 40*40 mm pipe along the center of the dump.
- Fix a semicircle of thick-walled metal sheet to the pipe by welding. Make three holes in the installed arc, allowing you to change the direction of the shovel.
- Make an L-shaped holder from a pipe with a cross-section of 40*40 mm. One end is bolted to the frame with holes on the blade, and the other to the walk-behind tractor.

Ready dump from a barrel
How to make a snow blower from a chainsaw
Chainsaw snow blower with power up to 7 hp. With. easy to manufacture and manage. Below is an example of making a snow plow based on the Ural 2T saw. Its feature is the presence of an inertial clutch, which acts as a fuse if a foreign object gets into the rotor.

Gasoline snow blower equipment
Equipment and drawings of homemade equipment
The snow blower has the following standard equipment:
- motor – installed on the longitudinal axis to avoid distortions during operation;
- gas tank from Ural - mounted on the steering support;
- frame – made of pipes with a cross section of 20*20 mm;
- ladle – body made of metal pipe 10*10 mm, casing – galvanized sheet with a thickness of 1.5 mm;
- auger-rotor shaft, consisting of a pipe, rotor (2 mm thick steel) and auger blades (4 mm thick duralumin sheet);
- assembly with bearings.
Drawings of a chainsaw snow blower clearly demonstrate the structure and assembly diagram with your own hands.

Drawings of a snowplow based on a chainsaw
Assembly sequence for a gasoline model
Stage 1. Creating the frame and bucket:
- From metal pipes weld the frame following the given drawing.
- Cover the bucket with galvanized sheeting, fixing it to the frame with aluminum rivets with a diameter of 5 mm.
- Weld a metal plate with a thickness of 4 mm and dimensions of 60 * 4 cm along the bottom of the ladle.
- Rivet a polyethylene strip to the installed plate.

Assembly diagram of the rotary screw shaft
Stage 2. Manufacturing of the rotary screw shaft:
- Familiarize yourself with the design of the shaft and prepare its components:
- pipe section 568 mm long;
- sealed bearings 40*16*16 mm;
- 12 steel blades;
- two rotor blades 115 mm wide.
- Weld steel tips to the ends of the pipe on which the bearings will be fixed.
- Attach two 4 mm thick metal corners measuring 25*25 mm to the frame with bolts.
- Install a sprocket with 33 teeth located at 12.7 pitches on the shaft.
- Weld the screw blades in pairs to the shaft at a distance of 96 mm, maintaining the symmetry of their location.
- Secure the half-blades with bolts to the “wings” of the auger.
- Install the rotor blades.
Stage 3. Engine installation:
- In the engine, replace the drive sprocket of the gearbox with a cardan transmission.
- Install the removed sprocket on the driveshaft at the end of the second bend.
- Attach the housing to the frame with bolts using angles.
Stage 4. Installation of wheels:
- Make an axle from a pipe with a diameter of 26 mm and a length of 55 cm.
- Weld trunnions with a diameter of 20 mm along the edges of the axle.
- Fix the wheels with built-in bearings - wheels from a regular cart will do.

Chainsaw-based snow blower
Additionally, the device can be equipped with a folding sleeve that will regulate the direction of the snow.
Modification of a trimmer for a snow blower
You can make your own electric snow blower from a grass trimmer. A unit with the engine located on top is optimal. An electric motor with a power of 1.6 kW is enough for the “snow blower” to throw snow masses 3-4 meters.
Considering design feature electric engine, the snow removal mechanism can be made rotary - without installing a screw shaft. Interesting option working chamber-bucket - use of a ventilation “snail”. Snow will be thrown out through the existing socket. The size of the installation allows it to be controlled manually.
The rotor is made of four metal blades, the length of which must correspond to the diameter of the base of the “snail”. The trimmer gearbox is installed in an improvised bucket, and a rotary mechanism is attached in place of the blade from the brush cutter.
Important! When creating a snow blower from a trimmer, special attention should be paid to the power wire. The cable must be of sufficient length and high quality - it will have to be aggressive conditions operation.

Electric snow blower
Design features of an electric snow blower:
- optimal electric motor power – 2.2 kW;
- The power unit must be protected from snow and water - otherwise there is a high probability short circuit;
- the engine should be placed above the snow removal level;
- The wire must withstand cold down to – 60°C.
Making a snow blower with your own hands - not an easy task. If technical knowledge and design experience are insufficient, then it is better not to take on such work. However, if you have the skills to weld and create metal products, you can make a practical and economical unit.
This year, we have had quite a lot of snow in the Altai Territory since the fall, in almost a couple of weeks. Apparently the winter will be snowy, so don’t throw it. It’s good that last year I assembled a small but reliable snow blower with an engine from an old chainsaw. In the spring I only had time to test it: it proved itself to be, in general, quite good, although not without its shortcomings. Based on the experience of using it, I made some changes to it in the summer and now I present it to your readers.
The power unit is from an old Ural-2T chainsaw. This motor was used because it is light and quite powerful (5 hp), and also has a 1:2 reduction gearbox and an inertial clutch. This clutch engages whenever a foreign object enters the rotor, and it disengages the transmission without damage. And also the motor can be easily removed and used for its intended purpose (or on a lawn mower, scythe, etc., say in the summer, when the snow blower is not used in any way). The mountings of the power unit on the frame allow you to use the engine from the Druzhba chainsaw, only the power of this engine is slightly less, which is undesirable. These engines can still be purchased inexpensively today.
I also tried to use a minimum of turned parts, non-scarce materials and spare parts. As a result, the snow blower turned out to be very inexpensive and easy to manufacture.

It was decided to place the motor along the longitudinal axis because shifting the center of gravity to the left or right would lead to a skew of the gripping bucket in the horizontal plane. And then, having sung or on the right, there would have been an unfinished trace from under. And this placement also eliminates steering 8 in one direction or another. Although this placement led to the use additional details transmission, but the snow blower in this form looks more organic. Which in itself is also important!
The gas tank is a standard one, from a Ural-2T chainsaw with a volume of 1.6 liters, and is attached with two bolts to the steering support, which has two mounting eyes for this purpose. The gas handle (throttle control) is used from a Ural motorcycle.
The snow blower actually does not have a frame, or it can be called a combined one - a pair of levers with a steering cross member welded to the bucket frame.
Almost the entire frame is welded from square pipes of 20*20*1.7 mm, with the exception of the upper part of the bucket. A square pipe measuring 10*10*1.7 mm was used there. The bucket is “covered” with galvanized sheet metal 0.5 mm thick, the sheet of which is riveted to the frame with aluminum rivets with a diameter of 5 mm. The frame design uses a metal plate 600*40*4 mm, it is welded at the bottom of the bucket. And a polyethylene strip measuring 600*60*5 mm is riveted to it. This was done for better sliding of the bucket along the surface being cleaned (mainly on paving slabs).

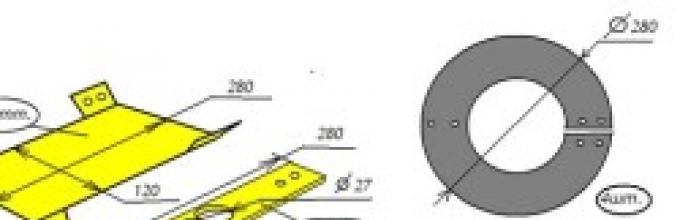
Rotor-auger with strip-wings without blades

Rotor-screw assembly:
1 - shaft (1/2" pipe); 2 - driven sprocket of the rotor-auger shaft (z=33); 3 - support bearing in the housing (2 pcs.); 4 - rotor wing (metal plate 30x4); 5 - blade rotor (2 pcs.); 6 - auger blade (8 pcs.); 7 - auger blade wing (4 pcs.); 8 support angle (2 pcs.)
The working body consists of a shaft on which two counter-directed screws and a rotor are placed. The shaft is made of water pipe diameter 22*2 mm and length 568 mm. Steel tips are inserted and welded into the ends of the pipe - trunnions for support bearings. The screw rotor is mounted on two support bearings in housings. Bearings with dimensions 40*16*16 mm - closed type, ball. The bodies are cylindrical, machined from steel and each welded to its own piece of metal corner 25*25*4 mm, which is screwed to the bucket frame with two M8*40 mm bolts and nuts.
A driven sprocket is also installed on the auger and rotor shaft; it is secured with four M6*30 mm bolts and nuts to a flange welded to the shaft. This sprocket has 33 teeth for a chain drive with a pitch of 12.7. The chain is used from the Ant motorcycle. I would like to draw your attention to the fact that the chain drive is installed inside the bucket body for the purpose of: firstly, to hide the moving chain with the sprocket, and secondly, given the dimensions of the snow blower, the bucket will have a larger snow-covering width, and thirdly, there will be fewer dead zones at the bucket (places from which it is impossible to capture snow, or limiting it). Twelve steel wing strips are welded to the shaft for attaching the auger blades and rotor.
The auger blades are made of 4 mm thick duralumin sheet. They are composite. Each part (in the shape of a horseshoe - to save material) is cut out with a jigsaw. This design of the blades simplifies their fastening, as well as replacement in case of breakdown. The blades have teeth cut into them to cut through dense snow. The “horseshoes” are secured to the auger wings with MB threaded bolts and nuts. The protruding parts of the screws are cut off and riveted so that they do not catch on anything and do not unwind. A duralumin sheet was used specifically to facilitate the rotating structure of the rotor-screw. Operation has shown that the 4-mm duralumin sheet provides sufficient strength.

Snow blower chassis (frame with engine and wheels):
1 - gas tank; 2 - engine; 3 - wheel; 4 - cardan shaft; 5 - bearing unit; 6 - drive sprocket (z-17)
The rotor blades (there are two of them) are made of stainless steel sheet 2 mm thick. I didn’t use it on purpose, but because I didn’t have a simple steel sheet of the required thickness at hand, and I ran out of duralumin sheet. The rotor blades are screwed, if possible, at the same distance from the shaft to eliminate runout during rotation. It is necessary to manually balance the rotor by placing it on the bearings. But if the wings and blades of the auger rotor are installed the same size and identical, then nothing will have to be balanced. But you still need to check.
The drive chain can be tightened or loosened by installing the auger-rotor shaft on the frame closer or further from the drive sprocket.
A cardan transmission is installed in place of the drive sprocket of the chainsaw engine gearbox. It connects the gearbox to the driving 17-tooth chain sprocket (with a pitch of 12.7 mm). The drive sprocket is installed at the end of the second bend of the propeller shaft. The driveshaft itself rests on two sealed ball bearings measuring 40*16*17 mm, installed in housings. The bodies are machined from steel and welded to corners measuring 40*40*4 mm and 120 mm long, which are attached to the frame using two threaded bolts M 10*40 mm with nuts.
Wheels measuring 3.25*8 inches with bearings built into the disc hub, used from Chinese wheelbarrows. The wheels are mounted on a tubular axle made from a water pipe with a diameter of 26 mm and a length of 550 mm. At the ends of the pipe, two axles with an outer diameter of 20 mm are welded, on which the wheels are directly installed and secured to them with two M10x30 mm bolts. I installed these wheels this winter (at first they were of a smaller diameter). These wheels are more convenient to use, as they have a larger diameter and width and do not sink so much in the snow. However, the quality of the rubber leaves much to be desired.
They haven’t started making wheel drive yet, and I think that’s right. Since the snow blower is lightweight and there will be little traction with the ground.
When working, if you come across a dense area with compacted snow, you need a lot of traction. But you can’t create it even with good tires, and you can’t install steel lugs - you’ll ruin it paving slabs. But there is a way out: with increased resistance to movement, you need to rest one foot on the wheel axle and push the snow blower. In this way, I can clear a meter-high (depth) snowdrift without any problems.

At first there was also a sleeve on the bucket that directed the snow to the side, but I abandoned it, since wet and sticky snow got stuck in it. And the sleeve also contributed to the creation of snowdrifts, and this led to snow retention. And when working, the sleeve did not save me from snow flying in my face. Fine snow dust is driven by the wind in the appropriate direction. Without a sleeve, snow from the rotor, rotating at high speeds, is thrown high up and forward and sprayed. Since the air is constantly moving, even when there seems to be no wind, snow dust falls neatly nearby. And if the wind blows, it generally carries it far away. At low, idle engine speeds, the snow is not sprayed so much and it is denser, flies out and lies in front. This is necessary to work in any “corridor”.
In general, the snow blower turned out to be small in size; lightweight - its weight was only 35 kg; economical - consumes little fuel - one liter of gasoline is enough to clear a fairly large area, and most importantly, quite productive and easy to use.
Total consumption of basic materials:
Square pipe 20x20*1 mm - 7.8 m. Square pipe 10*10x1.5 mm - 0.6 m. Pipe with a diameter of 22x1.7 mm - 0.6 m; pipe with a diameter of 26x1.7 mm - 0.55 m. Steel pipe with a section of 40x4 mm - 1.2 m; cross section 30x4 mm - 1.8 m. Half a sheet standard sizes galvanized sheet. A gasoline engine, two wheels and a few other things.
And among the identified shortcomings: this is a manual portable starter, which is inconvenient to carry with you all the time.
D. Slonov, Altai region


