
The design of the plasterboard ceiling can be any, have different shapes– straight, curved, round, oval. In any interior style, plasterboard ceilings will be appropriate and will allow you to decide whole line both technical and aesthetic tasks.

Design of plasterboard ceilings in the kitchen
Before you start designing plasterboard construction, it is necessary to take into account a number technical specifications. For example, equipping a work area with a hood requires an air duct above it, and this must be provided for. If you plan to build in lamps, the distance between the ceilings and the drywall should be selected taking into account the size of these lamps.
The work begins with assessing the size of the room and the shape of the ceiling. Then the number of levels and their location are determined depending on the chosen style and functionality. Next, choose the color and method by which the ceiling surface will be finished. The final stage of work on the design of plasterboard ceilings in the kitchen is the selection of lighting fixtures and decorative elements.


When choosing a color you should be guided by general rules design:
- Best used in small spaces bright hues;
- In spacious kitchens, rich dark shades are acceptable;
- Pastel colors will suit almost any interior style and add coziness;
- Bright, harsh colors can have a negative impact on your well-being and mood.
Tip: If you want to emphasize visual zoning, follow suspended ceiling from plasterboard in the kitchen at different levels - above each of the zones at its own height. Spotlights mounted in the ceiling along the border separating different heights will enhance the effect.


This is the most simple design, suitable for any room. Its surface can be plastered and painted - and in this case the ceiling will not differ in appearance from the traditional one, while retaining all its advantages.
You can remove communications, wiring or install lamps under the ceiling. At the same time, the visual zoning of the kitchen can be emphasized by using a different color or different texture over different zones. For example, the ceiling above the dining table can be light, and above the work area it can be of a richer color. This will draw attention to the dining area and ensure its dominance in the interior.


A plasterboard ceiling in the kitchen will also help to emphasize the definition of zones if you install lamps in it along the boundaries of these zones. Directed downwards, the light will create a kind of “light curtain”, effectively highlighting one or another part of the room.
You can turn a simple ceiling into a masterpiece if you decorate it with three-dimensional drawings. You can create them yourself - and it’s not difficult. Having applied the selected pattern to the surface, use liquid paper to draw it and dry it. After this, the sheets of drywall are strengthened in the selected places and painted in the usual way.

The design, made on two levels, often provides more possibilities to obtain a spectacular interior or solve technical problems that arise when renovating such a complex room as a kitchen. The protruding parts will hide large communication elements, for example, air ducts, or large recessed lamps.
The combination of parts of different heights will add volume and allow you to solve interior problems. Higher parts of the structure are often located in work area kitchens or in the center. They can have very different shapes, depending on the chosen design. Often, plasterboard ceilings in the kitchen combine oval and rectangular elements. There are also combinations of plasterboard elements with stretch ceilings. This diversifies the interior and adds a “zest” to it.


If elements of a plasterboard structure are used, located in three or more levels, such a ceiling is called multi-level. More often it is used in spacious kitchens with high ceilings - from three meters or more.
This is especially true in cases where the ceiling height exceeds four meters, which is usually for apartments of old construction, especially “Stalinist ones”. Not too large in area, but having a significant height, such rooms look disproportionate, and a multi-level ceiling allows you to correct the proportions and make the room more comfortable.


Such ceilings can hide large differences in heights ceiling, significant defects in it, and also remove ceiling beams or ventilation ducts from view. With their help, you can place accents, for example, to emphasize the exclusivity of kitchen furniture.


Plasterboard ceiling in the kitchen: pros and cons
There are many advantages to plasterboard structures; we list the main ones:
- Hide wiring and communications;
- Remove unevenness and defects in ceilings;
- Help to implement visual zoning;
- Give individuality to the interior;
- Allows the installation of point ceiling lamps flush with the ceiling;
- Provide additional sound insulation;
- Do not change when the building settles, do not crack;
- Provide unlimited design possibilities.
In addition to the obvious advantages, there are also disadvantages, and they must be taken into account when deciding on finishing the ceiling.
- When installing a plasterboard structure, 7 cm of height is lost;
- Installation requires skills and is carried out by specialists;
- Over time, the joints between drywall boards may crack.


Well-chosen lighting schemes can completely change a room, make it more spacious, highlight individual parts, and focus attention on the main areas. Spotlights, which can be mounted in the ceiling, can serve as main lighting or be directed to specific places in the room.


An interesting option is cornice ceiling lighting. In this option, the cornice is glued to the wall with a distance of a few centimeters from the ceiling, and behind it is laid LED Strip Light. The power and color of this backlight may vary. The illuminated ceiling seems higher, and the room itself acquires additional volume. Directional light from built-in sources can create an interesting play of light and shadow that transforms the interior.


The small size of the kitchen space cannot be an obstacle to the use of plasterboard ceiling structures. You just need to choose the right type and design.
- If the kitchen height is small, choose a single-level ceiling - it will “eat up” less centimeters, which are already counting.
- A thoughtful lighting scheme, as well as the use of cornice lighting, will help to complicate a single-level ceiling and make it more impressive.
- Light colors for painting the ceiling will help to visually enlarge the room.
- The use of glossy textures on the ceiling will visually increase the volume of the room.
Tip: If the height of the kitchen is small, but you want to have a ceiling on two levels, add a wide decorative cornice to the usual single-level ceiling, placing it slightly below the main level. Lighting placed behind the cornice will help create the necessary impression.


Plasterboard structures help to quickly, cleanly and beautifully correct all the shortcomings of the old ceiling, and it will cost relatively little. But a suspended plasterboard ceiling in the kitchen must be designed taking into account all the features of the room: humidity, lighting, geometry, and disadvantages of the ceiling slabs. Want to know everything about it? Read the article!

An undeniable advantage of gypsum boards is that the unusual geometry of the suspended structure will emphasize the features of the chosen interior style and help visually divide the room into several functional zones.
Why gypsum board

When choosing a material for finishing the ceiling in the kitchen, you need to take into account several important parameters:
- It is in the kitchen that good ventilation is important, and especially in the studio kitchen. Stretch ceilings are made of a thin and durable film that completely blocks the movement of moist air vapor. As a result, tiny drops settle on the ceiling. Drywall “breathes”, providing an ideal microclimate in the room.

If you like film ceilings, there is an alternative. You can decorate a plasterboard ceiling with self-adhesive bright patterns and patterns made from film; it will be cheaper than a stretch coating, and the effect is no worse.
- Film sheets impose certain requirements on the power and quality of light bulbs. For incandescent lamps - no higher than 60 W, and for halogen lamps - 35 W. I love bright light in the kitchen, these requirements stopped me from ordering suspended ceilings.

- Drywall is stronger and more difficult to damage or tear. And although stretch ceilings are positioned as resistant, they are very easy to tear when washed.
- The gypsum plasterboard construction allows you to create a spacious niche in the corner of the kitchen and reliably hide all communications.

- For private houses, gypsum plasterboard is preferable, as it additionally retains heat in the room and promotes high-quality ventilation kitchens.
An additional plus is that a plasterboard suspended ceiling can be placed anywhere, for example, doors can be built for access and maintenance of communications. This cannot be done with suspended ceilings.

The biggest advantage of plasterboard is the price; the cost of such ceilings is 40 to 50 percent lower than suspended ceilings. But this is if you take high-quality film coatings, and not counterfeit ones.
Kitchen Design Ideas

If placed correctly, plasterboard ceilings in the kitchen will help organize the space effectively and conveniently. How to do it?
Idea one - multi-level ceiling

For a studio kitchen, a multi-level ceiling option is suitable, as it will help visually delimit the space of the working and dining areas. If the room is less than 10 square meters, then you can choose a two-level option, with curved lines and lighting from halogen bulbs along the edge of the wave.

The disadvantage of complex multi-level ceilings is that they do not look good in rooms with a height below 2m30 cm. It should be taken into account that one level is approximately 5–8 cm in height. Therefore, designers recommend designing the second level of the suspended structure from the corner to the center, in sectors, as can be seen in the photo.

Another option for low rooms is a combination of hemmed and suspended structures. Some of the plasterboard panels are attached directly to the ceiling, and the second level is installed on hangers.
The advantage of this installation is high-quality insulation and excellent sound insulation.
Idea two - ceiling partition

Designs in the form of a narrow partition of original geometry that can be lowered from the ceiling look beautiful. But it is not necessary for such a partition to reach the floor; you can effectively divide the room into several functional zones and, using small arches or partitions, half the height of the room.

With the help of curved lines and contrasting colors, it is possible to make even a small room much more spacious, without losing comfort and functionality.

Another advantage of plasterboard ceilings is the ability to install any lighting and lighting option.
Idea three – combining colors and textures

Plasterboard ceilings in the kitchen can be covered with any finishing option - plaster, plastic lining, film. Therefore, it is possible to effectively combine several materials of different colors and textures, creating an exclusive and unique design.

Due to the fact that structures of any shape can be created from gypsum board sheets, the possibilities of exclusive kitchen interior design are limited only by the imagination of the apartment owner.

The combination of glossy and textured surfaces, stylized as torn stone or marble, which will decorate the kitchen dining area, looks beautiful.
Idea four - spacious mezzanine niches

If you make the ceiling box around the perimeter of the kitchen wider, then you can not only hide all communications in it (ventilation, pipes and electrics), but also create a comfortable, roomy niche.
You can also order comfortable shelves made of plaster, which will save furniture costs. But, in this case, the guides under the shelves must be mounted on reinforced hangers.

When they installed a suspended ceiling in my kitchen, I asked them to make a box for the microwave. It’s big and doesn’t fit on the shelves in my set. It turned out very convenient and there is no need to order additional brackets.
The sides of this shelf were finished “to look like wild stone”, and glass was used as a door. Looks great. About the same as in the photo above.
Idea five - original arches

Arches from the ceiling are an excellent solution for small spaces. They do not hide the space and divide the kitchen studio into certain zones. Arches are characteristic of different styles interior They will fit perfectly into the Mediterranean style or emphasize the sophistication of a classic interior.

If you make arches from irregular bent lines, this will help create an original design in the modern modern style, which is so fashionable in the coming 2017.
Idea six - combination

Since gypsum plasterboard can be combined with almost all finishing materials, then you can choose interesting mixes of natural and artificial finishes:
- The combination of film ceilings in the center with a gypsum board box around the perimeter will make the kitchen taller.

- Artificially aged wooden beams and plasterboard sheets finished with decorative plaster are an excellent solution for a kitchen in an ethnic style.
- A fashionable and popular combination of mirrored stained glass windows and suspended plasterboard ceilings will create a unique design in a light “flying” style.

- Popular combination of finishes a natural stone"and plaster looks very impressive, but is only suitable for large areas.

- A colored stained glass window in the center with beautiful lighting will become the center of the composition and a spectacular design for a kitchen in any style.
Due to the fact that plasterboard on hanging boxes can be combined with any modern materials, kitchen decoration can be done at a very reasonable cost. And the result will exceed your wildest expectations.
Rules for combining colors, shapes and lighting

The design of plasterboard ceilings for the kitchen can be very diverse.
But in order for the design to look harmonious and not cause an overwhelming impression, it is important to follow several rules for the design of any interior:
- It is possible to install any plasterboard structures in private houses only after the building has settled, and this is at least a year for houses made of stone and brick, and up to three years for log houses made of wood.

- Along the edge for small kitchens It is better to choose diffused lighting directed towards the ceiling, so the room looks larger and higher.
- Different lighting will also emphasize the functionality of the kitchen areas. Brighter lighting above the desk spotlights. In the dining area there is soft diffused light using a diode strip.

- For small kitchens, the design instructions recommend using only a fragment of the hanging structure. For example, a beautifully curved petal or a spectacular semi-arch starting at the dining table in the corner and ending in the center of the ceiling.
![]()
- If hanging elements are placed in the corners of the room, the room will appear higher.

- Bent elements of the suspended level, pointed towards the center, will help to visually increase the area.

- The incorrect geometry of the room can be corrected by knowing the characteristics of color and changing the geometry of the space. Dark colors they take away volume, and light ones make the kitchen more spacious. The fragmentary use of dark color concentrates attention. You can effectively combine black and white, which is fashionable this season, to make the kitchen more spacious.

Another advantage of a gypsum board ceiling is that repairs and design changes can be done with your own hands, without spending money on expensive specialists. The simplest option is to perform an even decorative plaster drywall, and then simply paint it at your discretion.
If we stop at textured plaster ceiling, then we must take into account that any textured surfaces conceal the area and it is difficult to update their decor yourself.

Summary
I think I have convinced you that drywall is a universal material that feels great on the ceiling in the kitchen. However, before installing it, you should also watch the video in this article, where there is another portion interesting ideas decor of similar structures. And I invite you to discuss the topic in the comments. I would be glad if you share interesting and inexpensive design ideas.
The kitchen is a special room where the walls, floor and even ceiling are exposed to steam, water, household chemicals, small particles of fat and much more, so the choice of materials for its renovation should be approached with particular care. In this section we will talk about finishing the ceilings in the kitchen with plasterboard.
Gypsum board ceiling in the kitchen: pros and cons
In order to decide whether it is worth making a plasterboard ceiling in the kitchen, let's consider its main characteristics.
| Advantages | Flaws |
| Sufficient strength | Weight: plasterboard ceiling much heavier than, for example, tension |
| Ability to level even the most uneven surfaces | Installation duration |
| The ability to create an original design (multi-level or figured ceilings), including combination with stretch ceilings | Labor intensity of installation of the structure |
| Safety Drywall can be quite fireproof for the kitchen. | Additional work: puttying and gluing seams, priming, painting or other decoration |
| Various finishing options (painting, wallpaper, texturing) | A plasterboard ceiling will reduce the overall height of the room by at least 10-15 cm due to its own thickness and the width of the profile on which it is attached. |
| Different lighting options suit any design ideas | Risks: kitchens have plumbing and sewer pipes, sometimes they connect washing machines, possible flooding by neighbors above. In this case, it is difficult to dry the ceiling; accordingly, even moisture-resistant drywall can become deformed |
| There is no need to first level the ceiling for plasterboard. | The ceiling is not sealed, that is, if your neighbors flood you, there will be a leak |
| In the space between the ceiling and drywall you can hide communications, lay insulation and/or sound insulation | A plasterboard ceiling cannot be washed frequently (except if it is painted with special paint), which is unacceptable in the kitchen. Particles of grease settle on the kitchen ceiling and the surface needs regular maintenance. |
What to finish with?
Perhaps the most famous drywall belongs to the Knauf brand. Optimal thickness plasterboard for the ceiling - 9.5 mm.
Today we have to find out how practical plasterboard ceilings are for the kitchen. We will weigh the pros and cons of the solution, and also get acquainted with the features of constructing gypsum plasterboard structures in a damp room with a high probability of contamination of the ceiling and walls. So let's get started.
Grade
First of all, we need to decide how appropriate a plasterboard ceiling is in the kitchen.
pros
- The suspended structure allows you to hide differences between floor slabs, traces of flooding by neighbors and other ceiling defects. The size of the irregularities does not matter: they will all remain invisible to the viewer;

- A plasterboard ceiling in the kitchen does not require foundation preparation. At all. You do not need to strip off old coatings and re-plaster the surface;
- , combined with tension inserts or plaster ceilings;
- Kitchen ceilings made of plasterboard allow you to install built-in lighting. At the same time, GCR, unlike plastic panels or PVC film, is not afraid of significant heating, which allows the use of lamps with inexpensive halogen or incandescent lamps of significant power;

- The plasterboard ceiling in the kitchen allows you to hide the openly laid ventilation duct and other communications (air conditioning lines, local network, horizontal sections of relocated water supply risers, etc.);

- Finally, the gypsum board is attracted by its price: sheet ceiling material 9.5 mm thick and 2.5x1.2 meters in size will cost the buyer about 200 rubles.
However: the costs do not end with the purchase of drywall. In addition, to install the ceiling you will need to purchase a profile, fasteners, putty and other auxiliary materials.
Minuses
They are also there:
- Plasterboard ceilings in the kitchen do not withstand flooding. Meanwhile, the kitchen is one of the rooms where floods are most likely: flooding can be caused by a rag plugging the outlet of a neighbor’s sink or a clogged sewer;

- GCR has a fairly high hygroscopicity (the ability to absorb water). Consistently high humidity can lead to swelling, deformation and loss of mechanical strength of the ceiling;
- Like any suspended ceiling, a plasterboard ceiling in a kitchen will make it lower;
However: the height of the room in the case of the simplest single-level ceiling will decrease by only 4 centimeters. The visual reduction in the volume of the kitchen can be compensated by increasing its illumination and using light colors in the finishing.

- When frying in an open frying pan, splashes of fat can fly over long distances. Including hitting the ceiling. Washing them off a painted surface is a more than trivial task.
Expenses
When installed on a turnkey basis, a single-level plasterboard ceiling in the kitchen will cost the customer at least 800 rubles per square meter. Installing it yourself will reduce costs to 300 rubles/m2.
For comparison:
- The price of a square of stretch vinyl film for turnkey installation starts from 260 rubles;

- Construction from wall panels will cost a little more - 350-400 rubles per square;
- the most expensive on our list: materials for their assembly cost at least 650 rubles per square meter.
conclusions
Plasterboard ceilings in the kitchen are quite appropriate, but with several limitations:
- For the manufacture of lathing or frame, you need to use only and exclusively galvanized profile. A slightly cheaper block is more likely to warp with seasonal and daily fluctuations in humidity in the room;

- The kitchen needs effective supply and exhaust ventilation: in this case, the humidity in it will not be high around the clock. To do this, just install instead of the ventilation grille exhaust fan or install an exhaust hood above the stove;

- For ceiling installation, it is advisable to use moisture-resistant (green) plasterboard(cm. ) . It differs from the one intended for dry rooms (white) by antifungal additives in the gypsum core and a cardboard shell that is resistant to contact with moisture;

- For finishing Washable surfaces must be used(read - paints resistant to wet abrasion based on silicone and acrylic resins).

Materials
What materials will you need to assemble a plasterboard kitchen ceiling with your own hands?
Here is the minimum set required to make a single-level ceiling:
| Image | Description |
|
|
Ceiling gypsum plasterboard (9.5 mm thick) is purchased according to the area of the room with a margin of 10-15%. The excess will go to waste when cutting the sheets. |
|
|
PP profile 27x60 mm is used to assemble the sheathing. The length of the profile should be equal to or slightly exceed one of the kitchen dimensions. The number of PP is calculated for a lathing pitch of 600 mm. |
|
|
The PNP profile 27x28 mm is needed as guides and is responsible for attaching the suspended ceiling to adjacent walls. The total length of the PNP should be equal to the perimeter of the kitchen. |
|
|
Straight hangers are responsible for attaching the sheathing to the ceiling. They are mounted along each guide in increments of 60 cm. |
|
|
Wedge anchors attach hangers to the ceiling and guides to the walls. Unlike dowel-nails, they will securely hold the ceiling structure even in the event of a fire, when plastic dowels may begin to melt. |
|
|
9 mm self-tapping screws are needed to connect PP and PNP profiles to each other and to the hangers. |
|
|
25mm self-tapping screws will secure the gypsum board to the sheathing. |
|
|
Finishing putty with gypsum binder is needed to putty the ceiling after installing the gypsum board. |
|
|
Serpyanka (fiberglass mesh with an adhesive layer on one of the surfaces) is responsible for reinforcing the seams. Without reinforcement, fluctuations in humidity and temperature will lead to the appearance of cracks after just one or two years of use of the finish. |
|
|
Penetrating primer on acrylic base prepares the ceiling for painting. |


Tools
Now let's prepare the tools.
What is needed to install a ceiling in the kitchen with your own hands from plasterboard:
- A hammer drill with a drill for drilling holes for fasteners;
- Metal scissors. We will have to use them to cut the galvanized profile in place;
An important point: it is highly undesirable to use a grinder for cutting. Abrasive cutting results in intense heating of the metal; in this case, a thin layer of low-melting zinc completely burns out in the cut area. In conditions of high humidity, a profile without an anti-corrosion coating begins to quickly rust.

- A screwdriver with a Phillips bit (preferably with a screw-in depth limiter) for assembling the sheathing and covering it with plasterboard;

- Water or laser level and chalk cord for marking;
- Hammer for installation of wedge anchors;
- Long metal ruler, tape measure, pencil and sharp knife for cutting drywall;
- Cord or thread. They will serve as a guide for us when installing the ceiling lathing;
- A bucket and a mixer or a drill with a whisk for preparing putty;
- A grater or sander with abrasive mesh for sanding the ceiling;

- Brush, roller and paint tray for priming and painting.
Technology
So, how to install a plasterboard ceiling with your own hands in the kitchen?
Assembling the sheathing
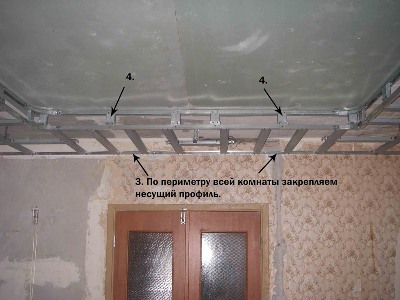
Here's the step-by-step:
- Mark by level. The ceiling line is marked on the walls with a chalk cord. If the ceiling should not hide the built-in lamps, the marking should be 27 mm from the bottom point of the ceiling - the thickness of the PP and PNP profiles;

- Fasten the PNP profile along the marking line. The fastening step is no more than half a meter. PNP is attached end-to-end, without overlaps;
- Mark the sheathing axes on the surface of the ceiling with a pitch of 600 mm and fasten the hangers along the markings with the same pitch;
- Insert PP cut to size into the guides and press them to the ceiling with curved hangers;
- Pull cords or threads between the guides perpendicular to the sheathing;
- Alternately lower the sheathing profiles to the level of the cords and pull the ears of the suspensions to their side walls, then bend the part of the ears protruding beyond the PP profile upward;

- Connect the ends of the PP profiles to the guides with self-tapping screws. The ceiling frame is ready.

Sheathing sheathing
How to fix drywall to the ceiling in the kitchen?
Each sheet is aligned with an edge in the middle of the PP profile and screwed to all sheathing elements covered by it using 25 mm self-tapping screws. The fastening pitch is up to 20 cm.
A few tips that are relevant at this stage of installation:
- Work with an assistant or using supports, clamps, etc. GCR is a fragile material and breaks easily even under its own weight;

- Screw in the fasteners no closer than a couple of centimeters from the edge of the sheet. Otherwise, the edge will crumble;
- The fastener caps must be recessed relative to the surface of the plasterboard sheet, without breaking through the cardboard shell. If you do not have bits with a depth limiter on hand, set the screwdriver ratchet to operate when the head is immersed;

- When cutting gypsum plasterboard with a hacksaw or electric jigsaw A huge amount of dust rises into the air. In order not to breathe it and save yourself from having to do general cleaning throughout the house, drywall should not be sawed, but broken according to cuts previously made with a knife;

- Don’t be afraid to leave a gap of 1-2 centimeters between adjacent sheets. The putty will hide it.
Reinforcement and putty
Tool - two spatulas (10-12 and 30-35 cm wide).

Mixing the putty is done in a wide container with a volume of at least 8-10 liters. The volume of a single portion should allow you to work it out in 30-45 minutes: by this time the plaster begins to set and becomes unsuitable for puttying.
An important point: mix plaster only in a clean container, otherwise the seized lumps will interfere with you and get under the spatula. The gypsum mixture is poured into water and, after a pause of 3-5 minutes for swelling, mixed to a uniform consistency.

The seams between sheets cut to size (read - with rectangular edges) need to be jointed - chamfered - before puttying. Jointing will allow you to fill the seam without cavities in it and reduce the likelihood of cracks.

Then the seam is glued with serpyanka, after which it is tightly filled with putty using cross-shaped movements of a narrow spatula.

The second layer is applied with longitudinal sliding movements of a wide spatula after the first layer has dried and hides the reinforcing material.

Continuous puttying of the entire surface of the flow is necessary only if the reinforcement of the seams is thick. The putty is applied in two layers perpendicular to each other “to tear off” or in one layer of millimeter thickness.

Sanding and priming
How to prepare plasterboard ceilings in the kitchen for painting?
Preparation is carried out in three stages:
- After the plaster has completely dried, the seams or the entire surface of the ceiling are sanded. For grinding, you need bright lighting falling on the surface at an oblique angle: it will highlight all the irregularities with shadows;

- Then the ceiling is vacuumed or brushed to remove dust;
- The last stage of pre-finishing is primer. The primer is applied with a roller or brush in one layer. Its task is to glue remaining dust to the ceiling, reduce the absorption of paint and ensure its strong adhesion to the surface.

Painting
At least a couple of weeks should pass between filling the seams and painting the ceiling: otherwise, the seams will stand out in shade due to the incomplete hydration processes of the gypsum. The paint is applied with a roller in 3-4 layers.
When painting the ceiling, you should follow a few simple rules:
- The junctions with the walls are painted first with a brush;

- The entire surface is painted in one layer in one step. If you take a long pause, you will get a visible thickening of the coating at the border of the dried area;

- Each layer is applied at right angles to the previous one. This way the stripes from the edges of the roller are less noticeable;
- The last layer is applied parallel to the prevailing light. The reason is the same.

Design selection

There are several rules that should be followed when choosing a plasterboard ceiling design:
- Taking into account the dimensions of the room, its height and layout, they decide what the shape and number of levels will be. When making a false ceiling, less sheets, effort and time will be spent. If the area, and most importantly, the height of the room allows, then you can create a two-level ceiling. In spacious rooms, multi-level complex systems will visually make the space more compact;

- The design is influenced by the finishing - complex ceilings cannot be covered with high-quality wallpaper or tiles; such finishing is ideal for flat surfaces, where it will add variety. A complex system can be visually weighed down by a variegated or overly embossed finish. It can be combined - it is important to think through all the nuances;

- The design is influenced appearance and the type of fixtures to be used. It is necessary to think about their number and location in advance. The latter largely depends on the arrangement of furniture and the location of functional areas.
Kitchen area and type of construction - what is the connection?

It was previously noted that the area of the room largely affects the type of hanging system, its color and complexity:
- Kitchen with low ceiling, can visually acquire additional volume due to a single-level light design with sufficient quantity built-in lamps;

- If the room is spacious, but the height does not allow installing a multi-level system, then you can use several shades in the decoration;

- As was previously said, a room that is too spacious will look more comfortable when using a complex multi-tiered system;

- In an open-plan apartment or when combining a kitchen and living room, multi-level systems are used to zone space, highlighting a dining or work area.

Advice. You can visually divide the room into functional segments using built-in lamps, the shape of a protruding volume, or the use of several colors and textures in decoration.
Conclusion
As you can see, even a beginner can easily make a plasterboard ceiling in the kitchen. The attached video will introduce you to the original designs of suspended ceilings and describe in more detail the technology of their installation. Good luck!
Did you know that the ceiling in the kitchen can not only be a decorative element, but also perform certain functions? This part of the room can be made useful and functional if you create it from plasterboard. How to do this, and how can the space under the ceiling structure serve a good purpose in the kitchen?
Why should you install a plasterboard ceiling in the kitchen?
Drywall is construction material, which was invented in the USA in the 19th century. It was invented by Augustin Saket, the owner of a paper factory. Then this canvas was called a construction board and resembled a kind of cake made of plaster and paper. The material was improved by engineer Clarence Utsman, who created the plasterboard as we see and use it now.

On a note! In one sheet of drywall, approximately 91% of the mass is gypsum dihydrate, the remaining 9% is cardboard, starch and surfactant organic matter.


IN Soviet Union Drywall came into use around the 50s of the 20th century and has been used in construction and design since then. The material is simple and easy to use, relatively cheap and not only allows you to finish (level) walls, but is also suitable for making window slopes. It is not surprising that plasterboard began to be used to create ceiling structures, including multi-level and complex ones.


The material has many advantages and that is why it is ideal for making a ceiling in the kitchen.

But plasterboard ceilings also have their drawbacks.
Drywall prices
drywall
- The design “eats” at least 7 cm of the total ceiling height, which is very inconvenient for small kitchens.
- Installing a plasterboard ceiling does not take five minutes. You may have to spend more than one day to assemble it completely.
- After installation, the ceiling will require finishing, which means additional time and financial costs. Depending on the type exterior finishing, the design can become difficult to maintain.
- Such a ceiling does not like moisture and will not save the room in case of flooding by neighbors above.
- If installed incorrectly, as well as with prolonged use, the surface finish may crack in places where seams run between sheets of drywall.
However, despite all the shortcomings, plasterboard ceilings are one of the most popular types of ceiling surface finishing. It has many more advantages.

Types of plasterboard ceilings
Drywall is such a “plastic” material that it allows you to create completely different shapes, including in the kitchen. In order to purchase the required amount of materials, necessary tools and begin installation work, you should decide what your ceiling will look like. There are several types of plasterboard ceiling structures.
Table. Types of plasterboard ceilings.
| Ceiling type | Description |
|---|---|
| The simplest option for a plasterboard ceiling. It is a flat surface without additional elements. Easy to install: the metal frame is simply sheathed with sheets of plasterboard. Such a ceiling “eats” a minimum of the total height of the room, but at the same time allows you to completely hide the rough ceiling. |
| Medium in complexity type of ceiling finishing with plasterboard. The main “subtlety” is to correctly calculate the location of additional levels and create a more complex frame than in the case of a one-level ceiling. This makes installation more difficult and takes longer. But the levels can be played out in an interesting way using curved lines, and also illuminated using lamps or a glowing strip. It is worth remembering that a multi-level ceiling “steals” even more of the room’s height, so it is only suitable for spacious kitchens. |
| As a rule, such a ceiling will have a very complex structure and some kind of volumetric decorative element of its surface. For example, in the center of the kitchen a flower may bloom or a butterfly or even some abstract design may appear. Such a ceiling is difficult to install for those who do not have experience working with plasterboard. |


Let's take a closer look at ceiling structures consisting of several levels. The ceiling in the kitchen can be made framed, diagonal or zonal.
Frame ceiling- This is the simplest option for implementing a multi-level ceiling. It is a surface with one or two steps along the perimeter of the kitchen walls.
On a note! By the way, the step along the perimeter of the kitchen is an excellent place to organize additional lighting for the room. As a rule, lamps look very organic there.

Diagonal ceiling- a structure where the level steps are located only on one side of the room and stretch from corner to corner. They are made both perfectly smooth and wavy.

Zone ceiling will allow you to clearly highlight the work or dining area. The main step will emphasize it. The rest of the ceiling space will be flat. As a rule, such a step is not large and massive.

Design tips for kitchens small and large
To ensure that the ceiling in the kitchen pleases you for many years and does not seem bulky, ugly, or heavy, you should carefully consider its appearance.
When choosing the type of plasterboard ceiling structure and its finishing, it is important to consider several important factors:
- dimensions and height of the kitchen;
- general interior style;
- the need for additional lighting equipment;
- the need to use decor.
Why is it worth paying attention to these factors? The fact is that a plasterboard ceiling, if installed and finished incorrectly, will not only “press” - it will look very bad, and you will definitely not be satisfied with the repairs made.

Here are some tips, following which you can very successfully design your ceiling and make it perfect.
- Use spotlights to zone the room.
- Hide the corrugation and other kitchen communications under the drywall.
- Use materials to finish the structure light shades– beige, cream.
- In small rooms, it is better not to make projections on the ceiling in the center of the kitchen.
- Playing with colors will also help to zone the room. Use different shades for this.
- IN large kitchens you can create a floating ceiling - in this case, it seems that part of the structure is simply hanging in the air (the fastenings are not visible).
Attention! Remember that in a small kitchen bulky multi-level structures will look very bad. It is best to make the ceiling one level or work out a frame version of the ceiling made of plasterboard.
Ceiling installation
Once you have decided on the design of the plasterboard ceiling in the kitchen, you can begin installation.
To do this, you will need the following tools, which should be purchased in advance:
- perforator;
- screwdriver;
- roulette;
- construction laser level;
- ladder;
- pencil for marking;
- putty knife.

Video - Drywall tool (basic set)
Materials needed to create a plasterboard ceiling:
- plasterboard sheets;
- anchor wedges for the ceiling;
- metal profiles CD and UD;
- suspensions, rods;
- putty and primer, finishing material;
- sealing tape, separating tape, serpyanka;
- screws for metal and drywall;
- dowels;
- profile extensions, “crabs” for suspended structures, “fleas”.

Also, purchase lighting fixtures in the required quantity and wires to connect them to the electrical network in advance.
The procedure for performing work on installing a two-level ceiling.
Make a detailed plan for fastening all structural elements. It will facilitate the work and allow you to calculate the required number of fasteners and materials.
Prices for screwdrivers
screwdriver

Start your work with markings. Using a tape measure, determine the lowest corner in the kitchen; from the base ceiling downwards, make a mark along the lower border of the first tier (this is approximately 10 cm). Make the same marks on other corners. Determine the level on them using a laser level.


Connect the points marked in the corners with one line along the perimeter of the kitchen. To do this, it is convenient to use the so-called chop cord.

Attach the UD guide profiles using dowels along the drawn line. Make holes for the profiles using a hammer drill. Remember to reinforce each profile at the edges at a distance of at least 10 cm from each end.

Attention! Before attaching the profiles, glue them with sealing tape.

Transfer to the ceiling that part of your diagram where the main profiles fixed under the ceiling are marked. The step between the parallel marking lines is approximately 40 cm. Perpendicular to them, make marks in the places where the hangers will be installed (the step is about 50 cm). In this case, install the outer hangers at a distance of 25 cm from the wall.
Start installing hangers. Screw the anchors into the ceiling, secure the suspended structure and bend its ends so that it does not have free movement.

Fastening suspensions (here - vibration suspensions for sound insulation)
Install the profiles on the prepared structure, screwing them to the hangers with self-tapping screws - first the edges, then the middle. At the same time, attach the profiles first on one side of the ceiling, then on the other, step by step.

On a note! The length of the entire profile should be approximately 2 cm less than the length of the kitchen. Short profiles can be connected using special connectors. Remember that the joints of several profiles in this case should not be at the same level.
Install jumpers between the profiles using “crabs”. Install jumpers in those places where there will be joints of drywall sheets.

Do all the electrical wiring, because after plasterboarding you will not be able to carry out this stage of work. Lay the wires for the lamps and check the functionality of the entire network.


Advice! In order not to subsequently look for the installation locations of the lamps, they can be marked in advance on sheets of drywall.
Start installing drywall. Before this, it must be processed - cut each sheet at a slight angle along the edge. This is necessary to improve the puttying results in the future. The pasted ends of the sheets do not require trimming.


Fasten the sheets, starting from the corners of the room, with self-tapping screws in increments of 20 cm. Make sure that the sheets are installed “in a staggered manner.”
Ceiling profile prices
ceiling profile


Attention! The heads of the screws should not stick out; they should be recessed a few millimeters into the sheet of drywall.
Once you have covered the entire ceiling, proceed to install the second level. Pull two threads from corner to corner of the kitchen so that they intersect. This will help you find the center of the ceiling. It is from this that you begin to set aside equal distances to determine the boundaries of the junction of the ceiling levels. That is, now you draw the markings along which you will attach the profiles for the other tier.

Screw the guide profile along the marked perimeter. Repeat steps 2, 3, 4, now focusing on the second level.


Now cut the CD profile into pieces of the length at which you plan to install the second level. This is the same length as the distance from the first level to the guide profiles of the second, mounted on the wall. Cut special “tongues” on one side of the sections, cutting off the side parts of the profile.
Insert the segments into the UD profile fixed on the first tier at a distance of approximately 5-6 cm. Strengthen them with flea screws.

Place another guide profile on the hanging sections.


Prepare sections of CD profiles equal in length to the distance from the resulting mini-frame to the wall, and install them, securing them with fleas.
Cover the frame with plasterboard.

Advice! To save material, do not cover with plasterboard that part of the first tier that will be hidden under the second.

Make holes for the lamps using a cutter of the required diameter or a reinforced stationery knife. Install the lamps after finishing the drywall.
Prices for putty
putty

Video - Two-level ceiling with rounded sides
Ceiling finishing
Now you can begin finishing the ceiling surface. To do this, carefully prime and putty all the joints, also use serpyanka tape and then again coat all the irregularities, including the places where the screws are screwed in.
All that remains is to finish the surface. How to cover plasterboard so that the ceiling in the kitchen looks harmonious, is beautiful and lasts a long time?
- You can paint a plasterboard ceiling with acrylic, latex, or water-based paint.
- You can paint it, or you can combine these two types of finishes.
- Looks good too.
Attention! Glossy paints can only be used if the ceiling has been completely puttied. Otherwise, all irregularities will be visible.

Master Class. How to make a small figure on a plasterboard ceiling
The figure is made at the original ceiling level made of plasterboard, made using the technology described above.


Now the most difficult and important part of the work is the installation of cornices. For this we need such a tool. This is a saw in a universal miter box. It can be tilted at almost any angle. The cut is smooth, precise and slightly rough, which will improve its adhesion to the glue.


The plasterboard ceiling in the kitchen is one of best options finishing for this room. However, covering drywall better paint so that you can wash it regularly. Wallpaper and plaster do not like water, and the ceiling in the kitchen is often exposed to steam, and it often gets splashed with grease. Therefore, choose the most practical materials for finishing, so as not to complicate your life.


