
Every PC user needs email. Even if you do not engage in vigorous correspondence, it is one of the prerequisites for registering on many resources. Many people have several mailboxes on different services. This is not always convenient, because you have to open pages one by one and log in. An email client for Windows 10 will avoid these problems. Link your addresses to it and check your mail in one window.
Windows 10 has two standard email clients: Mail and Outlook. Most users are familiar with the latter. And Mail was added in 8. We'll show you how to set up both programs for convenient interaction with your mailboxes.
The label looks like a white envelope. If the client is not present on the Windows taskbar, find the application through search.
To work you need to add an account. We press the button.

You can select from the list any service that already has an account.

Let's try to select “Other account” and configure the program to work with Yandex mail. Let's enter the data and indicate the name for the connection. The password should be specified from the service, in our case it is Yandex.

After a few seconds the operation is completed.

In the next step you can add another Mailbox.

Let's add a Google account. Click on add and select Google.

Here the program connects directly through the Google mail service.

Enter your data. Please note that you can log in not only through gmail.com, but through any account linked to it. In this case, we used the address from the mail.ru service. On the mail.ru website these two mailboxes were linked.


Now you already have two mailing addresses linked to one client.

Let’s go to the “Inbox” folder and see a familiar interface, only for two addresses.

In the lower left corner, you can go to the Windows Calendar or People apps, and customize program settings. If you need to add a box, click on the gear.

And in the panel on the right, select account management.

As you can see, setting up mail in Windows 10 is extremely simple. At the same time, there is no need to think about where mail is stored in Windows 10. The application transfers letters from mail servers to your computer into a user folder. Therefore, if you do not have access to the Internet, you will only be able to see information from the cache. Conveniently, you can view old mail even offline. You won’t be able to access online email services without a connection.
What to do if Windows 10 mail does not work
This happens due to updates. Especially often when upgrading from an old version to Windows 10. You need to reinstall the application.
- Right-click on the Start button and select PowerShell.

- Type the command get-appxpackage -allusers *communi* | remove-appxpackage. The process of uninstalling the application will begin.

- Go to the “Users” or “Users” folder on the system disk (for an English-language system) and follow the path “User name - AppData - Local” and delete the Comms folder.

- One folder will not be deleted.

- Reboot and delete again.
- Go to the Windows Store. This can be done either through the icon on the taskbar (highlighted on the screen) or through search.

- Type the word “mail” in the search bar.

- Install the client.


The Mail application has been reinstalled.
Microsoft Outlook
This is one of the oldest email clients. It was introduced in Windpows 95 and has since been used successfully throughout the world.


The Outlook client is rightfully considered one of the best programs for Windows 10. In addition to mail, it contains modules:
- Summary of events.
- Contacts.
- Calendar.
- Task Manager.
- Diary.
- Notes.
If we talk about mail, then in this client for Windows you can add as many mailboxes as you like from various servers, set up filters, specify audio alerts and much more.
Free email clients for Windows 10
In addition to the built-in tools, which many are prejudiced against, you can download other email clients.
EMClient
After installation, select a theme for design.

You can automatically link your email (Mail tab) or enter your address and go through all the steps.

After all letters have been imported, you can use the program as usual. The free version is intended for two accounts, and the PRO ($50) is for as many as you like.

In addition, the client offers chat, calendar, contacts and task manager, translator, spell checker. Overall, the application is not anything outstanding.
Thunderbird
This is a free email program for Windows 10 in Russian from Mozilla.
The application is open source. Today, it is considered one of the best email clients for Windows 10. It is successful due to the extensions that allow you to increase its capabilities.
It includes convenient features such as client setup wizard, search engine, event log, activity manager, etc.
After installation, you can create a new account not only for email, but also for chat or blog.

At the beginning you are quite strongly asked to create a new gandi.net mailbox, but you can skip this step and connect your existing accounts.

After registration, synchronization with the server occurs and then you can start working.

Mailbird
A lightweight and convenient application for working with multiple mailboxes. You can download the email client for Windows 10 here.
It has free version(with limited functionality) and paid. Allows you to create quick responses and templates for them. Supports drag-n-drop technology. Search is carried out in one click. Allows you to view a contact’s profile on social networks. Supports Russian interface (must be selected during installation).
After installation, provide registration information from mail server.

And we wait for synchronization.

Here you can connect to different applications and work with them in one interface.

The last function is extremely convenient if you work in dropbox, googledocs, etc. Everything you need will be collected in one place.
We spent short review email clients for Windows 10. We hope the material will be useful to you. And if you want to learn how to manage running programs, you can read about it here.
I really like the Mail app - it's simple, concise and convenient. I want to show you some postal chips.
Today on the program
Fine-tuning notifications
Besides general settings notifications in PC settings, modern applications may have their own notification settings, and Mail has them!
- Open the Mail app settings.
- Select Accounts, and then the email service for which you want to configure notifications.
You can turn off notifications completely, or receive them all or only from selected contacts. Of course, in this case the favorites should not be empty :)
Favorite Contacts
Favorites, as it turns out, is a very convenient mail sorting system. It allows you to display important emails from friends, colleagues or relatives in the foreground, and leave less important emails (for example, advertising messages or notifications from social networks) in the second place.
It's easiest to favorite people you communicate with frequently, because Mail automatically lists them. Just click on the star next to the name.
Advice. Tap a favorite or frequently used contact to see all their emails.
You can make any contact from the address book where the link leads to favorites View contacts(see picture above). If the recipient is not there yet, you need to add it. In this case, you will see a connection between the Mail and People applications, which plays the role of an address book.
Separate message window
Deleting an Outlook account
If you are working with an account Microsoft entry, an Outlook account is automatically created in the Mail application. It is first in the list of mailboxes, so when you launch Mail, Outlook always opens first, and only then can you switch to another mail service at the bottom.
I don't use Microsoft mail, preferring Gmail, so I was wondering how to remove Outlook and leave only Gmail.
If you simply delete your Outlook account, Mail won't launch until you create the account in it again. But there is a workaround!
- Open the Mail app settings.
- Select Accounts – Outlook and uncheck email sync!
Now I only have a Gmail account in my mail. The switch between accounts has disappeared at the bottom, but if you have other email services connected, the switch will remain, of course.
If you want to add mail @mail.ru, but with the ending, for example, @bk.ru, then with simple registration you simply will not be able to log into your mail. To add such an address, you need to select an IMAP mail type (as for mail.ru in principle), and click Show more details.
A window will open (as in the figure below) where you need to specify the IMAP and SMTP servers of the mail service. In this case, the @bk.ru address was received at mail.ru, so the servers are the same: imap.mail.ru and smtp.mail.ru.
This registration scheme is suitable for all email addresses whose domain name is different from the site on which the address was registered.
Hotkeys
Through experience, I discovered hotkeys that can be used to speed up work in mail:
- CTRL + Q Mark message as read
- CTRL + E Start Search
- CTRL + R Reply to message
- CTRL + U Mark message as unread
- CTRL + O Open message in new window
- CTRL + A Select all messages
- CTRL + D Delete email
- CTRL + M Move to another folder
- CTRL + > Next message
- CTRL +< Прошлое сообщение
- CTRL + S Send email
Vadim. Mail is very good example how to make modern applications and develop them. I really like it too, and use it regularly on my tablet (and sometimes even on my laptop, responding to email notifications from favorite contacts!). By the way, I also wondered how to remove Outlook, eventually coming to the same decision as Maxim :)
Configure via IMAP protocol
via IMAP protocol:
2. Select the account type - “Other POP, IMAP account”.


4. Click "Login".

manually:
1. Click "Add Account".

3. Select "Internet mail".

- Incoming mail server - imap.mail.ru;
- Account type - IMAP4;
- Check the boxes:
Configure via POP protocol
To set up Mail for Windows 10 via POP protocol:
1. Click "Add Account".
2. Select the account type - “Other POP, IMAP account”.
3. Enter the required data:
- Email address - full name your mailbox;
Please note: in this field you must enter the full name of your mailbox, including login, “@” dog and domain (for example, [email protected]).
- Password—the current password for your mailbox.
4. Click "Login".
5. Enter your name, which will appear in the “From:” field for all messages you send.
6. Click “Login”, then “Done”.
If you can't add an account automatically, add it manually:
1. Click "Add Account".
2. Click "Advanced Setup".
3. Select "Internet mail".
4. In the window that opens, enter the following information:
- Account name - the name of your account;
- Your name is the name that will appear in the From: field for all messages you send.
- Incoming mail server - pop.mail.ru;
- Account type - POP3;
- Username - the full name of your mailbox;
- Password—the current password for your mailbox;
- Outgoing mail server (SMTP) - smtp.mail.ru;
- Check the boxes:
"The outgoing mail server requires authentication,"
"Use the same username and password to send email"
"Request SSL for incoming mail."
5. Click “Login” and wait for a message indicating successful account creation.
If you have problems setting up your email program, use our
Configure via IMAP protocol
via IMAP protocol:
2. Select the account type - “Other POP, IMAP account”.
4. Click "Login".
manually:
1. Click "Add Account".
3. Select "Internet mail".
- Incoming mail server - imap.mail.ru;
- Account type - IMAP4;
- Check the boxes:
Configure via POP protocol
To set up Mail for Windows 10 via POP protocol:
1. Click "Add Account".
2. Select the account type - “Other POP, IMAP account”.
3. Enter the required data:
- Email address - the full name of your mailbox;
Please note: in this field you must enter the full name of your mailbox, including login, “@” dog and domain (for example, [email protected]).
- Password—the current password for your mailbox.
4. Click "Login".
5. Enter your name, which will appear in the “From:” field for all messages you send.
6. Click “Login”, then “Done”.
If you can't add an account automatically, add it manually:
1. Click "Add Account".
2. Click "Advanced Setup".
3. Select "Internet mail".
4. In the window that opens, enter the following information:
- Account name - the name of your account;
- Your name is the name that will appear in the From: field for all messages you send.
- Incoming mail server - pop.mail.ru;
- Account type - POP3;
- Username - the full name of your mailbox;
- Password—the current password for your mailbox;
- Outgoing mail server (SMTP) - smtp.mail.ru;
- Check the boxes:
"The outgoing mail server requires authentication,"
"Use the same username and password to send email"
"Request SSL for incoming mail."
5. Click “Login” and wait for a message indicating successful account creation.
If you have problems setting up your email program, use our
In 2015, Microsoft presented the tenth Windows version. It is fully compatible with a wide variety of devices: laptops, tablets, Xbox One consoles, smartphones, etc. It combines and improves the positive aspects of previous versions.
Windows 10 is, as always, user-friendly and has some common features with Windows 7. For example, the Start menu of these two versions is almost identical. Windows 10 starts instantly and reboots quickly. A big plus of the “tens” is the built-in security features, which are much more numerous than in previous versions. Another plus is compatibility new Windows with a wide range of different software.
Windows 10 makes it easy to set up any email application or program.
Outlook
This email client has proven itself to be excellent in the process of working with email. It is also a full-fledged organizer that provides the functions of a calendar, notepad, task scheduler, and contact manager.
Windows 10 supports all non-legacy versions of Outlook.
For today it is:
Outlook 2013/Office 365
Outlook 2010+
Outlook 2007
Application Microsoft Outlook is familiar to many, but not everyone actively uses its full potential and functions. As a rule, office workers are only interested in its individual components. For some, this application helps plan work and leisure, for others it is just a convenient calendar, and for others it is a functional database of business contacts. However, most people still use Outlook as their email client.
How to set up Outlook
In the main application menu you need to find Setting up accounts. An alternative is to use panels Windows management . First press the button Start(located in the lower left corner of the screen next to the taskbar), then select Control Panel. In the list that appears, click Mail. Eventually a window will open Mail setup - Outlook.
Then click on the button Accounts and get a list of current accounts. To add another one, click on Create...

The next window helps us add our account. We don’t change anything in it, leaving the “yes” switch selected by default. Now click Further. 
If you have already used the program, the main working window. Select the option in the main menu File. Next, click the add account button (there is a green cross next to it).

We indicate the following data:
-In the top field your name- enter your first and last name
-In field Email address- our mailbox address
-In field Password- personal password to the mailbox. Next, we confirm it in Password verification.
 One more possible option action is to automatically set up an account. In this case, just methodically press the button Further, and the application will do everything for us, independently determining the necessary parameters for working with mail. After this, a window will appear indicating that the setup was completed successfully. Click on the button Ready and start working with the mailbox.
Manual setting is of course also available. Just turn the switch on Manual configuration or additional server types and press Further.

Now a window appears Service selection. In it we put a switch on POP or IMAP protocol.

In the next window, specify the mail server parameters for your account.
Important! Check the box Secure Password Verification (SPA) in no case should it be, since otherwise it will become impossible to accept correspondence.


Now let's go to the tab Additionally and check the port numbers.
 Click OK and finish working with additional settings.
Users also have the opportunity to verify their account. This is the function Checking your account settings. If your account is an IMAP account and you are using the correct domain, then when you check it, a warning window will appear in which you should click on the yes button. Next, we wait a bit while the settings are checked. If everything is fine with them, a corresponding message will appear.

However, errors may be found during the verification process. In this case, you will have to carefully check all the settings, since somewhere there is an inaccuracy.

If there are no errors, then the next window will show information that the account has been created. Now all that remains is to click on the ready button and feel free to start working with your mailbox.

True, this same “last” window is also the starting point for adding another account, as eloquently evidenced by the corresponding option. If you need another account - then go ahead...
The Bat!
The Bat! provides electronic correspondence. It compares favorably with other similar applications due to its good functionality and user-friendly interface. Thanks to its advantages, TheBat! has gained popularity in all corners of the world, and Russia is no exception.
This program is a practical solution to many problems that arise when working with email. It will greatly simplify the processing of electronic correspondence.
The Bat! can work with a large number of mailboxes, and the number of letters it can save is generally unlimited. This application has an excellent system for sorting and filtering emails and copes well with spam. Its copy backup function ensures the safety of letters. The built-in filter system of this application independently sorts and arranges all letters into separate folders. The user can configure the sorting principles himself.
TheBat! has a built-in text editor for spell checking. In addition, this program works with templates.
The Bat! allows you to use different languages without restarting the program. To change the language interface of this program, you do not need to download its foreign language version or install a special plugin. Almost all the languages of the world are built into it from the very beginning.
How to set up The Bat!
After we download and run the program, this dialog box will pop up

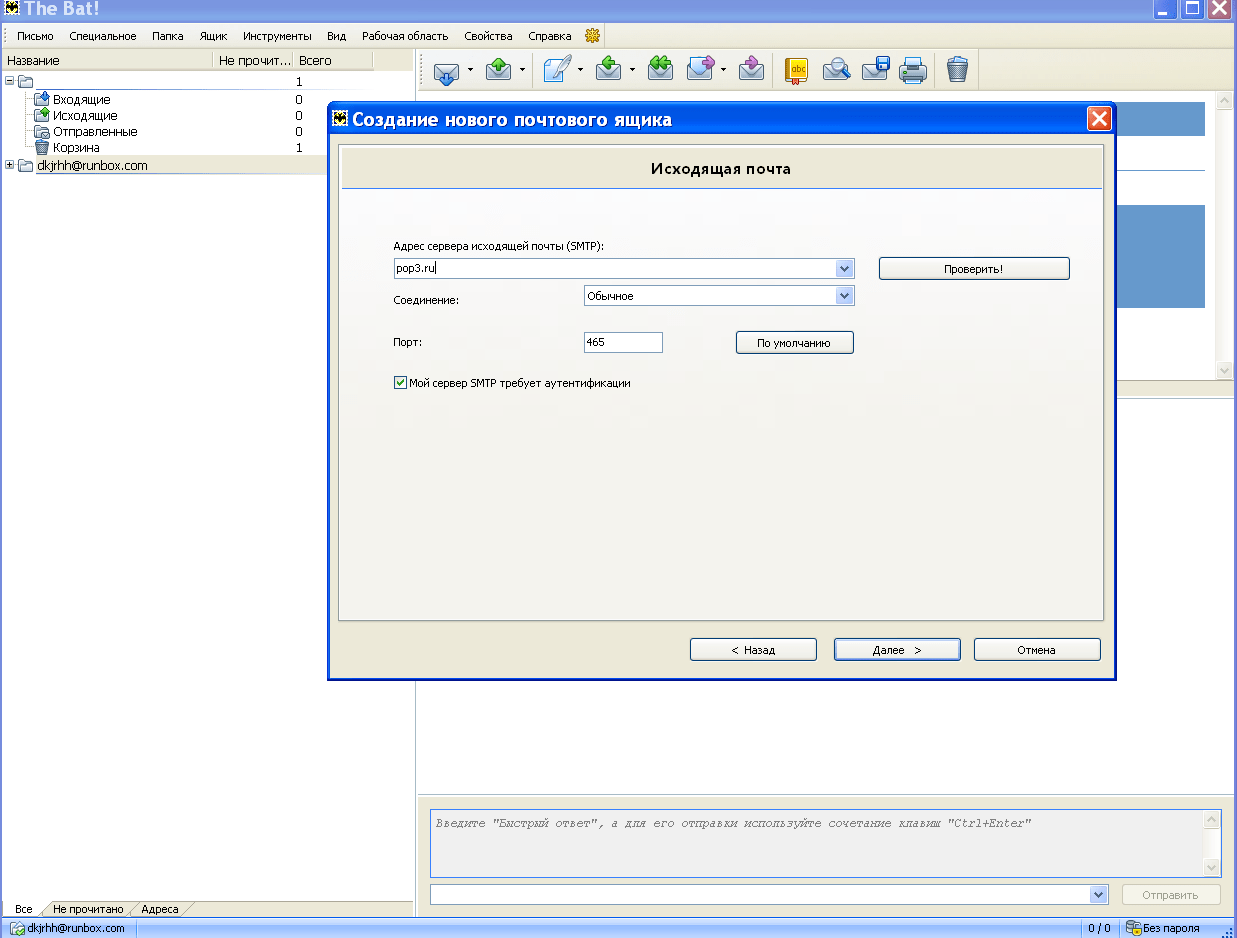
In the windows under a common name Creating a new mailbox We enter the requested information about incoming and outgoing mail and account information.


The main dialog box will then open.

If you have multiple email addresses, you must configure the appropriate number of mailboxes. The mailbox names, of course, must be different. In the top menu of the dialog box, select the option Box, then in the drop-down menu click on New mailbox.

In the window for creating a new mailbox, perform the steps described earlier. Here you can select the protocol for posting mail.


Place a checkbox next to the option My serverSMTPneeds authentication. Click next.
Click Ready.

In the window Mailbox properties on the left in the explorer select Transport and press the button Authentication.

In the window that appears, set the switch to using the options below(i.e. username and password).

Now The Bat! received the necessary settings and is ready to go.
If you need to change the settings of an already created email account, select the option in the menu Box, and then in the drop-down list click on Mailbox properties.

Now fill in all the fields of this window:
If you have problems receiving or sending mail, you need to click at the top of the menu Box, then select from the drop-down list Work log.

If you cannot figure out the cause of the difficulties on your own, you will have to contact technical support.
Mozilla Thunderbird
Mozilla Thunderbird is a modern program designed to work with electronic mail resources and various news groups.
This is an easy-to-use, highly functional, popular email client. It has a lot of advantages and capabilities, so Mozilla Thunderbird can turn into an indispensable assistant for working with email and newsgroups.
The program was created in 2004, and since then it has been constantly modernized and improved. Her upgrade is regular and very creative. Over the years of its presence on the market, Mozilla Thunderbird has gained loyal fans, the number of which is constantly increasing.
IN this program everything is built in necessary tools and functions that allow you to turn working with mail into a comfortable and fruitful experience.
The Mozilla Thunderbird interface is quite simple and highly customizable. Working with buttons is very convenient - they can be easily added or removed. Configuration and appearance Windows are also easy to change.
The application's spam filtering and detection system is also effective. All messages are sorted into specially created folders. The distribution criteria are date, topic and sender.
The HTML letter editor of this application allows you to reduce the size of the sent letter several times. Moreover, the compression algorithms of this editor are an order of magnitude better and more reliable compared to editors of similar email programs. In addition, all letters received by the addressee are automatically converted into text with the font installed on his computer for convenient and comfortable reading.
There are no problems with encodings, since the program supports all their varieties. Thanks to this, the display of letters from all other email clients is absolutely correct. At the same time, letters created in Mozilla Thunderbird are fully compatible with other email programs. They can be freely read without resorting to any special actions.
The program can be expanded because it has the ability to integrate additional modules. MozillaThunderbird also supports changing themes.
How to set up Mozilla Thunderbird
Installing the program is quite simple.
The installed program's dialog box looks like this:

You can switch to local folders

And import from Outlook:

There are also Blogs and news feeds:

How to set up an account?
In order to be able to receive messages, you first need to create an account. To do this, open the option in the menu Tools

In the drop-down tab select Account Settings.

Enter in the appropriate field account name.
Click Account Actions and select from the drop-down list Add a mail account.

Enter all the necessary information (name, email address, password) into the appropriate fields and click Continue.

Mozilla Thunderbird will attempt to determine account parameters based on the part of the email address that follows the @.
To stop searching, click Stop.
In the required fields you must enter the appropriate name, a specific email address and your access password. The Email Account Setup Wizard will automatically find the necessary settings by sending a request to the database.
If there are no problems (that is, all emails are received and sent, and old emails are saved), but an IMAP account was accidentally created , then it needs to be removed. To do this, open In With settings - Account settings. In the dropped Account Actions select the action to delete the account. Problem solved.

You can experiment with different layouts of Control Panel elements. For example, you can return the current settings to the default level by clicking on Restore in the window Toolbar Settings.
Conclusion
All the described applications are equipped with a huge number of features. As a rule, the average user is not familiar with most of them. And he loses a lot from this. To study any program thoroughly is very useful thing. Then working with it on Windows 10 will not only bring great practical benefits, but will also instill in the user confidence in their own abilities. Having mastered one program well, in the future he will be less afraid of the numerous options and functions of various applications.


