
A well in the country, and sometimes near the house, is a necessary thing. But just a concrete ring sticking out of the ground with some kind of cover does not please the eye, and the comfort of use is below average. To remedy the situation, it is required to ennoble it and put a gate that will facilitate the rise of water. Ready-made well fences are for sale - with a roof and a gate, but they either have a solid price or look pathetic. Therefore, most often a house for a well is built with their own hands. Then you can apply your imagination and arrange everything the way you need.
Types of well houses and their tasks
The primary task of the well house is to protect water from the ingress of various substances - dust, foliage and other similar contaminants. This requires a tight-fitting lid. Open wells are possible only for technical water - for irrigation. Water from them cannot be used for other purposes. So if you plan to at least wash the dishes, the well should close tightly.
Protection from precipitation of any kind is also necessary: rain and melt water carry with them very dirty water with fertilizers dissolved in it, animal waste, various garbage and impurities. Its entry into the well is fraught with serious pollution. To protect against precipitation, a canopy is made, most often a gable - it is easier to remove precipitation.
Another task of the well house is to protect from outsiders or, in any case, to ensure safety for children. To do this, hecks are made or locks are cut in.

To make it easier to raise water, racks and gates are installed - in the simplest case, a rotating log with a handle to which a chain is attached. And all this together should still please the eyes of the owners, but at the same time require minimal maintenance.
open or closed
As you can see in the photo, the well house can be open and closed. It’s cheaper and easier to make it open: the well ring can be finished with stone or wood, the lid, racks and canopy - made of wood or metal - whichever costs less. Materials for such a structure require a minimum. There is only one “but” - in winter, water can freeze in such a well. If you do not plan to use it in cold weather, no problem.
But for winter use, an insulated well house is required. But even then it can be made open:
- buy a polystyrene "shell" for the well - they are of the right size, fix it, and put the finish on top of it;
- make the overlap of the ring and the cover from several layers of wood, and lay the boards in different directions, blocking the joints.

Another option is to make a closed house. It is slightly larger than the well ring in size. Available air layer already a good heat insulator, but you can still improve the protection - by laying the gaps with foam, for example.
What to do
The choice of appearance sometimes takes a long time. The beautiful half of humanity is especially “suffering” with the desire to decorate the well, going through numerous design options and spending a lot of time doing this. In fact, everything is simple: if there is a house, and the well is nearby, it is worth decorating it in the same style and, if possible, in the same color. Agree, it looks good.

What if the house is brick or plastered? Choose a finish that matches your style. If this is one of the first buildings on the site, just do it the way you like.
Often the question arises: to make of metal or wood. Wooden ones look really nice. But without proper care, they quickly lose all their attractiveness and become gray and ugly. If you are not afraid of the prospect regularly, at least once a year, update protective covering(delete old paint, then paint again), make from wood. If this is not for you, make it out of metal. The whole structure or just the frame - your choice. What is a bad option: a frame made of galvanized metal profile, sheathed with siding. Especially if the house is finished in the same way.

As you can see, there are a lot of options. First choose the type - open-closed, then the materials and finishes to your taste, understand the design, make a house for the well with your own hands.
Canopy for a well with a cover - an open house
Structurally, the device is simple: there are two racks located one opposite the other. They serve as a support for a canopy, and a gate is attached to them - a device for lifting buckets of water. A drawing of an open house with dimensions, see the photo below.

Please note that the posts can be dug in after the well ring has been finished. Depending on this, the order of work changes, but the design in any case remains the same.

How to make a canopy
First, the canopy is assembled. Make two side triangles according to the required dimensions. In the drawing above, only an approximate spread of the two extreme points is given. More can be done if necessary. The length of the canopy depends on where the racks will stand - close to the well ring or behind the casing. The approximate dimensions of the canopy with a ring diameter of 100 cm are shown in the photo below.

Dimensions of a well canopy for a diameter of 100 cm
It is possible to assemble the structure from a galvanized profile, a metal profile pipe or wooden beam. To prevent the profile from bending, it is reinforced at the door attachment points - you can put a wooden block or a metal corner inside.
To ensure that rain does not get inside, the expansion must be made much larger than the size of the ring - at least 20 cm on each side.

If the racks are attached directly to the concrete ring, the procedure is slightly different. First, a frame is assembled that encloses the ring. In the photo, it is made of a board 30 mm thick. Racks are also made of the same board, the place of attachment to concrete is reinforced with overlays. They also play a decorative role.
If the canopy turned out to be heavy, it is advisable to use a beam of greater thickness, otherwise it will not withstand the load.

After that, the previously assembled roof is attached to the racks. You can make triangles right on the spot, but it’s more convenient to prepare them in advance, assemble truss system, and ready to hoist on racks.

Next is the finish. Sew up with a board, clapboard, roofing material. Just keep in mind that the boards, if used raw, will dry out after some time, gaps up to 5 mm thick will form between them. There is no question of any hygiene then: both rain and dust will get in ... Using a dry board is also not very good - in wet weather it will swell, the flooring will “go in a wave”. In general, if you want to have clean water, build a house with doors - closed. There are more chances to save moisture from pollution.

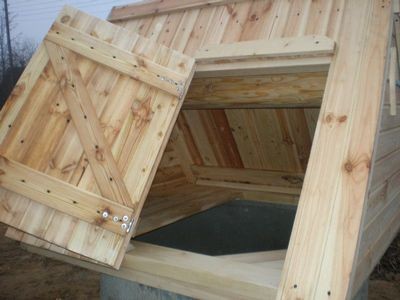
Do-it-yourself closed house for a well
We are talking about such a variant of shelter for the well - with a door. If you still make a cover inside, it’s sure that dust will not get in.

A frame is being built, then it is put on the head of the well and fixed with anchor bolts.

- support post made of 100*200 mm
- short support posts from the same beam 100 * 200 mm
- fixing bar 30*60 mm
- triangular beam
We assemble the frame, with the help of short bars we fasten it to the ring. After we proceed to the assembly of the pallet. Assemble the flooring from a board of 30 * 100 mm or so. The frame is sheathed with boards or sheet material, such as waterproof plywood.

To keep the doors well, you can put additional jibs. We hang doors - one or two, as desired. To make it easier to navigate, below are drawings with dimensions.

According to the same scheme, you can make a roof for a metal house. If available, you can use profile pipe. It is easier to attach finishing material to it.
How to make a fully enclosed frame
You can also hide a concrete ring in the house. In this case, the gate, as a rule, stands separately, and then the frame is assembled. Choose the dimensions so that the design freely covers the ring. Height - 20 centimeters higher than your height: so that you can safely bend over and get a bucket.

We take profiles from thick metal, galvanized. From the guide we assemble two identical frames - the “floor” and the upper level of the ring. They are connected by racks (profile for racks). It turned out a cube with filled sidewalls.

At the guide profile, we cut the sides, leaving the “back” intact. So you can make a triangle. We fix the rack, which is equal to the height of the entire house. If you want to have equal slopes, the rack is attached in the middle. You can make the far slope steeper, then the stand is moved 15-20 cm from the center.
We attach the notched profile to the fixed rack. We get one of the elements of the truss system. We perform the same operation on the other side. We connect the resulting tops of the triangles with a crossbar.

From the side of the door, we add racks - on both sides. It is better to strengthen them - put inside wooden bars and fasten with screws.

We fasten the roofing material, for example, a profiled sheet, sheathe it with plywood. Soft tiles are then laid on plywood and nailed - who has what technology. The "foot" and sides of the roof are finished with any material. If you want - you can use wood - clapboard, imitation of a log or timber, if you want - siding.
In this case, the same materials were used as when facing the house: so that everything looks like a single ensemble.
Another video example of an assembly from a drywall profile in video format.
Making a well ring with your own hands
If a cap or canopy is made, the gray concrete ring remains visible. The view is not the most attractive, and I want to decorate it.
stone finish
The most popular way to decorate a well is to finish it with stone - pebbles or medium-sized rubble. If with finishing material everything is more or less clear - to buy or assemble, then the question of what to cling to remains. There are several recipes:

We offer the third recipe for how to line a well with stone in video format. The composition of the mixture here is very similar, but before applying the solution, a mesh is fixed on the ring. With this technology, nothing will definitely fall off.
An interesting variant of the hinged cover on the well is proposed in the following video: it leans back almost completely, but whether such a device is needed is up to you.
Photo options for finishing wells


Today, a well on the site is not only a source of water supply, but also a design element. Therefore, the appearance of the structure should be not only practical and functional, but also aesthetically attractive. And the attractiveness of the well is provided, of course, by the roof. For the exaltation of this architectural element it is not necessary to hire specialists. A well shaft, a body and a roof for a well with your own hands - this is not at all difficult. In particular, if you familiarize yourself with the theoretical basis before starting work. In this article, we tried to collect all the basic tips that will definitely help you give your well a new roof. Give your well a new roof.
First you need to choose a style for the well roof. It should not stand out from the entire design concept of the site.
In wells, the head and roof can be made in different options. The roof can be flat (sloping) or pitched (pointed). pitched roofs, in turn, are divided into single-slope, dual-slope and tent. In addition, it can serve as a canopy, and can immediately serve as the walls of the house.

There is some design rule. According to him, the roof of the well and the roof of the house should be covered with the same material and repeat each other with their shapes.
The material with which such a canopy, necessary for a well, can be covered in the modern market building materials it's easy to choose. It can be tiles of various types, metal or ordinary tes.
If your estate has a pronounced Russian style, then the well can be made in a similar design. Finish the log house of the well and the roof with a rounded log, which will be enough to varnish.
If you have woodcarving skills, then the roof of the well will be a unique feature: do not limit your imagination! After all, then, you can decorate your well with various wooden motifs that make it fabulous.
If the well ring protrudes above the ground, then its wall can be decorated with a log house.
Materials used in the construction of roofs
For the roof, materials such as tiles, metal profiles, stone or slate can be used.
Roof tiles
There are four types of tiles. The choice of one or another type directly depends on the climate, personal wishes and the type of roof.
- Ruberoid tile for a roof. It is made from tar, felt and stones. Tiles are refractory, economical and construction market a wide selection of styles and colors of this material. Tiles are easy to install and repair.
- Ceramic tiles. well tolerated high temperature. It has a very attractive appearance, but in order to lay this material on the roof, some special skills are required. She is very durable. But if it is still damaged, it is also very difficult to repair it. In addition, this type of tile is quite heavy.
- Cedar tiles. This is the very first type of this material. It looks very nice, has a small weight. But it has a high degree of fire hazard. And in order for the tile to always have an aesthetically attractive appearance, it must be regularly looked after. And it's very troublesome.
- Metal tile. The tile has such a structure that snow does not linger on it. And also it is processed special solutions which prevent the development of rust. The price of such material is not at all low, but its properties are worth it.
metal profile
The metal profile is very popular today for sheltering roofs. And all because it has some valuable characteristics. Such as
- Simple styling:
- Durability and strength;
- Does not require regular care;
- Light weight;
- Withstands weather conditions.
In the construction market of roofing materials, you can find a metal profile made of aluminum, galvanized steel, titanium-zinc alloy or copper. The most common is a metal profile made of galvanized steel. The material from this alloy is economical in terms of material costs, convenient for installation. Sheets of steel are treated with zinc on both sides, which protects them from rust.
For a conventional gable roof on a well, it is enough to use sheets half a millimeter thick.
The leaf wave can be in the form of a trapezoid, a sinusoid or a rounded shape.
There are some nuances, following which, when installing a metal profile on a roof, you can significantly improve the quality of the structure being built:
- The metal profile sheet is attached to the crate in places where the wave bends.
- Near the eaves and ridge, the fastenings must be repeated in each wave;
- At the vertical joints of the sheets, self-tapping screws are fastened in increments of no more than half a meter;
- It is better to additionally treat the joints of the sheets with silicone sealant.
- After three months after laying the metal profile sheets, go through the fasteners again and tighten the loose ones.
For cutting sheets, do not use scissors, gas cutting and a grinder.
Slate
This is the cheapest roofing material today. And in terms of durability, it is not inferior to any modern material. Installation of a roof made of this material is carried out on a crate. Bars or boards are simply nailed to the rafters perpendicularly. Each sheet should be supported by three boards or bars.
Sheets are stacked from top to bottom and from right to left. The sheets overlap each other by no less than 12-14 cm.
If the slope of the roof is more than 30 degrees, the sheets are laid dry. If the roof slope is more pointed, the joints of the sheets are lubricated with bituminous mastic.
Slate can be painted in any color you want. Use moisture and temperature resistant oil paints and enamels. Before painting, prime the slate sheets and only then apply the paint in two layers. Each layer should dry well.
As a primer, you can use ordinary drying oil. And warm the paint before painting to 40 degrees in a container with hot water.

Today, on building markets, you can find slate of various colors. The paint on the slate protects the material from moisture and damage, and also increases the degree of frost resistance of the material.
In some countries, asbestos is banned, so many manufacturers already produce slate without this component. They add mineral and synthetic fibers. Such material has the most aesthetic appearance. Yes, and in some characteristics it is much better than asbestos.
Stone
This material is considered elite, especially if used in roofing works Oh. As a rule, of natural stones, slate is the most common material.
It is this material that is very durable and does not change its color or shape when exposed to the most powerful natural destroyers. It is not fire hazardous, has a high degree of thermal insulation and sound insulation. The service life of this material can be calculated for centuries.
For roofing, stone is processed by hand. Each tile is polished, adjusted to the desired shape. Tiles are made in a rectangular shape with sharp or rounded edges. Similar tiles can be combined with forged copper products.
Here with the color in this type of material you will not particularly scatter. As a rule, slate tiles have a grayish tint. But there are tiles with a greenish or reddish tint. But even with this set of colors, you can lay out a unique ornament on the roof.
Tiles are laid on the crate from the bottom up. Fastening to the crate is carried out with special hooks or nails.
If suddenly any tile is damaged or collapsed, then it is easy to replace it with a similar one without violating the entire roof structure.
Today, manufacturers offer sheets of artificial slate slate. Keep the color scheme a large number of color variations. It also increases the breadth of choice and various cut options. Artificial material is much lighter than natural and less fragile.
Roof top options
Consider some examples of the arrangement of the ground part of the wells.
Roof-flower bed
This type the roof for the well has another additional aesthetic function - it is also a flower bed. A similar roof on a well with your own hands is a process consisting of the following steps:
- Prepare wooden poles. They must be treated with a special moisture-resistant compound, and the places that will be fixed with concrete must be treated with a special bitumen mastic (approximately 75 cm). The length of the posts should be about 3 meters. Wrap the treated parts of the pillars with roofing felt and secure it with nails or staples.
- Dig holes for the posts. The depth of the pits should be approximately 1 meter 20 cm. The diameter of the pits should be 2 times the diameter of the pillars. At the bottom of the pits, fill in about 20 cm of sand. Lightly dampen the sand with water.
- Pour a concrete base about 30 cm wide. Allow the base to dry and (usually the next day) install the posts. Pillars can be fixed with spacers.
In order to install the posts evenly, you need to use plumb lines.
- Tables are filled with mortar to ground level. Give the concrete time to dry.
- You can finish the pillars with a stone plinth. To do this, wrap the pillars to the desired height with roofing felt and a special grid for plaster and, using a mortar, overlay with a stone.
- Bolt the top rails to the post; The lower ones are fixed in a similar way. From the timber you make the transverse crossbars of the roof.
- Lay OSB sheets on the rafters.
- Sheets must be coated with bitumen mastic. Fix a layer of roofing material across the sheets, and another one will need to be fixed across the bottom layer. Roofing material should be overlapped.
- Decorate the roof ridge.
- Spread a special drainage fabric over the roof surface and fix it on top with a plaster mesh.
- Fill the roof with soil and plant the necessary plants.
Well house
It is more expedient to build a house for a well in regions with low winter temperatures and strong winds. Then the well will need to be insulated so that the water does not freeze. Make the walls of the well double and lay a layer of expanded clay or insulation between them.
- Prepare four pillars with a square of size 15 * 15 cm in cross section. The pillars are concreted into dug holes. The bases of the pillars that will go into the ground, pre-treat with a moisture-resistant compound (you can use bituminous mastic) and wrap with roofing material.
- Using ties and brackets, fasten the rafters to the posts in two parts (upper and middle).
- Make the roof in the form of a crate from a lining. Turn the slats of the lining down. Cover the roof with any material you need.
- Fasten a beam with holes in the middle of the pillars. They are designed to secure the gate.
The hole for the gate axis must be made in the form of a cylinder from the sides, and the gate handle must be laid in the beam from above, like a groove. The holes are made smaller in diameter than the diameter of the axis and handle.
- Glue a wooden plate onto the groove.
- For the gate, take a dry log, trim the edges of which with metal corners and secure with washers.
- Drive the axle and handle into the holes. Bolt the handle onto the handle.
- In front of the well, nail a wide board - a shelf for a bucket.
- Place narrower boards around the perimeter. They can also serve as a frame for the door.
- Hang the door on the hinges.
A real house (not a house) for a well is needed if you have hydro from the well pumping station. Then not only the well itself needs protection, but also the machinery. And you can't get away with a simple house here. Can be built closed gazebo for such cases.
You can build a house without sheathing, that is, for this you just need to attach two racks to the base and make a roof from an ordinary profile sheet.
marquee
The process of creating a tent consists of the following steps:
- Pillars are dug in along the perimeter of the well. It is better, of course, to concrete them into pre-dug holes. Do not forget to treat the part of the tree that is being dug in with bituminous mastic and wrap it with roofing material.
- Pull the canopy over the poles.
This version of the roof superstructure is also suitable for abandoned wells and looks great as a design element on the site.

The proposed roof for the well has a stone base. Large stones are placed on the cement mortar. The inner diameter of the base should be 1m 20 cm, and the outer one and a half meters. Such a massive foundation must also have an equally worthy foundation. The foundation in this case can be the concrete rings themselves, which are the walls of the well itself. You can also lay a special foundation, which is laid to the depth of non-freezing. Using the latter option, use concrete pillars to a depth along the diameter of the well.
Outline the boundaries of the foundation and dig a small ditch 20 cm deep and 30 cm wide. Using a drill along the ditch, make holes 60 cm deep. Pour concrete into the holes and lay the first row of stones on the mortar that has not yet hardened. cement mortar
Immediately in the process of laying the first row, two supporting pillars made of timber are also built into it.
Please note that for artificial "aging" of the masonry, it is necessary to add a little gravel to the solution.
Now it's up to the canopy itself. It is built first on the ground. The roof should have a triangular section and is already mounted on supports in finished form.
For the roof, you will need 5 * 10 cm bars. First, connect the rafters and the ridge with the bottom bar, which is located longitudinally. Put the resulting structure on the ground with one slope and, similarly to the first, fix the second rafters. Secure the rafters with cross bars.
On the supports from above, make special grooves for the ridge. Four supports for the roof with load-bearing supports are connected in a groove, and with roof rafters - with bolts.
But the roof still needs to be sheathed. For the first layer of the crate, ordinary boards or plywood, which are attached to the rafters, are suitable. Then spread a layer of roofing material. Well, then any roofing material - tiles, metal profiles or slate. Just carefully hammer the ends of the roof with boards.
Fasten the roof to the supports and install the water raising mechanism.
A few words about the mechanisms for raising water in wells
Finally, we can not say about the mechanisms for lifting water, which are an integral integral part roof superstructure and are attached to the roof supports.
- The gate is the most common. To make it, you need a log. Its length should be less than 5 centimeters of the distance between the pillars of the well to which it will be attached.
If there is no suitable log, an ordinary beam with a section of 20 * 20 cm will do. Attach a round plate to it from the side and circle the outline. Then, using a jigsaw, give the bar a round shape.
From the sides of the log to a depth of 13 centimeters, drill a hole with a diameter of about 2 cm. As noted earlier, the diameter of the pipe of the axle shaft handle should be slightly larger. So the gate will be stronger.
It is desirable to fix the gate on the axis with washers. A chain is attached approximately in the middle of the log.
- Crane. It seemed that such wells have not been found anywhere for a long time. An no. Such a mechanism gives your architectural structure a special old Russian chic.
For this mechanism, you need a pole with a fork, where a long “crane” pole will be attached. Another wooden pole is attached to one end of the pole, the diameter of which is half that. A chain (short, about 1 m) with a bucket is attached to this narrower pole. And at the other end of the pole, a load is attached that weighs more than the weight of an empty bucket.
If the well is equipped with this mechanism for raising water, then the well must be closed with a hinged lid.
Either a house or a cover must be equipped vent hole. It should be located either closer to the edge of the lid, or in the house - opposite the handle of the gate handle.
So, we have considered the most important and necessary information that may be needed in the practical construction of a roof for a well in your suburban area. To avoid extra costs, you, using the advice of this article, are able to choose the right material yourself, install a house, build a gate and build a roof. And most importantly, you can do all this on your own, without resorting to anyone's help! It is possible that after completing the work, you will most likely feel tired, but it will be a pleasant tiredness, flavored with a sense of pride in your skillful hands. A do-it-yourself well roof is a dream that you can fulfill by reading the materials in this article. For business!
The owners of an autonomous well should prudently prepare a shelter for it from external influences and attacks from intruders. A do-it-yourself well house will hide the equipment from prying eyes and provide sufficient thermal insulation. This option is especially relevant in a situation where the pumping station is installed on the surface. The functions of the building can be expanded by using it to store tools.
But it should be understood that such an outdoor building may not fully protect the components and assemblies of the plumbing system from external influences. For this, a caisson is used - a sealed container made of metal, plastic or other materials. The container has an opening in the lower part for the entry of the casing pipe, at the top there is an opening for access to the well, which is hermetically sealed. Arrange. But in some cases, the device of the caisson is impractical - for example, if water is taken only in summer. In this case, a simple house will suffice.
Material selection and design
A country well with an open casing pipe remains defenseless from external influences. The entry of stones or small rodents into the well can spoil the operation of the pump. The safety of equipment is a separate conversation, an expensive water lifting unit can be lifted and stolen in the absence of owners. For well protection, ready-made metal containers, but they will stand out ugly on the site. In order for the appearance of the house for the well in the country to harmonize with the surrounding space, it is better to make it to your taste.
 Metal box for a well
The main building materials are wood and brick. From lumber, you can assemble the entire structure from the frame to the roof. Brick will only go to laying walls, the construction of the roof will require wooden rafters and one of the roofing.
Advice. Before starting work, the timber and boards are treated with an antiseptic. This procedure will extend the life of the building.
In order to avoid difficulties during construction, a house project is being prepared. It specifies the dimensions of the structure and necessary materials. Simple and affordable option will become frame building With gable roof. Depending on the height of the structure, the well maintenance door is placed on the wall or on the roof slope.
 wooden house for a well
frame structure
The following materials will be required for construction:
- dry timber 5 × 10 cm;
- board 10 × 2 cm;
- lining, block house or siding;
- slats;
- flexible tile
Do-it-yourself work on building a house for a well begins with site preparation. The area near the casing pipe is leveled and compacted.
Advice. It is better to start the arrangement of the house a few months after drilling the well. During this time, natural shrinkage of the soil will occur.
Frame assembly
The foundation for the construction is being prepared from various materials: paving stones, paving slabs, or concrete foundation. The simplest and most affordable option is the concreting of corner supports.
- Places for the location of the beam are marked around the pipe. Pegs are driven in at the supports, then cords are pulled to determine the perimeter.
- Digging holes with a depth of 30 cm, the bottom is covered with sand by 10-15 cm.
- The supporting pillars are inserted into the pits, fixed with auxiliary material (stones) according to the level. Filled with concrete.
- After solidification (3-4 days), the lower strapping of the frame is performed. A beam is connected along the perimeter with the help of metal corners and self-tapping screws.
- The next step is the top harness. It is performed similarly to the bottom. For structural strength, you can install an additional vertical rack in the middle of each wall.
sheathing
The choice of material for sheathing depends on the owners. It can be a lining, an imitation of a beam or a block house, in the form of a rounded log. Lathing slats are stuffed onto the frame, if necessary, waterproofing and insulation are laid on them. The cladding is attached to the top with screws.
The roof of the house
The standard option is a double-pitched roof. For its installation, it is necessary to create a truss system. It consists of roof trusses - two boards are fastened at the ends at an angle of 30 °. You can strengthen their strength with a crossbar - a bar nailed 20 cm from the top of the truss truss. You will need two truss trusses. Between themselves, they are connected by a ridge beam. On one of the slopes, two additional beams are nailed to the ridge, which form an opening for the door.
A crate is mounted on the rafters. A waterproofing layer is laid on it tightly. Roofing material is laid on top, for example, flexible tiles or ondulin.
 Roof for building
Advice. For the convenience of maintaining the well, some craftsmen make the roof removable.
Door
The design of the door is very simple, it is a shield made of boards. For its manufacture, several boards 10-15 cm wide are laid, then they are fastened with a bar in the upper and lower parts. There are 4 screws for each piece. Reinforce the door with a diagonal bar. Metal hinges are used for hanging.
 Door for a house
Other building options
A woodworker can lay out the base of the house in the form of a log house from logs. Such a building does not require additional insulation. The roof of a decorative log house is covered with metal tiles, siding or bituminous tiles.
 log house
A house for a well in the country can be laid out of brick. Under this solid structure, a shallow-depth concrete foundation. To make the building more functional, it is erected up to 180 cm high, which allows you to use the house for storing household equipment and tools. The roof is double pitched.
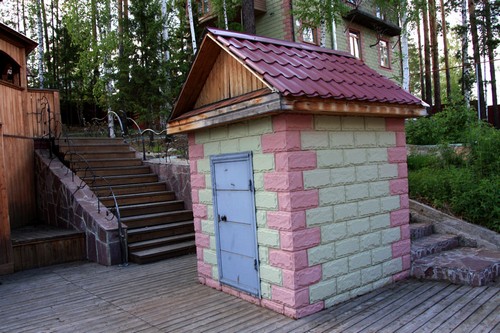 brick building
An affordable option is to equip a house made of concrete rings stacked on top of each other. One is buried in the ground and serves as a foundation. The outer wall of the upper concrete ring plastered and finished with decorative stone. The lid is made of boards, it is insulated from the inside and waterproofed. The outer part is covered with a special varnish or stain. A hole is cut in the lid for the door.
Well houses do not have special installation requirements. Their appearance and design depend on the imagination and skill of the site owner. A small structure is assembled in a short time and is quite inexpensive. Any materials are suitable for its construction and decoration.
Don't forget to rate the article.
Original ideas for building and decorating a house for a well can be done with your own hands using standard building tools. The creation of a private well traditionally ends with the arrangement of a house, which is both a protective and decorative element. There are quite a few options for finishing the mentioned design, however, the procedure for arranging houses as a whole remains almost the same. Only the dimensions, configuration and design features change. Traditionally, wood is used to build houses. Read the provisions of the presented guidelines and choose the option for decorating the house that suits your case.
Why do you need a house for a well?
Available for sale big choice ready houses for wells. However, the cost of such products leaves much to be desired. Therefore, many owners decide to build well houses on their own - there is nothing complicated about it.

The main purpose of the house for the well is to protect water from various kinds of pollution and direct sunlight. Insects, debris, animals, excess heat - all this negatively affects the quality of water.
The house will also provide reliable protection wells from various kinds of precipitation and chemicals used to spray plantations. In winter, a properly equipped house will not allow the water in the well to freeze.

Work set
- Woodworking Machine. This device will allow you to process wooden blanks as quickly and efficiently as possible. In the absence of access to a woodworking machine, prepare at least an electric planer.
- Circular Saw.
- Electric jigsaw.
- Hacksaw.
- Nail puller.
- Phillips screwdriver.
- A hammer.
- Pencil.
- Building level.
- Roulette.
- Cutting board.
- Bar.
- Fasteners.
- Roofing material. Choose at your discretion. The main thing is that the support normally withstands the weight of the finish, and the roof itself is in harmony with the surrounding space. For example, slate, roofing material, metal tile is well suited.
- Door.
- Door latch.
- A pen.
- Loops.
Prices for popular models of jigsaws
Electric jigsaw
House with gable roof

The simplest and most popular design option. Such a well house is easily built from improvised devices, because. almost everything needed (timber, boards, fasteners) remains after the completion of larger construction activities.

frame
To create the basis of such a house, boards and a wooden beam are used.

First of all, you need to choose optimal dimensions main structural elements. If the details are too thin, the well house may not withstand wind and other loads. Too voluminous elements will make the house bulky.
 House diagram. 1 - base frame, 2 - gables, 3 - stand, 4 - roof ridge, 5 - gate, 6 - gable lining, 7, 8 - roof slopes

Therefore, stick to the recommended and time-tested parameters. So, optimal thickness boards is an indicator of 4 cm, the cross section of the beam is 8x10 or 10x10 cm. The design of such a house consists of four racks of timber and the same number of boards suitable for making the top and bottom strapping. The recommended board width is 120-150 mm.

Saw the boards in advance in accordance with the dimensions of your well, and then nail all the elements one by one to the support posts. As a result, you will get a reliable and even frame. To fasten the elements of the dimensions mentioned, use nails with a length of about 100 mm.

At this stage, it is best to adhere to the following algorithm:

Roof and upholstery
Proceed to the arrangement of the roof of the well house. Start with the installation of trusses - this is a rigid structure designed to fasten the crate. Make farms from durable boards with a thickness of at least 30 mm. Choose the length individually - the final height of the well house directly depends on this indicator.


Prepare boards for jibs and crossbars. There will be enough material 2.5-3 cm thick. In general, you need to prepare 6 rafter legs, 3 crossbars and 8 jibs. Cut the rafters at an angle, and then connect upper ends products with each other. Attach with self-tapping screws.


For additional fixation of the rafters, use crossbars. They need to be placed 30 cm below the point of the upper fastening of the rafters. Create cutouts at the junctions of the rafters with the top trim boards. To connect the rafters and frame, use 12 cm nails.

Strengthen the fixation of the truss elements with jibs. To connect the farms, use a kind of skate - a construction of two boards. Fasten the batten boards in increments of about 15 cm. Provide 10 cm ledges above the walls of the building. Cover the finished roof frame with roofing material, and on top of it, if desired, fix the finishing roofing material at your discretion. In conclusion, you will only have to cover the corner joints with wind boards.


The frame of the roof structure is most conveniently assembled on the ground.

Door
The door of such a well house looks like a kind of plank shield. The door is made to the maximum simple principle. Cut boards with a width of about 150-200 mm. 85 mm will be enough in length.

Fold the boards one to the other and fasten with 30x25 mm bars. Two bars will be quite enough - you will fix one from above, the second will be nailed from below. Use self-tapping screws to fasten the elements of the product. Four screws for each board will be enough.
Nail an additional diagonal bar. It will help increase the rigidity of the product. Sheathe the gables, attach the latch and handle, and then hang the finished door on the hinges.

Do not forget to treat the outside of the product with an antiseptic and varnish it. Before applying varnish, you can paint the door waterproof.


Prices for various types of lumber
lumber
Such a well house will have an original and very interesting design. To build such a structure, you will need the following:

- rounded logs;
- boards for arranging roofs and supports;
- roofing finish;
- material for arranging the gate with a comfortable handle.
Similar well houses are often found in villages. Racks of the structure, gates and the frame itself are made from rounded timber.

Manufacturing technology
Fold the rounded timber into a log house according to the dimensions of the well. Connect the timber by any suitable and convenient method. Install two massive wooden beam supports. For additional rigidity, equip the racks of the house with props. Arrange a wide roof structure on top of the support posts. The roofing guide was given in the previous section of the instructions - do everything in the same order.

The edges of the roof should extend beyond the base of the well house. This will prevent rainfall from entering the well shaft.
Lock the gate securely. You can decorate the protruding ends of the timber with a variety of curly cutouts.

Modification of the previous design. It differs only in shape - it is hexagonal and saves additional space, which is important for owners of compact wells and small plots of land.

In general, the sequence of construction of this house remains the same as in the case of the construction of an ordinary rectangular building from a bar. The house is well suited for framing a mine with pumping equipment.

Prices for popular types of antiseptics
Antiseptics
There are several ways to decorate a house. A popular decoration option is carving. A neat carved house will fit into any landscape, the design of which is made using wood.

Also, a simple and popular option for decorating such structures is staining. Varnishes and impregnations allow you to radically change the texture and color of the material.
In some situations, it will be appropriate to decorate a house using a ceramic or wooden figurine of some animal.

Otherwise, each owner must independently consider the finishing design of the well house in order to finished construction fit well into the environment and fully demonstrated the individuality and taste of the owner.
Successful work!
Video - Do-it-yourself house for a well
TOP-8 popular roofing
| A photo | Name | Rating | Price | |||
|---|---|---|---|---|---|---|
| Piece roofing materials for the roof | ||||||
| #1 |
|
⭐ 100 / 100 |
||||
| #2 |
|
⭐ 99 / 100 |
||||
| #3 |
|
⭐ 98 / 100 |
||||
| #4 | Wooden tile (shingles) |
⭐ 95 / 100 |
||||
| Soft roofing materials for the roof | ||||||
| #1 |
|
Soft tiles |
⭐ 100 / 100 |
|||
| #2 |
|
Roll roofing |
⭐ 99 / 100 |
|||
| #3 |
|
Membrane coating |
⭐ 98 / 100 |
|||
| #4 |
|
Self-leveling mastic roofing |
⭐ 97 / 100 |
|||


- cement-sand tile is an analogue of ceramic roofing material. She also bears a resemblance to him. It is produced from a mixture of quartz sand, cement, binders and water-repellent additives, as well as a coloring pigment. In production, mainly high-quality raw materials are used. Usually it is cement from 200 and above.
- it is durable. If the material is made with strict adherence to technology, it will serve for 30 - 50 years;
- does not collapse under the influence of rain, snow, hail, does not fade under the sun;
- the material does not rust, has sufficient thickness, does not rot and does not deform;
- the material is resistant to significant mechanical stress, strong enough. The risk of chipping during installation is minimal.
- has a lot of weight;
- with resistance to mechanical stress, the material does not withstand specially applied blows;
- facing rough surface complicates the melting of snow;
- the main fragments do not differ in a great variety of forms.
Cement-sand tiles
- is considered one of the best and respectable roofing options. This is due not only to the natural origin, but also to the excellent technical characteristics of the material. In a number of parameters (strength, resistance to environmental factors, durability), ceramic tiles are superior to many other roofing materials.

- eco-friendly. Made on the basis of clay, it is not only safe for human health and the environment, but also allows you to create a favorable microclimate in the room;
- does not absorb moisture;
- withstands up to 300 freezing cycles, does not fade in the sun;
- easy to install;
- The service life of the material is 100 years.
- weight - 50-70 kg / m kV;
- fragility of tiles based on baked clay, inconvenient in storage and transportation;
- high price.
- Slate roofing not only has an attractive appearance, but also has high technical characteristics. Such a coating can last more than 200 years without losing its original properties. Slate roofing and features of elite roofing materials.

- The service life of a slate roof is 200 years. Appearance and specifications while the material remains unchanged;
- does not absorb moisture;
- resistance to sudden temperature changes;
- not subject to corrosion and deformation;
- has good thermal insulation properties.
- does not differ in a wide range of shades;
- the large weight of the plates creates a high load on the roof truss system;
- the high cost of roofing.
Wooden tile (shingles)
- designers use it to reconstruct old buildings or to create new objects in an authentic style. The manufacture of roofing elements and its laborious installation should be trusted only to experienced builders with a high professional level.

- environmental safety, no waste during installation;
- light weight;
- harmonious combination with the environment.
- the need to treat material made from hardwood with primers and antiseptics;
- leaking roofing;
- deformation under the action of moisture and sunlight;
- fragility;
- annual inspection of the coating and repair of damaged areas.
How often the attention of neighbors in the country is attracted by such a seemingly ordinary thing as a garden well. Nevertheless, there are times when this particular subject becomes the object of close attention and admiration. In this case, we are talking about the external design of the well.
Most Owners country houses does not attach much importance to the design side in this matter. Usually their "fantasy" is limited to digging a well and installing concrete rings.

But if someone really wants to transform the gray routine, he can easily turn his garden into a real fairy tale. To do this, you will need to think carefully about the garden landscape and install a beautiful house for the well as one of the elements of garden design.

The need for a well
What is the need for such a building? Is it an ordinary decoration that could well be ignored, or is its construction and installation really important.


The main task that such a design performs is to create a protective effect for clean well water from dust, various debris, and fallen leaves.

In addition, it is customary to spray the garden and vegetable garden in the spring and summer. Some summer residents prefer to use chemicals for this. At the time of processing, splashes can fly into the open space of the well.

All of the above factors are taken into account when there is a need to build a house on a well. Among other points, it is noted that if the well is closed, then the water in it does not freeze even when severe frosts begin.

Repeating, you can add the already known opinion that the construction on the well can become a decoration of the site, if a creative approach is applied to the work on its manufacture.


Well house installation options
Of course, the easiest way to buy such a house in the construction market. The range of such structures abounds in its assortment. From the simplest, sold at fairly low prices, to expensive, representing a real work of art.

If the market does not attract with its choice, you can place an order according to the corresponding catalog of wooden garden structures. Among the colorful pages with views, you will surely find a photo of a house for a well that you like, which can later be transformed into reality.

At the request of the client, craftsmen working with wooden structures, can decorate the structure with beautiful carvings, decorate using natural stones as decoration, ceramic tiles or other finishing materials.

It is the original forms of such structures and other exotic buildings that often become objects that attract everyone's attention with their originality, which naturally highlights the site on which they are located.

Independent work
No less often, the idea of buying or ordering a wooden structure is replaced by a completely reasonable decision to build a house for a well with your own hands.

All that is needed for this is to make a drawing and make a purchase. the right tools and materials. The main building material will naturally be wood. It is easy to handle, looks great and will last a long time.


Of the building materials for the house, you will need a certain amount of wooden beam, edged board, block house or wooden lining. Any of the last two materials can be an excellent finishing element.

The roof can be made of metal, polycarbonate or roofing material. As a coating, many people use siding, profiled sheet, euroslate and other types of roofing surfaces.

The requirement that is placed on the top cover is that it must be lightweight so that the installed support posts can freely support it.

Among other materials, you will need a log and a metal rod to make a gate. To process wood, you will need to purchase antiseptic compounds, varnishes and paints. Next, you need a door and door hinges To her.


For a tight grip, you will need short metal corners. Additionally, you will need metal bushings made from pipe trim (2 pieces). A metal chain is needed to lift the bucket.

The construction of the house begins with a detailed study of the drawing. Moreover, most of those who are going to build a well on their own find drawings on construction sites. And of course they require detailed study. You can also find it on the internet detailed technology performance of similar works, since installation of a framework and finishing with finishing works.

It's not all that difficult if you approach the matter in good faith. As a result, a wooden miracle will be created with your own hands.

Photo of a house for a well


