Some bulbs store well, remaining firm all winter, while others suddenly begin to actively sprout, especially store-bought ones.
Housewives are trying to put such heads to work as quickly as possible, although they could leave it for greenery if they knew how to grow sprouted onions at home. Why buy expensive onion feathers out of season when you can get them yourself from bulbs that have sprouted ahead of time?
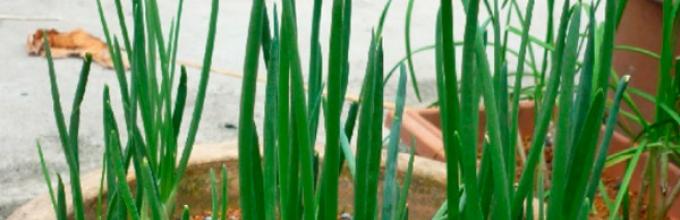
Growing sprouted onions indoors
To obtain a strong and juicy green feather, you will need a container, regular soil or water. If you want the feather to grow faster and more abundantly, you need a phytolamp or a regular fluorescent lamp.
We purchase special containers for growing onions or use egg trays, cutting off the bottom of the cells and placing them in a tray with water. Next we do this:
- If you are using a special container, pour water into it to the indicated mark and close it with a lid with holes for the onions. The technology is no different from using egg trays - they don’t cost us anything at all.
- We place the sprouted onions in the recesses so that only the roots are in the water, and the onions remain above the water. Otherwise, they will quickly rot without producing a harvest.
- We regularly change the water in the container to replenish the air supply. To enrich the water with oxygen, you can use an aquarium aerator.
Do onions grow in tap water? Be sure to settle it before pouring it into the container. We keep the planted onions on a light windowsill.
If we want to grow onion greens in the ground, we use containers with holes in the bottom and trays, since onions growing in containers with a solid bottom have brittle and flaccid feathers. The substrate can be anything: universal fertile soil, sphagnum moss or sawdust.
Planting sprouted onions
To understand how to grow sprouted onions at home, we study the following planting technology:
- Laying drainage. We place two centimeters of drainage in the form of pebbles, broken bricks or expanded clay on the bottom of the vessel: it allows the roots to breathe and retains moisture.
- Backfilling the soil. If you use garden soil, be sure to steam it, protecting the onions from infection with diseases. But it is still better to prefer light universal soil, sold in garden stores.
- Checking bulbs for signs of rot. Before planting, we inspect the sprouted onions, removing the top layer of husk from them. They should not be rotten or covered with white or dark dots.
- Planting bulbs. We plant the onions in the substrate, pressing them tightly against each other. Heads planted out of season do not grow, but dry out, so they are planted as closely as possible. The container will accommodate more bulbs, which means a lot of greenery will grow.
After planting the onion, sprinkle it with a layer of substrate, leaving a third of the head uncovered.

Caring for onions when forcing feathers
To obtain abundant, strong greenery, we provide the onion plantings with proper care:
- Lighting. For a week we put containers with onions in a cool, not very bright place: let the root system grow. Then we put them on a well-lit windowsill.
- Temperature. In the place where the onion grows, the temperature should be 20-27 degrees: the warmer it is, the faster the feather grows. However, it needs protection from overheating if the containers are in a sunny place: we wrap them in foil.
- Watering. We water the substrate as it dries, without getting carried away with frequent watering: it is better to water less often, but abundantly. We do not allow the soil to become waterlogged, otherwise the onion will rot and dry out: the feather will not be juicy and tasteless.
Sprouted onions planted in the ground do not need fertilizing. If you want to speed up the forcing of greenery, once every two weeks we water the plantings with a solution of wood ash (5 grams per 1 liter of water).
Now it’s clear how to grow sprouted onions at home in containers with water, soil or other substrate. But it is better to choose the second option: it allows you to get much more greenery than when grown in water.
From onion sets 1.5-2.5 cm in size you can grow large juicy bulbs, which is why they love it so much plant summer residents on their plots are profitable. But is it easy? Pre-sowing treatment includes a number of traditional activities: preparation of planting material, soil, formation of beds. A plant onion sets in open ground, like as a rule, in the spring. We have collected basic information about this in this article.
When to plant seedlings in open ground?
In the southern regions, it is permissible to plant seedlings in the ground at the end of April, and in other regions of Russia - only at the beginning of May. If you hurry and plant the onion in unheated soil (temperature less than 12 degrees), it will go into arrows. But there is nothing good in late sowing either: due to lack of moisture and heat, the seedlings will grow slowly. Everything has its time 😉
If you focus on the Sowing Lunar Calendar, then in 2017 the favorable dates for planting onions, including sets, will be:
- in April: 22nd and 28th,
- in May: 7, 8, 9, 19, 20 and 24th.
In June it is too late to plant onion sets.
Preparing for landing
Sorting
Before sowing, the seedlings are selected and sorted. The best specimens are considered to be bulbs with a diameter of 1.5-2.5 cm, but you can take larger or smaller sizes. The main thing is to reject specimens that have dried out, sprouted, with signs of disease and visible damage.
Don’t fall for sales and tempting offers to buy onion sets on sale. As a rule, sprouted, dried bulbs are offered at discounts. They already have practically no vitality and, despite careful care, little sense will come of it.
18 degrees for storage, well dried. If purchased and stored in an unknown location, let it sit for 2 weeks at room temperature. The sets were stored at low temperatures - such a bow goes into the arrow.
Planting material is sorted by size and planted on the bed also by size: first the large ones, then the smaller ones, and finally the smallest ones. This way the shoots will be more or less uniform.
Warming up
In order to disinfect the bulbs before planting in the ground, they are heated:
The seedlings are heated 2 weeks before planting at a temperature of 38-43 degrees for 8 hours. This is especially true if you use your own planting material and the plants suffered from downy mildew last year.
Warming up in water. Warm bath for onions. 1 day before planting, the bulbs are poured into a bucket and filled with hot water (45-50 degrees). You only need to hold it for 1-2 minutes. After this, the bulbs are transferred to cold water and kept for only 1 minute.
Soaking the sets
Once the bulbs have warmed up, we move on to the soaking stage. To do this, you can prepare a nutrient solution from biogrowth stimulants: dissolve 1 tablespoon of Intermag for bulbous crops and 5 drops of Emistim growth regulator in 10 liters of water. Soaking is carried out for 12 hours. Then there is no need to wash the sets, but proceed directly to planting. With a soaking solution, so as not to throw away so much goodness, they spill the grooves.
You can also soak onions in growth stimulants. The universal remedy “Bud” is suitable; it is used according to the instructions on the package. And to prevent sores from becoming attached, after this treatment you can hold the bulbs for 15-20 minutes in a solution of cherry potassium permanganate, and then rinse with clean water. And after that you can plant the onion.
To make the onion germinate faster, it is recommended to cut its tails to the shoulders (while still dry), and then soak them in a solution of potassium humate “Prompter” for vegetables: dissolve 1 tablespoon of the product in 3 liters of water and mix. It is necessary to keep onion sets in the solution for exactly one day (24 hours).
You can soak the seeds before planting in other solutions: potassium permanganate, vitriol, table salt. This is discussed in detail in the article.
Soil preparation
It is better to prepare a bed for seeding in the fall. It is important to remove all plant debris from it and disinfect it with a solution of copper sulfate. To do this, prepare the following composition: 1 tablespoon of vitriol per 10 liters of water. Consumption: 1 liter per 1 square meter of soil.
In the spring, immediately before sowing, the soil is dug up and fertilized. You can add 3 kg of humus, the same amount of peat and the universal purchased mixture “Exo”. It’s better to add organic matter depending on the composition of the soil (see table).

After applying fertilizers, the soil is leveled with a rake and lightly compacted. It’s a good idea to sprinkle it with a growth stimulant, for example, “Energen” (dissolve 2 capsules in 10 liters of water, use 3 liters per 1 square meter).
Then it is recommended to cover the finished bed with film for 5 days and leave it like that until sowing.
How to plant
Before planting, grooves are made on the ridge. Depth of the grooves: 4 cm. Distance between them: 20 cm. The grooves are watered with water at room temperature using a watering can with a fine strainer. Water consumption: 2-3 liters per 1 square meter.
The onions are placed in rows at a distance of 8-10 cm from each other and sprinkled with a 2 cm layer of soil. If you plant them deeper, the onions will grow poorly, and if they are shallow, the onions will become bare and, again, will grow slowly.
*Small sets can be planted more often, and large ones - less often.
The planted seedlings will hatch after 5-6 days. And now it’s worth taking care of proper care of the young shoots. But this is a topic for a separate article. 😉
Video
A very detailed and accessible description of how to plant onion sets in open ground is described in the video of our favorite channel on Youtube “Garden World”.
Dear friends, the spring May sun is warming up more and more confidently, which means that it’s time to plant onions. We hope that you have already prepared onion sets.
This is the name of a one-year-old onion grown from seeds (nigella) and representing a small onion.
Sets can be grown yourself from seeds or purchased at garden centers and stores.
How to choose sets
It is important to choose the right quality planting material. The bulbs should not be wrinkled or already sprouted. In this case, their supply of nutrients has already gone to the feather, and you won’t get a good turnip.
Also inspect them for damage and rot, this is important because such sets will not make a good onion head, it will be susceptible to disease, will grow poorly, and may even rot.
The principle applies here: quality is more important than cheapness. It is better to purchase good planting material than discounted material that does not meet these criteria.
A good set of small size, dense, with a shiny, smooth, whole and tight-fitting husk.
When to plant onion sets in open ground
The most popular month for planting onions is May. Specific dates depend on your climate zone. In central Russia, onions can be planted throughout May, as long as spring soil moisture remains, which onions respect very much.

When planting onions, it is not even the date that is more important, but the weather conditions and soil temperature. There is no need to rush planting if the weather is cold and wet. You need to wait for warm days when the soil warms up to at least 15-20 degrees Celsius.
If you rush and plant onions in cold soil, it will not lead to anything good. Although onions tolerate frost and cold quite well, their character deteriorates because of this. He will certainly take revenge on you and, instead of good turnips and greens, he will grow flower shoots for you.
Therefore, it is better to wait for stable warm weather without rain than to be left without a harvest. Pay attention not only to the lunar calendar as the ultimate truth, but also to the weather forecast, it will be more correct.
What to do to prevent the bow from going into the arrow
Even before planting, it is important to know why the seedlings go into the peduncle and how to avoid this.
The reason that onions shoot is the incorrect storage temperature of planting material, lack of adaptation before planting, and violation of care rules.

Let us explain in more detail: onion sets must be stored at above-zero temperatures, because it is the cold that provokes the onion to create arrows. This is a signal to launch a self-preservation program and give birth to offspring as soon as possible. Therefore, as soon as you plant such a set, it will begin to produce flower stalks in order to produce seeds faster.
The key to large and strong onion turnips is storage in comfortable conditions, without cold stress.
But what to do if you purchased onion sets in a store and have no idea how they were stored? No problem. Purchased onions need an adaptation period.
To do this, keep the onion near a radiator or in another warm place for two weeks after purchase. And then before planting we store it only at room temperature and in the dark so that it does not begin to germinate ahead of time.
If there is no time for the radiator to warm up or the heating has already been turned off, then you can do the following: give the onion a warm bath. Place the onion in a bowl of warm water (40-45) degrees and leave for 8 hours, periodically adding warm water. Then we take out the heads, dry it thoroughly and store it at room temperature until planting.
For planting on turnips, choose medium-sized heads, because large ones are more prone to bolting and are better planted on greens. Do not plant in cold soil. For the same reason, watering with cold water should be avoided.
Processing and soaking onions before planting
First of all, when preparing the seedlings for planting, you need to carefully sort them out. Arm yourself with several sorting containers.

It is necessary to discard all damaged and small specimens, leaving medium-sized bulbs for planting on the head. Large onions, small ones, and even sprouted ones are suitable for greens. But we throw away the empty, wrinkled, missing ones.
Next, carefully cut off the dry tail on the top of each head with scissors. This simple operation will help them germinate faster and better. Well, you need to be afraid that an infection will get into the cut, because the seedlings will be treated for diseases before planting.
Should I soak onions before planting? And what is the best way to do this? Let's figure it out.
To nourish the onion so that it grows large, it is recommended to dilute complex fertilizer in water (40-45 degrees) and soak the onion there overnight. When the seed is saturated with nutrients, you can begin its protective treatment and planting.
Most popular recipes:
- Soaking onions in potassium permanganate. Make a strong dark pink solution of potassium permanganate and soak the onions in it for 2-3 hours. After this, they will need to be washed under running water so that the concentrated potassium permanganate does not damage future young roots. Potassium permanganate prevents fungal and bacterial diseases.
- Soaking onions in saline solution. 1 tbsp. Dilute l salt in one liter of water, immerse the onions in it for 2-3 hours. Salt also prevents rotting and disease.
- Soaking in copper sulfate. 1 tsp copper sulfate per 10 liters of water, for 10-15 minutes. Copper sulfate disinfects seedlings and protects them from diseases.
Treating onions before planting with salt, potassium permanganate and ash
For a three-liter jar of warm (60 degrees) water, take 2 tbsp. l with a slide of salt + dark pink solution of potassium permanganate + 2 tbsp. l wood ash. Soak for 2 hours.
Treating onions before planting against pests with birch tar
The most nasty pest of onions is, of course, the onion fly. Luckily for us, she cannot stand the smell of birch tar. And if you want to protect your crops, then it would also be a good idea to soak the onions in the solution: 1 tbsp. l. tar in a liter of water for 10-15 minutes.
The same solution can be used to additionally water the plantings during the growing season.
Onions planting and care in open ground
As we know, onions cannot be planted in the same place where the onion bed was also located last year. In this case, the likelihood of disease increases greatly, and such plantings should be avoided.
Choose a place where tomatoes, carrots, potatoes, legumes, cucumbers, zucchini, pumpkin, and cabbage were previously planted. The soil after them retains its nutritional value, and the onion needs this to grow a good turnip. Onions and carrots have good neighborly relations; they repel each other’s pests, so you can plant them side by side.
He also prefers the soil to be light, loose and nutritious. Loves bright places, with good drainage, without stagnant moisture.
It is better to prepare the future onion bed in advance in the fall, loosen the soil well and add humus and compost. In the spring, one to two weeks before planting, we loosen the soil and sprinkle it with organic humic fertilizers. Will do.
Planting an onion on a turnip (on the head)
We prepare grooves approximately 8-10 cm deep. The distance between them is at least 15 cm.

We spill them with a disinfection solution. You can use both powder (1 tsp per 10 liters of water) and paste (1 tbsp diluted paste per 10 liters of water).

We plant our seedlings in the spilled grooves at a distance of 10 cm from each other. We sit him on what is called “shoulder-deep”, i.e. not only to cover the roots, but much deeper. This is necessary so that the bulb has good contact with the soil and does not dangle, because It won't be long before she has roots.

Sprinkle wood ash on top as fertilizer and disinfection. And fill the grooves with earth.

Planting onions on greens (on a feather)
When we don’t have a goal to grow turnips, but we only want greenery, then to save space we suggest you use the bridge planting method.
This is when the bulbs are planted one to one very tightly and not very deep. In this case, planting in open ground is not necessary; you can use a container with soil. Or select a small place in the garden bed.

Mixed fit on the pen and head at the same time
When we don’t have a lot of space, but we want to grow good onions and eat greens, then this method will come in handy. We make the furrows as usual, but we plant the seedlings in them in a checkerboard pattern and quite often.
With such a goal that some of these seedlings will grow into turnips, and some can be pulled out as they grow into greens and consumed fresh.
Otherwise, the actions are the same as for classic planting on a turnip (see above).

Onion care
When we have organized a good garden bed, in a well-lit place, with nutritious, loose soil, all we have to do is weed it in time so that weeds do not interfere with the growth of the crop. We water after planting once a week.
Onions also need frequent loosening of the soil (between rows and between plantings, especially after rain, so that the soil does not turn into crust) and fertilizing.
At the end of May it is necessary to feed it with nitrogen-containing fertilizers, in mid-June - it already requires potassium fertilizers and ammonium nitrate. For those who prefer to do without chemicals, green fertilizers made from weeds and nettles, vermicompost and ash are suitable.
Fertilizing with ammonia is also effective: 2 tbsp. Dissolve a liter of ammonia in 10 liters of water; you need to water it on wet soil, not dry soil. Therefore, we pre-moisten the beds. Ammonia will drive away pests and nourish your plantings with the necessary nitrogen.
We do this feeding in triads with an interval of 10 days. And you will forget about the yellowing of the onion feather, and the onion fly will not even stick its nose into your beds.
That's it, dear friends, there is nothing complicated in growing onions, you will definitely succeed.
How to treat onion flies
Summer residents often encounter a situation where prepared planting onions germinate ahead of schedule. This happens due to improper storage and non-compliance with temperature conditions. Contrary to popular belief, this root vegetable “loves” both cold and heat equally; in the first case, there is a high probability that it will spoil, and in the second, it begins to germinate quickly. To prevent this from happening, you need to store it in a cool and dry place with good air circulation, at a temperature from 0 to +20 C. If the moment is lost, germination cannot be stopped, a logical question arises: is it possible to plant sprouted onion sets? Onions are a finicky crop, it is worth discussing this in detail, in order.
You should not store onion sets in a cardboard box, as many do, making a grave mistake - the cardboard draws in moisture and transfers it to the bulbs, thus unconsciously creating all the conditions for its germination.
The best time to plant onions
It is believed that the earlier you plant onions, the better. In reality, it is not the time that is important, but the accompanying weather conditions for planting. Regardless of the air temperature, the soil must warm up to at least +30 C; in unheated conditions and with periodic night frosts, the planted crop will certainly go to waste.
Planting sprouted onions
But you can’t wait too long - the soil must be moist and contain enough moisture, thanks to which the bulbs will form a strong and developed root system in just a few days. It should be added that a common mistake is planting onions according to the sowing or lunar calendar, without taking into account the size of the territory of Russia and the many climatic zones that surround it. Under normal weather conditions, the most favorable time in almost all regions is considered to be early to mid-May.
What to do with sprouted onions
Onions do not always germinate earlier, until it is time to plant. The culprit for this is often a delayed winter; naturally, in such a situation, it grows, regardless of storage conditions.
Note! If unfavorable weather disrupts plans, and the onion set sprouted before planting, all that remains to be done is to continue to germinate it, otherwise it will spoil, and right in the house, so that at least you can use the onion greens.
For these purposes, use a box with soil, where the seedlings are planted close to each other and watered abundantly. The original solution is a kind of bottle ridge:
- earth is poured into plastic bottles;
- make many holes in height;
- bulbs are placed in them in a horizontal position.
Onion in a bottle
This method of growing has a number of advantages:
- The “home flower bed” takes up little space on the windowsill, where at least a dozen bottles are placed;
- Onions grown in this way are easy to conveniently water, simply pouring water into the neck of the bottle, it will evenly moisten the soil;
- It is also convenient to cut greens using ordinary stationery scissors;
- There will always be fresh early leeks from the sets on the table, before the peculiar planting of the virtually doomed ones;
- In cold, dank weather, a bulbous “herbarium” looks lushly green on the windowsill, looking like an exotic plant.
Is it possible to plant sprouted onion sets in the ground?
Important! Many gardeners believe that sprouted onion sets are hopeless and are simply thrown away. But in fact, it can be cultivated, and to the question: what can you do with sprouted onions, there is a simple answer - plant them with the rest.
It should be noted that not all and not for its intended purpose:
- If the bulb has sprouted slightly, it’s okay - it’s quite suitable for planting, like all the others. After proper preparation, it will not shoot arrows and can please you with the harvest;
- If the sprout is already large enough, the set can be grown, but it will no longer produce a turnip - the plant will give everything to the above-ground part. It is suitable for greens, but the sprouts must be cut off before planting;
- If the onion has an excessively long sprout tail, and the bulbous part is dry and wrinkled, such a specimen is truly hopeless. No measures will help, it should be thrown away.
Onions in the garden
Before planting, sprouted onions especially need processing - soaking in a special complex solution, in which they are saturated with useful substances that promote healthy growth.
How to plant sprouted onions
Planting sprouted sets is no different from the rest, regardless of whether they are grown onions or for feathers:
- immediately before planting, germination is carried out by soaking;
- the bed must be at least 5 cm deep so that the seedlings are 3-3.5 cm underground;
- the distance between each of the planted bulbs is from 10 to 12 cm;
- the interval between the beds is 25-30 cm.
Note! Before planting on greenery, it is imperative to cut off the sprouted top, it will grow even more magnificently and intensively, but you cannot even partially cut the root, otherwise the plant will die, even if it is completely healthy.
What to do if onion sets become moldy
If stored in a too damp place, without access to fresh air, onions, in addition to sprouting, may become moldy. It is quite simple to determine this - the head is covered with a powdery coating, bluish in color. If you squeeze it with two fingers, it turns out to be soft and wrinkles like a punched soccer ball, often accompanied by an unpleasant, musty smell.
Important! Is it possible to plant sprouted and moldy onions? In this case, you will receive one harm. Fungal spores will quickly spread through damp soil, destroying onions and affecting neighboring crops.
Sprouted onions that are not dried out or covered with mold can bring benefits, and under favorable circumstances, even a harvest. Therefore, you should not despair, write off and throw away such an onion.
Maria Lugovaya:
The sale of onion sets begins in February, and the peak of sales is in March. At this time, the full range is presented and you can find any variety. Of course, it is easier to buy onions in April: you will have to store them for a very short time and with less losses before planting, but you may not find some varieties.
Onion sets react to changes in temperature and humidity, so the more often they are handled and transported from place to place, the faster they begin to grow and germinate. And since it is difficult to create all the conditions for its storage in garden centers, onions sometimes reach gardeners in a deplorable state. And we need to save it until May.
Best size
Before sale, onions are calibrated in size into several fractions:
8–14 mm - the smallest. This is the optimal size for winter planting; onions do not bolt, but bulbs that are too small are likely to freeze. For spring planting, the size is very small; there may be a lag in ripening from the average fraction of about 3 weeks (small bulbs are obtained in poor soil).
14–21 mm – middle fraction. It is widely used for winter planting. The bow doesn't shoot. Best size for planting in spring.

21–24 mm - large faction. Designed for winter planting - only for greenery. When planting in spring, bolting is possible in certain varieties due to improper storage or early planting (when the temperature changes sharply), but its advantage is early ripening and a guaranteed harvest (usually even the most inexperienced gardeners succeed).
24–30 mm - a large faction that has appeared on sale only in recent years. The advantage of this fraction is its very low price. Designed for winter planting, only to obtain greenery. The features of spring planting are the same as those of the previous faction.
Samples – onion sets size 30–40 mm . Used mainly to produce greens. If stored properly, even bulbs of this size will not bolt. But just in case, it is better to warm up such material before planting.

The onion is frozen. What to do?
You shouldn’t buy onions outside in cold weather; they will definitely be frozen. Frozen onions after defrosting look like boiled ones, become soft, and acquire a sharp, unique smell.
If it is severely frozen, then after some time it not only becomes wet, but actually flows, and it can no longer be preserved. If only the top scale is frozen (it looks like it has been scalded), it means the bulbs have experienced stress and are starting to grow. They can be planted to produce fresh greens.
Secrets of a successful purchase
The onion set should be of uniform color - without stains, firm to the touch, dry, without visible damage, without mold. Many stores do not provide the necessary conditions, so they sell onions wet. If the set is a little damp (usually it is darker in color), it is enough to scatter it at home and dry it.
The exact name of the variety and shelf life must be indicated on the packaging. Onions are stored until May, so storage times are approximate.
Onions are planted as soon as the soil warms up enough. Late April–early May - depending on the weather. Small onions can be planted early, large ones 7-10 days later.

Storage before planting
The most important thing is that the temperature does not change randomly. Changes are possible within 1–2 degrees. Otherwise, the bow will be stressed and it will shoot. It is advisable to maintain humidity around 70–75%. The onion needs ventilation; nothing should be placed on it. You can store it in a net (previously, many people stored onion sets suspended in a stocking), in uncovered boxes (but not in cardboard boxes, they become damp).

Store correctly selected onions in a dry, ventilated room at a temperature of +10...+15 °C. Storage at higher temperatures is also possible, but you need to check periodically to make sure the onions do not dry out. Sprouted, sprouted onions are kept in the refrigerator at a temperature of +1...+2 °C in the vegetable compartment.
Onions can also shoot if planted early, when they sense fluctuations in soil temperature. For example, if during the day it is +5 °C, and at night –2 °C. That's why
Maria Lugovaya, JSC "Lukamore"


