Even the most reliable and high-quality foundation waterproofing cannot indefinitely resist ground moisture. Sooner or later, water will find its way through opened capillaries, cracks and mechanical defects in the insulating layer. To prevent this from happening, and to prevent the foundation from becoming a capillary pump and a source of dampness in the premises over time, it is necessary to remove groundwater away from the foundation or at least reduce the capillary pressure on the waterproofing surface.
Most reliable way To protect the foundation from getting wet is to remove water from it through drainage. The following describes various drainage systems and provides examples of their implementation.
What is drainage and how does it work?
If waterproofing can be compared to a wall for water, then drainage is like a drainage pump. Waterproofing and a drainage system around the house complement each other perfectly and provide the most complete protection of the foundation from ground moisture.
As you know from a school physics course, liquid, according to the law of communicating vessels, always flows into a lower place. Do not forget that in the soil moisture spreads through the capillaries quite slowly. Therefore, quickly draining the collected water through the drainage pipes allows you to create a dry area behind them. It is this effect that is used to protect the foundation of the house.
It is not difficult to lay drainage around the house with your own hands. It is a system of perforated pipes that collect groundwater, which flows by gravity to a discharge point in a suitable place, for example, to a special well.
In any case, drainage pipes are installed at a slope. Ideally, the soil around the house has a slight slope, and there is a ravine nearby where water can be discharged. In a horizontal area located in a lowland, water has to be collected in a special storage tank - a drainage well, from where it is periodically pumped out as it fills. The accumulated moisture can be used both for technical needs and for watering plants.
Ready-made drainage pipes can be replaced with homemade ones. A do-it-yourself drainage pipe is made from orange water pipe (thick-walled pipe for outdoor installation). The effect is achieved by drilling many drainage holes in it.
Types of drainage for a private house
There are two types of do-it-yourself foundation drainage for a house: surface and deep. The first of them is necessary for draining water after melting snow and rain from the surface of the soil or blind area. Structurally, this is an ordinary storm drain. Water is collected into it along the foundation area, which has a slight slope from the wall of the house in the direction of the sewer pipe. The size of the storm drain depends on the maximum precipitation level in the area and the area of the roof that collects water.
To protect from groundwater, it is necessary to equip a deep drainage system. Moreover, it should be located as low as possible, ideally below the base of the foundation.
To save money and time, some inexperienced developers combine the waste and drainage systems by organizing the drainage of roof gutters into a drainage pipe. This should not be done under any circumstances, since during rain the drainage pipe does not have time to drain water wastewater, and they actively penetrate into the soil through perforation, causing waterlogging around the drainage. If there is nowhere to drain rainwater, you can drain it directly into a drainage storage tank, but always through its own separate pipe.
The drainage arrangement itself greatly depends on the type of soil. So for sandy soil with a high clay horizon lying above the base of the foundation, drainage should take place at the junction of the clay and sandy horizons. Heavy clay soil does not allow water to pass through well, and to determine the depth of water penetration, you will have to dig an exploration pit. On very wetlands, it may be necessary to create a local watershed using a waterproof film or even a concrete barrier in the ground.
Arrangement of deep drainage
The main element of underground drainage is a perforated drainage pipe that collects water from the ground and transports it due to its slope. The greater the slope, the more efficiently the home’s self-installed drainage works, and the more water is drained from the ground. But a strong slope leads to a sharp increase in the amount of work, especially with a large length of the water drainage system.
On the other hand, a small slope of the pipes slows down the movement of water and leads to gradual silting of the internal channels. A slope of at least 1 cm per linear meter of pipe is considered acceptable. The slope angle must remain constant throughout the drainage. Otherwise, sediment will begin to accumulate at the fracture sites, which will gradually lead to blockage of the pipes. During drainage installation, this angle must be controlled using a meter bubble level and a centimeter lining.
A drainage ditch is dug along the perimeter of the foundation no closer than 50 cm from it. If the blind area of the house is wider than half a meter, we dig a ditch along its edge. The minimum width of the ditch is also 50 cm. The wall closest to the foundation is made vertical. The opposite slope of the ditch has a slight slope. Further actions depend on the type of soil and the level of waterlogging in the soil.
Construction of a drainage system on light soils
If the soil does not suffer from high humidity and has a light mechanical structure, drainage can be arranged according to a simplified scheme. Water-permeable geotextiles are laid at the bottom of the ditch with overlapping edges. A layer of coarse sand and several centimeters of medium and fine gravel are poured onto it. A drainage pipe is laid on top of the crushed stone.
Then it is completely covered with crushed stone and the whole thing is covered with the edges of agrofibre. Sand and crushed stone act as a filter, trapping solid particles that can clog drainage holes. The ditch with the pipe is filled with a thin layer of small crushed stone and then with soil.
How to make drainage around a house with high levels of waterlogging
For heavily waterlogged soil, the drainage described above will not be enough. To separate excess moisture, waterproofing is first installed along the outer edge of the ditch. The simplest option to make such an artificial watershed is to cover the outer wall of the ditch with a waterproof membrane or several layers of roofing felt. The depth of the ditch in this case must exceed the level of the waterproof clay horizon or be below the base of the foundation.
For complete protection, the drainage must complete a perimeter around the foundation. The drainage point is installed in the place where the pipes are most buried. As already mentioned, storage capacity can serve to collect both groundwater and precipitation. In this case, the joint use of drainage and drainage pipes is unacceptable, and the groundwater discharge point should be located below the connection point for the rain drain.
Bottom line
A drainage system around the house provides a fairly high level of protection against the foundation getting wet. Thanks to a properly equipped water drainage system, you will be free from many problems associated with increased dampness for many years.
Excess water in country house even more dangerous than its deficiency. You need to know how to remove it and store it for future use. After all, during the season, the supply of moisture and the need for it are unequal, which means the process needs to be controlled. House drainage systems will help with this.
Drainage systems around the house
Excess water in the soil surrounding a country house can cause irreparable damage to the foundation and buried parts of the building. The reason for this is the hydrological situation at the construction site. This can happen for various reasons:
- high location of aquiferous sand, which results in an increase in moisture levels during seasonal peaks from snow melting;
- the presence of waterproof clay soils that prevent the rapid outflow of liquid;
- the location of the house in a lowland, due to which runoff from the surrounding area is directed towards it.
This largely occurs as a result of errors in the design and construction of a house in unfavorable hydrogeological conditions.
The wall drainage system, together with good waterproofing, removes moisture from the foundation, extending its service life
Types of drainage by design
There are several types of drainage systems for removing excess moisture:
- Open water discharge devices. They are made in the form of ditches. To protect against siltation, large stones, fragments of brick or crushed concrete are placed at the bottom of the ditch. Such devices are used only for draining liquid from large areas. The sanitary and aesthetic condition of the spillway does not allow its use around the house.
Water in such ditches can stagnate, so open drainage local area not applicable
- Backfill pipeless systems. They are the same ditches with the same filling. The difference is that the fillers are wrapped in geofabric, which acts as a filter. A gravel bed and a sand filter layer are poured on top of it. The unfilled space is filled with previously removed soil. The soil is reclaimed, as a result of which the device quickly becomes overgrown with grass and becomes invisible. Cleaning such drains is impossible; they can only be redone.
The backfill drainage is covered with a fertile layer of soil, but it cannot be cleaned if it is clogged.
- Closed drainage systems. With this design, the ditch is covered with geofabric with the edges extending onto the walls, after which medium-fraction gravel is poured into it. Next comes the laying of pipes and their joining with couplings or tees. They are placed with a slope towards the drain of about 2-3 degrees and covered with gravel on top with a layer of up to 20 centimeters. Then the edges of the geofabric are wrapped with an overlap. It is advisable to sprinkle this entire “pie” with a layer of coarse sand up to 10–15 centimeters. The surface is leveled by backfilling the previously excavated soil and reclamation of the turf layer.
To increase the reliability of drainage, drainage pipes (drains) are covered with a layer of gravel on top
Types of drainage systems by purpose - design and installation
To normalize living conditions in a waterlogged area, several types of drainage systems are used. To remove excess moisture from the site, developed systems are used. The distance between the drains in them is determined by the qualitative characteristics of the soil.
Ring systems
Such drainage schemes are arranged in the absence of recessed rooms in the design of a residential building. The distance from the foundation to the drains in this case is 2–4 meters. This is also due to the characteristics of the soil. On heavy loams or clay, the drain is capable of draining a limited area around itself, while sandy or light sandy loam soils help collect water over a larger area.
Inspection or rotary wells are installed in the corners of the drainage system. Their purpose is to inspect the condition of the system and, if necessary, clean the drains from above with water under pressure. Such wells are also installed on straight sections longer than 10 meters. In a closed system, water flows through drains into a storage well or a special container - a tank. When the system overflows, the liquid is automatically pumped out of the area. After purification in the tank, the water is suitable for use for household needs - for washing a car, watering the garden, etc.
A drainage ring system is often combined with a storm sewer system.
Such a system is considered mandatory if the house has recessed rooms - basements or semi-basements. Its installation is usually carried out during the construction process when installing the foundation. The depth of the drains should be approximately 50 centimeters below the supporting plane of the base of the building. The purpose of wall drainage is to collect and remove moisture from the foundation. For its construction, exclusively perforated pipes insulated with geotextiles with gravel and sand filters are used.
The wall drainage system is performed as follows:
- After the concrete foundation has been properly cured, the formwork must be dismantled.
- Waterproof the base wall. To do this, it is better to use bitumen mastic with pre-treatment with a primer. The brand of primer is indicated on the package with mastic. Leave the layer for 24 hours, then repeat the operation.
After complete drying, the foundation must be coated with bitumen mastic for waterproofing.
- Deepen the ditch along the foundation by approximately half a meter.
- Cover the bottom of the ditch with geofabric, secure the edges to the wall of the ditch and to the foundation.
- Pour gravel into the bottom in a mixture of fine and coarse fractions in a layer of 20 centimeters. If a pipe with a coconut filter is used, coarse sand should be used instead of gravel.
- Lay drains, maintaining a slope of about 1–2 mm per meter of length in the direction of liquid drainage. Check the slope with a laser or spirit level.
Drainage pipes are laid along the entire perimeter of the foundation with a slope towards the drain collector
- Install wells in the corners of the drainage system.
- Cover the pipes with gravel (or sand) in a layer of approximately 20 centimeters above the pipe. Wrap the ends of the geofabric over the gravel with an overlap.
The drainage pipe is covered with a layer of gravel and covered with the remaining part of the geotextile.
- Fill the ditch with previously removed soil. As an option, instead of backfilling with soil, you can make a clay water seal. To do this, clay in the required amount is soaked in water for a day. Then a solution is prepared from it with the consistency of thick sour cream. You need to add fiber shavings to it as a reinforcing element. The solution is laid on top of the geotextile at a level below 10 centimeters from the top edge of the bitumen waterproofing. The clay seal must be dried for 4–7 days, periodically spraying it with water.
Further actions are performed together with the device storm sewer.
Basement drainage (layer)
It is advisable to use reservoir drainage when groundwater is high or there is a reservoir near the house. Basically, it operates at maximum seasonal water inflows.
Installation of such drainage is carried out during construction before laying basements in the following order:
- A foundation pit is being excavated to construct a basement.
- On the bottom cleared of construction debris, a geotextile sheet is laid and a gravel bed is arranged.
Reservoir drainage is installed in a pit dug and filled with gravel.
- The drains are laid out and brought out for joining with the wall drainage system during its installation. To do this, sleeves made of steel pipe are put on them in order to subsequently place them in the body of the foundation.
To connect drains, special metal or plastic couplings are used
- After this, the geotextile is wrapped over the gravel layer and the top layer of gravel is poured.
- The bottom of the basement and the foundation itself are being poured.
- A wall drainage circuit is installed, and a reservoir circuit is connected to it. A well is installed at the connection point.
Storm drain
The name itself suggests that such systems are used to collect and utilize rain and melt water from the site. Stormwater is especially necessary on soils with a base of low-permeability clay layers.
The main functions of storm drainage are:
- collection of rain and melt water into storm water inlets;
- sand filtration;
- cleaning fluid from oil contaminants.
If all these functions are implemented as part of a storm drainage device, the water from it can be used for household needs.
To implement such tasks, the following devices are needed:

Thus, they are realized additional functions storm systems:

The following components are used for storm drainage:
- drainpipes and gutters - used as part of the roof of a building to collect water and direct the flow into the drainage system;
- trays - installed to collect rain flow and transport water to storage tanks;
- storm water inlets - serve to accumulate liquid and its initial sedimentation before settling of large solid components;
- collector well - intended for combining wastewater from different storm water inlets and final settling of water.
Storm drainage is a surface installation system, so it does not require significant excavation. A special feature of its design is the use of pipes with solid walls for transporting wastewater. The drainage wiring is mounted separately and uses perforated channels.
Photo gallery: components of storm drainage
Do-it-yourself drainage around the house
The essence of the issue is to practically solve the assigned problems with minimal costs Money. To do this, it is necessary, first of all, to develop a drainage device.
Drawing up a drainage system diagram
This activity can be successfully completed only on the basis of objective data from a hydrogeological survey of the site. To do this, test drilling can be done at several points. This can be done using a small diameter auger drill. The more pits are made, the more accurate the information for decision-making will be.
By examining soil samples from different well depths, you can get an idea of the quality of the soil and its moisture content, that is, obtain objective information to answer the following questions:
- at what distance from the walls of the house to install ring drainage;
- is there a need to install reservoir drainage;
- at what depth to lay drains;
- what pipes to choose for the drainage system.
Based on the research results, materials are selected, a layout diagram and type of catchment are drawn up, and all necessary system components are purchased.
Installation of drains
The system is assembled after laying geofabric in the trench and filling the bottom layer of gravel filter. The pipes are laid out along the axis of the ditch and the presence and magnitude of the slope in the desired direction is checked. A good way to do this is to use a laser level. For different types pipes, the angle of inclination should be slightly different, but on average it is enough to provide a slope of 1.5 mm per linear meter of pipeline.
After that:

After the work is completed, only well covers and drainage grates will remind you of the presence of the system.
Video: drainage installation around the house
By getting rid of excess moisture around a country house, you can not only protect yourself from a number of troubles. It is quite possible to use the allocated water rationally. The excess water accumulated in the spring can be very useful during the dry summer.
For comfortable living, preventing destruction and increasing service life, buildings are equipped with a drainage system. And in some cases, given climatic conditions and the state of groundwater at construction sites, it is impossible to do without such work. How to properly make drainage around a private house, what types of structures are used, as well as the procedure for performing the work, we will now consider.
Drainage systems are engineering communications located outside buildings, designed to remove moisture from the foundation or site, which can appear as a result of the influence of groundwater, as well as flood water and precipitation.
Conditions under which drainage must be done:
- The soil at the construction site is characterized high content clayey rocks.
- A large number of precipitation in the construction region.
- The terrain of the site, as well as its location, contribute to the accumulation of moisture and do not allow it to escape beyond its boundaries.
- High groundwater level.
- Nearby buildings have deeply buried foundations.
If groundwater is close to the surface to improve the surrounding area, as well as create favorable conditions for growing plants, drainage is arranged around the entire site.
Types of systems

Structures are divided according to the method of their installation and intake of excess water, as well as location options in relation to buildings. Depending on the purpose of the system and the type of foundation of buildings on the site, drainage communications are located in two options.
1. Directly at the wall of the building - drainage is installed if the building has a deep foundation in the ground. This may be due to the need to equip a large basement or ground floor. This design prevents moisture from entering, consequently, flooding of premises and subsequent destruction of the building. Installation is carried out below the level of the foundation base.
If the drainage system around the house is located near the walls, this does not mean that external waterproofing is not necessary. Preparatory work and installation of drainage systems should be carried out simultaneously with the start of construction. Therefore, when digging a pit or trench, you must immediately make a reserve for the width of the expected communications.
If the soil is characterized by a large amount and high level occurrence of groundwater, and the building is located on slab foundation, arrange reservoir drainage in the form of additional crushed stone backfill. In this case, moisture under the building will be drained to the wall drainage system.
2. With an indentation from the walls - communications are arranged if the buildings stand on a shallow foundation and the composition of the soil does not allow water to quickly absorb and escape. Therefore, the drainage of the house is laid at a shallow depth. As a rule, communications are laid behind the foundation blind area or, depending on the characteristics of the site, at a distance of up to three meters from the building.
According to the installation method, drainage systems for a private house are divided into two types:
- Closed - with this method, the storm channels are completely hidden and moisture enters them directly from the ground.
- Open - an option when water penetrates the system not only from the soil, but also flowing down its surface. In this case, drainage channels can be open or protected by gratings. As a rule, such communications are shallow. In addition to removing moisture from buildings, in this way you can make drainage around the site if it is flooded or very swampy.
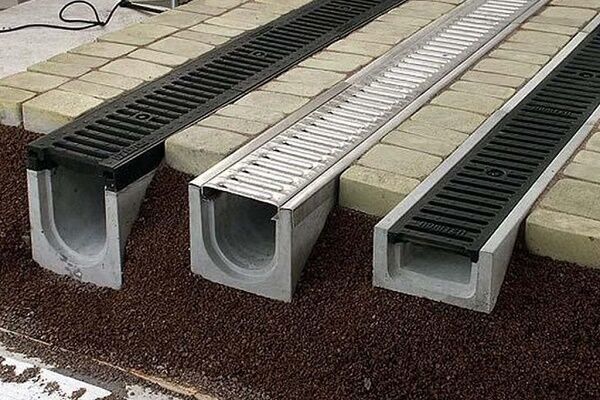
Structural elements and materials

Wells - perform a number of functions:
- Water collection and drainage.
- Monitoring the working condition of structures.
- Maintenance.
- Sump filter.
Depending on the purpose, their diameter can be from 30 centimeters to one meter. Used for deep drainage concrete rings or ready-made plastic wells industrial production. Large diameter plastic pipes can be used.
- Trays - used for open drainage, they are made of concrete and plastic, and also lined with brick or stone.
- Grids - for draining water and protecting trays from large objects. They can be made of plastic, concrete or cast iron.
- Pipes and connecting elements - use products into which moisture can penetrate through their walls. Typically, plastic corrugation is used.
If it is not possible to use special pipes (drains), the question arises, how to make a drainage pipe yourself? To do this, you can take asbestos or regular plastic pipe with a diameter of 70 to 150 millimeters, depending on the size of communications and the planned volume of water. Using a drill or knife, make holes in it, the size of which should not exceed the diameter of the crushed stone.

- Crushed stone - coarse material made from hard rock is used for backfilling and forming a drainage layer.
- Sand - used as bedding and compaction of the bottom of the trench. Should be applied pure material river origin.
For proper operation communications, each layer of bedding should be at least 15 centimeters.
- Geotextiles are used to reduce the penetration of clay deposits and soil into the structure.
- Profiled two-layer membrane or geocomposite - the use of a membrane makes it possible to reduce the consumption of natural bulk materials and facilitates the installation process.
- Waterproofing materials used when the structure is located directly next to buildings, for preparing walls located below ground level and processing trays if they are made of concrete.
- Pumps - if it is not possible to drain water by gravity.
It should be noted that, depending on the topography of the site and the requirements for the method of moisture removal, the drainage of a country house may simultaneously include structural elements that are present in the closed and open views drainage.
Equipment and tools for work

- Construction level, for determining the angle of inclination, as well as the top and bottom points. If the communications are short and do not occupy a significant area, you can use a water level.
- Bayonet and shovel shovels, in case of a large volume of work and the possibility of application, you can additionally use an excavator.
- Construction wheelbarrow and buckets for delivering bulk materials.
- A drill is useful if you need to make drains yourself.
- Trowel and trough for preparing the solution.
- A set of tools for a mason when he has to carry out installation of bricks or stones.
- Roulette.
Materials, as well as tools, should be selected taking into account the structure being arranged, as well as the working conditions.
When is the best time to install a water drainage system?
In order to save time and optimize installation costs engineering communications, you should take care of the design of the drainage system in advance and carry out installation in parallel with the main construction work for the construction of the building. To ensure quality work, drainage around the house should be installed in the warm season, during the period of low water and least precipitation.
Procedure
To correctly determine what type of drainage around the house to use on the site, the following points must be taken into account and analyzed:
- Relief - what is the difference from the top to the bottom point, as well as the presence of depressions on the surface of the territory being developed.
- Depth of foundations and groundwater level.
- Type of soil.
- Possibility and method of removing moisture outside the site.
Before starting work, you should determine exactly where and what structural elements will be located. For this purpose, a drainage scheme around the house is being developed. If you have experience and knowledge in this area, you can develop it yourself, otherwise, order it from specialists.
The following points should be indicated on the diagram:
- The length and depth of communications on each segment and the entire structure as a whole.
- Places for installing wells and their purpose.
- The top and bottom points in the design.
- Planned direction of moisture movement.
- Turning points and connection options between elements.
General installation rules:
- The angle of inclination of the drains must be at least 1 centimeter per 1 linear meter.
- If the structure is located deep, the leveling and drainage layer should allow water to pass through well.
- The drainage well is installed at the lowest point.
- Inspection wells are installed at every turn and at the points where drains converge, and in case of long communications, on straight sections, they should be located at a distance not exceeding 20 meters.
Stages of installation work
Surface drainage around the house is installed no closer than the foundation blind area.
- Drawing markings where the structural elements will be located and pass through.
- A fragment of a trench. The depth is calculated taking into account the dimensions of the tray or rain inlet, as well as the thickness of the protective grille. In addition, you need to add ten centimeters to install a concrete base.
- Leveling the slope and compacting the bottom of the trench.
- Installation of a concrete base under the tray.
- Installation of a rain inlet or tray.
- Construction of a well (sand catcher) at the lowest point of the structure.
- Installing ratchets on the tray.
- Backfilling of spaces between the tray and the soil.
Wall-mounted, closed design option

The first point with markings is the same as in the case of surface location. If in country house the drainage system was not installed initially during construction, then a trench must be dug directly along the plane of the wall, 30–50 centimeters below the level of contact of the foundation with the ground.
- Places for constructing wells are dug at each corner of the building and connected by a trench.
- The walls are cleaned of soil and the waterproofing coating is restored using bitumen mastic.
- A leveling layer of sand is poured and compacted. The thickness should be at least ten centimeters.
- Geotextile material is being laid with a margin of 60 centimeters on each side.
- Crushed stone is laid to a height of 10–15 cm.
- Drains consisting of pipes are installed.
- Wells are being installed. Their top level should protrude above the ground surface.
- Pipes are put into the wells. After this, the holes into which the pipes enter must be sealed hermetically.
- Crushed stone is poured onto the drains to a height of up to 20 centimeters.
- Cover the pipe and crushed stone with the edges of the material and secure them with rot-resistant tape.
- The trench is backfilled and leveled.
It is important to control the slope angle during digging and leveling trenches; it should always be directed towards the lowest point.
Is drainage necessary if the soil is dry and absorbs water well, and the house is not prone to flooding? Here you should know that the terrain and soil composition, as a rule, do not change, but no one is immune from climate changes, for example, heavy rainfall. This is especially important in the spring, when the snow melts. Therefore, it is better to prevent possible troubles.
Beginning construction small country house or a solid cottage, everyone expects that his brainchild will stand for more than one ten years and will serve growing children and even grandchildren.
How long will it last? built house- depends primarily on correctly executed grounds.
But even quality foundation
will not help if he is in constant conditions dampness caused by the presence of moisture in the surrounding soil.
Water can penetrate into the ground after rain, when snow melts, and the most unpleasant case is if the area is high ground water level(UGV).
What is it and what is its purpose
To avoid flooding foundation by rain, melt or groundwater and serves drainage system, which is a collection of devices intended for removal excess moisture: trays, channels, trenches, wells and so on.
Drainage systems are used for foundation protection a separate building or the entire site, if it is located in an area with low relief. This article discusses drainage systems for foundations house under construction.
Main types of drainage structures
 Trenches of this type are used to drain surface water when the area on which the house under construction is located has practically no no slope or even in small depression.
After prolonged rains, you can only approach such a house in rubber boots, not to mention spring flood.
Using open ground trenches they organize collection and disposal surface water into the sewer system, a special collection well, or off-site, if possible.
Open systems are easy to make, but they spoil the landscape and are unsafe when walking - you can easily trip.
Closed
Such drainage is a more effective solution for draining soil on significant depth- up to one and a half meters.
Represents a system filter pipes, placed in water-permeable material: small crushed stone, gravel, expanded clay
For this purpose, special perforated pipes with numerous holes small diameter.
You can also use regular plastic sewer pipes by drilling holes using an electric drill. The design of such a system is much more complex and expensive.
Backfill
Used for a small area backfill drainage trenches. They successfully remove both surface and groundwater.
In this case, there is no need to spend money on purchasing pipes and related accessories (angles, tees, gratings, etc.). Ditches are dug to a depth of 1 to 1.5 m the perimeter of the house at some distance and fill them with broken bricks or crushed stone of large fractions. 
It is better to cover this backfill with a strip of geotextile on top, and then fill it earth with laying turf. True, they cannot be cleaned after silting.
Superficial
There is nothing more than open drainage. It has 2 varieties: point and line.
Point drainage
 Perform for local lead water (from one point). For example, from a drainpipe, from garden shower or watering tap.
If there is a place on the site where often accumulates water, it is easiest to get rid of it using this method. The device is water intake, usually purchased, laid flush with the surface of the earth in the required place.
Concrete or plastic are attached to it trays, laid with a slope of about 1 degree in the direction of water drainage. The top of the trays is covered with metal or plastic bars.
Linear drainage
If several point receivers combine into one general drainage main, you get a linear drainage system.
It should be recalled that point and linear system only withdrawn superficial water
The final destination could be storm drain, receiving sump or filter well.
Deep
If the house is located in the lowlands, or at depth there is a waterproof clay layer, as well as at high groundwater level quantity underground water will be large.
In this case, deep drainage should be performed closed type, the device of which is described above. To avoid clogging drainage pipes, make inspection (cleaning) pipes wells of such a size that you can put your hand into it.
Position cleaning elements follows in corners, T-shaped junctions and after 10–12 meters underground communications. Depending on the location relative to the foundation, deep drainage can be wall or ring.
Wall drainage
Arranged when there is a basement or basement. A trench is dug close to the wall of the strip foundation.
You can avoid additional excavation work if you do it when laying the foundation. The depth of the shallowest point should be approximately 20 cm greater than the depth of the sole.
The pipe is being laid inside drainage layer of gravel, small crushed stone or expanded clay, wrapping everything with geotextile fabric.
When backfilling a ditch with soil, a layer of clean coarse-grained soil is poured close to the side surface of the foundation. river sand, with layer-by-layer compaction 25–30 cm thick.
You should first coat the foundation wall with a layer of greasy crumpled clay(clay castle).
Ring drainage
Performed if there is no basement in the house. In this case, a trench is dug after the construction of the house is completed at a distance of 1.5–3 m from the foundation.
We carry out drainage ourselves
Best time to make
Drainage system is best build in summer, although in the heat it’s tempting to rest in the shade
And the ground at this time can be so dry that you can even pick it with a crowbar. Despite these negative aspects, there is no better time of year to do this work.
in spring, after the snow melts, the ground remains damp for a long time. If a drainage system is made at this time, by autumn the earth will settle, and it may the seal is broken connections of drainage pipes, which will require further additional time to eliminate defects.
On autumn months hope is frivolous, inclement rains may result in work having to be rescheduled until next summer season.
Preparing for installation
More attention should be paid to preparation for production drainage around a residential building. Lack of thoughtfulness in the layout of the device can lead to unnecessary excavation work or the purchase of unnecessary building materials, which will then uselessly take up storage space.
Before starting work, it is necessary to draw up a large-scale site plan indicating elevation marks, select a location for placement settling well.
If you plan to drain wastewater for the territory of the site, it is necessary to obtain permission from the local sanitary and epidemiological station (SES). Otherwise, all the work may be in vain, and money may be wasted.
Required Tools
For the manufacture of drainage system You won't need many tools. Most of them, as a rule, are available to each owner:
- measuring tape 30–50 m long;
- building level;
- hydraulic level up to 50 m long;
- bayonet and shovel shovels;
- wheelbarrow.
Instead of a hydraulic level, it’s a good idea to purchase an optical or laser level level. The laser device is useful when interior decoration house under construction.
Experience shows that the hydraulic level has an unpleasant property “lie” during the measurement process. This happens due to the fact that the connecting hose can get air bubbles, which lead to distortion of the result.
Making drainage
Let's consider making a drainage system around the house with your own hands. Let's do this using the example of constructing a deep wall drainage(meaning that the drainage system is being built simultaneously with the construction of the foundation):

Making a drainage well
At the end of the drainage system they erect filter or overflow drainage well. If it is not possible to drain water from it directly at the location, you will have to pump out the water using submersible pump.
For well installation you can purchase ready-made concrete or plastic sections and collect from them finished design. Purchased rings from reinforced concrete during installation will create difficulties due to heavy weight.
Alternatively, you can cast a well made of concrete directly at the place of its installation.
Done according to all rules drainage system along the perimeter of the house under construction will save foundation from exposure to moisture, thanks to which the waterproofing will retain its protective functions for a long time, the basement will be dry, and the walls of the house will serve more than one generation.
Drainage of ground and storm water from the foundation will significantly increase the service life of both the permanent building and the country house. An easy-to-use drainage system will protect underground concrete structures from gradual erosion and basements from watering. But it is extremely important to prevent the destruction of the very foundation of the structure, right?
A well-designed drainage scheme around the house will help to build an efficient system for collecting and draining natural water. We invite you to familiarize yourself with carefully selected and verified information based on regulations and real experience of builders of low-rise buildings.
We will tell you in detail about the types of drainage systems, the features of their design, and the specifics of operation. We will give reasons in favor of choosing a certain type of drainage. The useful information presented to your attention is supplemented with photos, diagrams and video instructions.
When designing a drainage system, the goals that are planned to be achieved are first determined. They may consist of draining the entire area, protecting the foundation and basement of the house from excess moisture.
Of the existing drainage systems, two main types can be distinguished - open and deep (closed). The first can be used for agricultural needs, for drainage from cultivated areas. Closed drainage is used to drain water in dacha and cottage areas, to protect buildings from negative impact high groundwater level.
The organization of a drainage system is necessary when the groundwater level is high, which is especially evident during the flood period. Drainage to protect from underground water aggression concrete foundation and reduce the hydraulic load
Combined drainage systems are also used. They are often supplemented with storm sewer lines designed for recycling atmospheric water. Provided they are properly designed, they can significantly save on the construction of each system separately.
Image gallery
The first and main sign that site owners need to arrange drainage is stagnation of water during the snowmelt period. This means that the underlying soils have low filtration capacity, i.e. do not allow water to pass through well or not at all
Drainage is necessary in areas with pronounced signs of soil erosion: cracks that appear during the dry period. This is a manifestation of soil erosion by groundwater, ultimately leading to destruction
Collection and drainage of water is required if, during the period of snowmelt and heavy rainfall, groundwater rises to the level of utility lines.
Drainage systems are constructed in areas with a characteristic slope. But in this case they are needed for a balanced distribution of water and retention of it on elevated areas
Flooding of the area during snowmelt
Erosion and erosion of soil under the foundation
Water at the level of utility lines
Suburban plot with slope
#1: Open drainage device
Open drainage is the simplest and most economical method of draining water, which can be used subject to the following conditions:
- the underlying soil layer is clayey, poorly permeable to water, which is why the fertile layer, located 20–30 cm from the surface of the earth, is waterlogged;
- the site is located in a lowland into which rainwater naturally flows during periods of heavy rainfall;
- there is no natural slope in the terrain of the site to ensure the movement of excess water towards the street.
Open drainage is arranged in areas with high groundwater level, the elevation of which is most often determined by the location of the land plot in a lowland or the clayey composition of the soil, which does not allow or very weakly allows water to pass into the underlying layers.

A drainage system designed to drain excess groundwater works perfectly in tandem with a storm drain, whose job is to collect and drain precipitation (+)
Planning a drainage scheme is best done at the design stage of a house. This will allow you to tie up the work and place the rainwater inlet under the gutters before installing the blind area.
Open drainage is considered the simplest and does not require drawing up a diagram. It consists of trenches 0.5 m wide and 0.6-0.7 m deep. The sides of the trench are positioned at an angle of 30°. They encircle the perimeter of the territory and direct wastewater into a ditch or pit, into a storm drain.
Areas sloping towards the street are easier to drain. To do this, a drainage ditch is dug in front of the house, across the slope, which will retain water from the garden. Then they dig a ditch, it will direct the wastewater towards the street, into the ditch.
If the site has a slope in the opposite direction from the road, then a transverse drainage ditch is dug in front of the fence facade and another longitudinal one is made to the end of the site.
The disadvantage of such drainage is its low aesthetics and the need to regularly clean the gutters from silt and dirt that periodically accumulate in them. This type of drainage is not recommended to be installed under the road surface, as it leads to subsidence of the soil and deformation of the road surface.
The length of lines for water drainage, the number of wells and sand collectors depends on the area of the site, its topography, and the intensity of precipitation in a particular area.
Drainage ditches can be strengthened from erosion using reinforced concrete slabs, stone paving, turf with crushed stone bottom
If the site is considered to be more or less flat, and its level of swampiness is not too high, then you can get by with installing the simplest drainage system.
Along the foundation of the fence, in the lowest place of the site, they dig a ditch 0.5 m wide, 2-3 m long and 1 m deep. Although such a drainage system will protect against high groundwater levels, it will also cope well with precipitation.
To prevent the edges of the ditch from collapsing, it is filled with rubble, broken glass and brick. Having filled it, they dig the next one, it is also filled and compacted tightly. The excavated soil is used to fill low-lying areas on the territory
Over time, this simple drainage system may become ineffective due to gradual silting. To prevent this from happening, it can be protected with geotextile. It is laid on the ground, and after filling the ditch, the drainage layer is overlapped with it. From above, to hide the ditch, it is sprinkled with a layer of fertile soil.
#2: Construction of an effective storm drain
Storm drainage is necessary for the accumulation and removal from the site of water falling in the form of precipitation. It is equipped with point and linear drainage devices.
Image gallery
Storm sewer systems are designed to collect atmospheric water and prevent its penetration into the soil and then into the underlying soils
Based on the type of water intake devices, storm sewer systems are divided into point and linear. The former are built in areas with organized drainage, the latter - with unorganized
Linear water intakes have a much larger collection area than point ones. They are installed next to houses with unorganized drainage and on areas paved with a waterproof coating
In linear storm drains, water is both collected and transported through a network of channels covered with metal or plastic grating. In point systems, water is drained through a system of pipes laid in the ground
Storm sewer with point water intake
Point storm drainage channels
Linear water intakes
Structure of trays with gratings
The first type of water collectors is installed under the risers of an organized drainage system. The second type of water collectors is located under the slopes of roofs with unorganized drainage.
Water entering the catch basin moves through an open or closed pipeline. It is diverted either to a common catchment well or to a collector well, from which it is transferred to a centralized sewer network or drainage ditch.
A storm inlet is a container for collecting water, equipped with outlets for connecting pipes of a linear drainage system. The devices are made of durable plastic or cast iron (+)
Elements storm system With point water collectors there are also drainage systems, ladders, and dampers. Some manufacturers provide the possibility of connecting storm water inlets to roof gutters, as well as to underground drainage systems.
In addition, ready-made production models include sand traps and waste bins to simplify system maintenance.
The device with installed decorative grille should be located 3-5 mm lower than the level of the path or ground
This is a system of drainage gutters made of plastic or concrete, which are installed on the site in those places where water accumulation is most likely, but extremely undesirable.
For a drainage well, choose the most distant place from the house, well, or cellar. If there is a natural or artificial reservoir nearby, then water can be drained into it
When designing with linear water intakes, the first step is to plan the placement of a catchment or collector well. Next, determine the location of the rotary and inspection wells. Their placement will depend on the placement of stormwater inlets, gutters and closed sewer branches.
To prevent water from the street from entering the yard, gutters are installed along the line of the gate leading into the yard, garage doors, as well as in the wicket area. When choosing system elements that will be installed on the roadway, the future load on them is taken into account.
To prevent moisture from getting inside the building, the slope of the coating in the garage is made towards the water intake grille. So water, when washing a car or thawing snow on vehicle, will flow into the gutter.
Drainage trays must be installed on the porch, around the pool. They are also installed along the blind area, garden paths, laid out from facing material sites
To give the storm drain a neat appearance, special trays made of polymer concrete and plastic are used, which are covered with metal or plastic gratings. When entering the house, use a special tray to clean shoes.
The grate for the gutter installed near the pool is chosen to be plastic, white to avoid burns on a hot summer day.
For intensive use, drainage trays are mounted on concrete base. The higher the load class on the roadway, the thicker the concrete base should be (+)
The gutters and water intake points are connected to the drainage tank. Inspection wells are provided at the junctions of gutters and pipes. They are designed to facilitate access to the system and clean it from possible clogging.
Inspection wells are made mainly of plastic. In order to obtain the required depth, their design provides for the possibility of extension using special extension elements.
The placement, slope and length of storm sewer pipes - all these characteristics are very individual and depend on many conditions on the site
A wide range of system elements allows you to design the most rationally, which will be optimal from a technical and financial point of view.
The main elements of linear drainage are gutters made of concrete, polymer concrete, plastic, point receivers, sand traps, gratings (+)
#3: Construction of closed drainage options
Underground, closed drainage is used if the device open system will take up too much space on plot of land or it absolutely does not fit into the landscape picture of the territory. The conditions for constructing a closed drainage system are similar to those for organizing a network of open drainage ditches and ditches.
Closed drainage schemes are used to protect foundations and basements from the effects of groundwater and increase their service life. By analogy with open ones, they are used to drain suburban areas from excess groundwater.
IN mandatory It is necessary to organize underground drainage on the site if:
- it is located in a lowland, wetland area;
- there is a natural pond near the buildings;
Underground drainage can be divided into two types:
- wall drainage;
- trench (stratal) drainage.
Both types of underground drainage are carried out at the construction stage of the building. If it was decided to begin the problem of drainage after the construction of the house, then a trench ring system is used. There are also limitations to the use of trench drainage. It can be used if the house does not have a basement.
The fact is that, after filling the pit with sand or soil, it creates a looser environment between the bedrock and the foundation. As a result, high water penetrates into this environment and then even the presence of a clay castle does not protect the building from moisture.
Therefore, if the house has a basement floor, for effective drainage it is best to install wall drainage. It is used for drainage to drain groundwater directly from the foundation of a building, to protect basements, cellars, ground floors from flooding.
Trees and shrubs should not be planted near the drain. The distance to the planted tree can be at least two meters and to the bush at least one meter
The wall one limits the rise in water level, preventing it from rising above the line where the drainage pipes are located - drains. It is believed that a drainage pipe 1 m long is capable of draining an area of about 10-20 m2.
When installing wall drainage, the pipe is laid around the perimeter of the building. The depth of the drains cannot be lower than the base of the foundation slab or the base of the foundation. If the foundation is very deep, then laying the pipe slightly above its base is allowed (+)
The distance from the drainage pipe to the foundation depends on the location. They are laid in each corner (or through one corner) of the building, as well as in places where pipes turn and connect.
Inspection wells are also located in places where there is a large difference in the level of the site and when the pipes are long - the distance between the wells should be no more than 40 meters.
In an inspection well, the pipe cannot be solid; it breaks. This is done so that if the pipeline becomes clogged, it remains possible to flush it using a high-pressure hose
The entire system closes to the last well. It should be located in the lowest place. The water then flows into a regular sewer or open reservoir. If it is not possible to drain water from the house by gravity, then install pump equipment and it is forcibly pumped out.
To ensure gravity drainage of water, the pipes are laid to the side of the collecting manifold. The slope should be two centimeters per meter of drainage pipeline. The depth of the pipe must be greater than the freezing depth of the soil.
The pipe is covered with drainage material - gravel, small crushed stone or sand. The minimum layer that will ensure the flow of water into the drain is 0.2 m
To save on geocomposite materials and prevent them from mixing with the soil, geotextiles are used. It freely passes water to the drains and at the same time retains particles that lead to silting. The pipe itself must also be wrapped in protective material before backfilling. Some drain models are produced with ready-made geotextile filters.
You can increase the efficiency of wall drainage using a profiled polymer membrane, which can be two- or three-layer. One of its layers is a polyethylene film with formed protrusions, the second layer of the membrane is geotextile fabric.
The three-layer membrane is equipped with an additional layer of smooth polyethylene film. The membrane helps filter water from the soil while also serving as a waterproofing layer for the building's foundation.
Closed trench-type drainage protects the structure from flooding and moisture. It is a filter layer that is poured into a trench at a distance of 1.5-3 m from the wall of the house.
It is better that the depth of the drain be 0.5 m deeper than the base of the foundation - this way the water will not exert pressure on it from below. There remains a layer between the trench with drainage and the foundation of the house clay soil, which serves as a so-called clay castle.
As with the installation of a wall drainage system, drains are laid on a layer of gravel or small crushed stone. Both the pipes and the gravel layer are protected from clogging by geotextiles.
#4: Construction of wall drainage step by step
In order to get a clear idea of the process of installing drainage around a country house, let's look at an example. The area shown in it required the installation of a groundwater drainage system, because Under the soil-vegetative layer there are loams and sandy loams, which are extremely poorly permeable to water due to their low filtration capacity.
Image gallery
To install drainage, we develop a trench around the house. Since the work was carried out with a mini-excavator, we retreated 1.2 m from the walls so as not to damage the building. If you save manually, you can do it closer. The bottom of the excavation is 20-30 cm below the foundation
The branches of the trench formed around the house must have a slope towards the common trench intended for the pipe for draining collected water to the collector well
Cover the bottom of the trench with sand. We compact it and form a slope of 2-3 cm per linear meter. We direct the slope towards the common trench, the bottom of which is also filled and tamped. In the case of communications crossing the trench, take into account that the drainage pipes must pass below them
We prepare drains, perforated polymer pipes, for installation in the trench. We wrap them in geotextile, which will prevent clogging of the system and filter groundwater
We cover the compacted bottom of the trench with a second layer of geotextile, pour gravel on it and lay drains
We lay channels for draining water from storm sewers and the drainage system in one trench. It is permissible to divert the water collected from them into one collector and use common inspection wells
Having wrapped the gravel backfill together with the drainage pipe with a second layer of geotectile, we fill the trench with quarry sand. We do not use the soil dumped during the development of the trench; sand will better allow water to pass through for collection by drainage
We bring the common trench to which the circular drainage is connected to the installation site of the collector well


