
Tree natural material, which naturally fits into . garden furniture from a log - inexpensive option for landscaping the site.
 It is necessary to try to preserve the original shape of trees and knots, to emphasize the elegance of the structure of the material
 To make, you need skills in working with power tools, desire and imagination. The material can be found everywhere, it could be an old tree on the site, or in forest area close to home.
A good addition to a massive log will be unusual shape driftwood, you can look for them on the shores of reservoirs. They will enliven the furniture composition and add a touch of originality.
The advantages of wooden furniture include:
- It can be made from available materials, low cost.
- The aesthetic appeal of wood, the originality of garden sets.
- Durability of log furniture, provided the wood is properly processed.
- Fits naturally into the natural landscape.
Depending on the source material and its size, the results are different variants garden furniture.
DIY garden furniture made from logs
Wood is a unique natural material. After special processing, its beautiful texture appears.
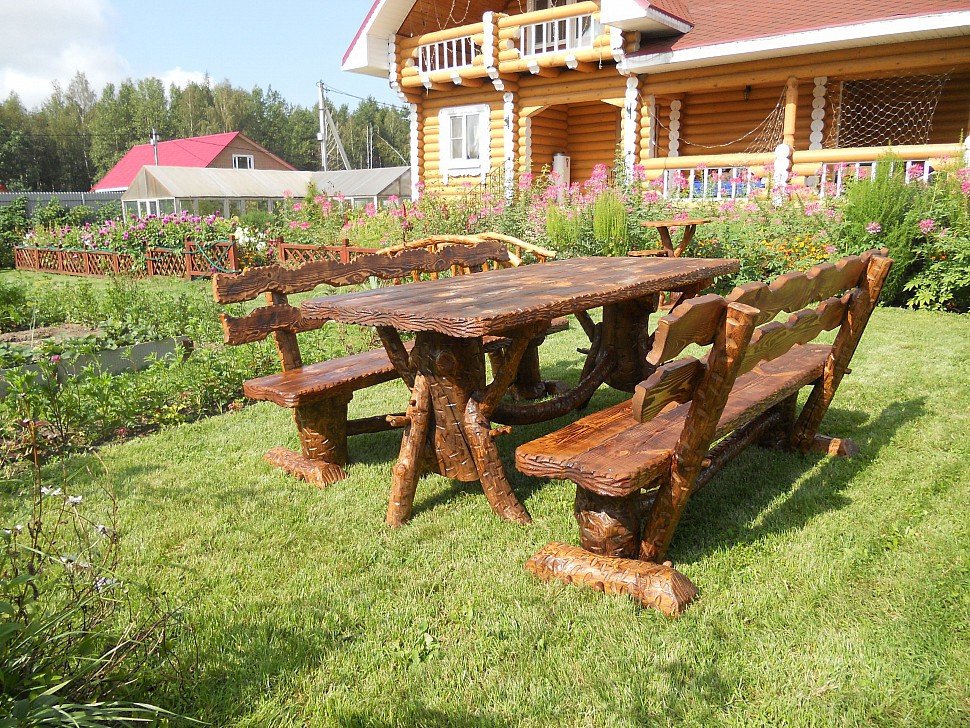
Sets of log tables and benches: 15 photos
They use not only logs and driftwood, but also saw cuts. Tabletops and bench seats are made from dies. They are filled with transparent epoxy resin. Such items are exclusive and durable.
There are three rules for processing logs:
- The bark, especially from old trees, is removed using a metal scraper or spatula. Under the layer of bark there are nests of insects and pests. Once the bark is scraped off, the beautiful texture of the material is revealed.
- from penetration of moisture and pests. Impregnations, stains, and varnishes serve as additional protection and help the texture of the material to appear and emphasize the natural pattern.
- Furniture surfaces that come into contact with the body must be sanded to avoid splinters.
Read also
Creation alpine slide with your own hands
You need to be creative when making furniture. Nature itself is a good master.
Log furniture options:
- deliberately rough sets;
- combined: log with snags or saw cuts;
- furniture made from processed, sawn tree trunks.
A separate set is unique, since each tree in nature is unique, different in texture, shape, size.
Making a bench
They are installed in the most picturesque corners of the garden. The simplest option for a bench for a summer cottage is to cut a solid trunk in half with a saw and install it on a base of stumps.
Bench options: 9 photos
Assembly instructions
For a strong connection between the seat and the supports, tongue-and-groove joints are cut into them. Additionally, you can mount a backrest from the second part of the log, securing it to thinner logs.
The combined option looks interesting. The seat is made from a cut trunk, and the back is made from treated driftwood. Installed on stumps with remains of horse taps. The bark is first removed from the wood and sanded. Treat with anti-moisture agents and allow to dry. Then they are opened with stain and moisture-resistant varnish.
The result is an expressive product that will decorate any landscape. Such objects look almost like a natural element.
Ready-made drawings of benches


After the construction of a log house, the remains of logs, logs, and boards are often left behind. Moreover, there is a shortage of substandard building materials after clearing the site - cut down trees, stumps, snags, etc. All this can be usefully used to make nice and even designer garden furniture - from a simple bench to entire sets of tables, benches and chairs.
From this article you will learn how to make from, literally, pasture lumber:
- several options for simple but stylish shops;
- two options for benches;
- stool;
- table.
In addition, you will receive plenty of food for the development of your own design fantasies, the implementation of which depends only on your skills in handling tools and the availability of free time.
All garden furniture products that will be discussed are made in a “wild” or rustic style, or in country style. They are perfect for furnishing a relaxation area outside the home. And if you have “”, then even more so, nothing is better to tastefully “furnish” the area around the house for summer holiday outdoors or gatherings with barbecue, you can’t imagine.
To immediately understand what we are talking about, here it is:
... and about this:

Such a product will require more time due to the larger number of parts and the need to fasten them together.
If you don’t mind, you can leave the log bench without protective treatment. But if durability is important to you, then the products should be protected with antiseptic compounds, treated with stain, or varnished.
Tools for making garden furniture
The set is, in general, standard. If you have a workshop, then most likely you have everything you need there. You may need a hammer, mallet, screwdriver (drill), grinder or grinder, axe, plane, saw...
In order to build a bench or other furniture in a “wild style” quickly and without extra effort, it is advisable to have a chainsaw or electric saw at your disposal. This will make your work a lot easier! Because the main idea in wild furniture projects is the use of half-logs as structural elements.
Of course, it is more convenient to cut whole logs and blocks with a chainsaw. But if you don't have it, it doesn't mean you don't have it technical capabilities build a bench or table yourself. You just have to split the logs with a cleaver and wedges.
In fact, it is possible and not as difficult as it seems. Here is a video on this topic:
In this video they use a cleaver - an ax for chopping wood. Its difference from a carpenter's ax is that the working, piercing part has a noticeable expansion, and the sharpening angle of the blade is wider. You can also use an axe, you just have to drive in the wedges earlier.

With this method of halving a log, it is important that the log splits along the plane of impact and that the crack does not go sideways. Much depends on the quality of the log. Firstly, it must be dry. In principle, it is advisable to work with dried lumber when building garden furniture, because raw timber can become deformed during the drying process, crack, and your bench, bench or table will become uncomfortable, unstable, or simply lose its aesthetic appearance.
Secondly, if you are splitting a log with a cleaver to obtain smooth materials suitable for building a bench, then it should not be too twisted. That is, the fibers must run more or less evenly, because the crack will go along them. Minor irregularities and deformations along the split surface can be removed with a plane and grinding. In addition, “wild” furniture does not have to be perfectly flat!
The nuances of using a chainsaw when building garden furniture with your own hands
Here is a wonderful example of a garden bench that is as designer and unique as it is simple:

But the simplicity is only apparent. Indeed, its design is elementary - just one log, no other parts or fasteners. The entire structure - seat, back - was cut out with a chainsaw. However, to cut such a shaped product, you need to have excellent command of a chainsaw, a feel for the tool and the material. Therefore, this bench is not so simple.
To evenly halve a log, you also need to have some skill. A couple of tips to make your work easier:
- make markings not only at the end, but also along the log;
- if the log is debarked, draw two lines - a strip along which the cut will go, 1 cm thick - this is the approximate thickness that the saw will “eat”;
- if you want to leave the bark and it is inconvenient to draw on a log, then you can stretch a cord from end to end and carefully saw along it;
- secure the log so that it does not “walk” due to the vibration of the saw, support it with wedges, bars, etc.
To decorate a bench or bench, you can lightly run a saw chain along the flat part of the half-logs - the seat and back - and make a few transverse scratches and gouges to age the wood and give the shape a natural look. When sanded, the chipped areas will be smoothed out and will not interfere with use, but the appearance of the bench or bench will become more interesting.
To age wood, firing and scratching with a hard steel brush are also used.
DIY wild style bench
The simplest piece of garden furniture that you can make with your own hands is a bench. If you have a thick enough log, you can cut it out of a solid mass, and you will get something like this:

We cut it out with a chainsaw and polish it. We burn it, cover it with varnish, stain – details to taste. This shop looks quite original, despite the simplicity of the design.
If there is no such thick log, then here is the second option:

It's intuitive how this is done, right? In general, all furniture of this type is folded, just like a log house - the upper elements are placed in cut-out grooves. In this case, the connection is “”, but it is not necessary to cut out an even “lunar” groove; it is enough to cut out a triangular segment so that the main half-log sits firmly in the block legs. Such grooves are easy to cut out with an ax - no fine work is required.
The log for the seat does not have to be smooth and without knots; it can also be crooked. The same is true in the case of making a bench. The natural curvature of the material, on the contrary, will add spectacularity to the product - brutality and stylish “wildness”.

A simple “wild” bench without a single nail
How to make a bench is already clear. To get a bench, you only need to attach the backrest. It can be attached without a single nail, screw, etc.
To do this, take two bars of triangular or trapezoidal cross-section. We get it from one, sawing it in the middle. A triangular section is needed to make a connection between the “” bars and the seat and backrest.

In the half-logs for the seat and back, triangular (trapezoidal) grooves for supports are cut out so that the wide part is inside the half-logs. Then all the elements are connected in these grooves. In the video you will see that it is easier than it sounds in words:
But this is more difficult than it looks. The main difficulty is to cut grooves of the desired shape at the desired angle in the rounded surface of the half-logs. Without certain dexterity and experience working with a chainsaw, this is not easy.
There is a simpler option - do without the dovetail, use self-tapping screws or nails to attach the backrest supports to the bench. The supports are attached to chocks, which serve as legs; they can also be attached additionally to the seat mass. The back can be secured in the same way by cutting out moon grooves in the supports themselves, if they are thick enough. We get approximately the following:

To make the benches and benches described above, you need initial logs from approximately 35 cm in diameter (if we take the same ones). This is dictated by the comfortable parameters of the bench or bench itself. Its height is 40-50 cm. The height of the seat plane is about 1.5 times the diameter of the log. The final calculation depends on the depth of the groove, but it is not necessary to cut it deep.
Another important note:
For two benches, it is advisable to cut the log in half, but for a bench, it is better to move the cutting plane away from the diameter plane, so that the beam for the back is smaller than for the seat. Firstly, your bench will be 5-10 cm higher, which is important if the log is not thick enough. Secondly, do not forget about the center of gravity of the bench.
If the half-log for the back is as massive as the seat, and the back is sloped, then the structure may be unstable. This problem can be solved if you rigidly attach the seat to the lower supports, but you will also be sitting on this bench! And you'll want to sit back!
To prevent the center of gravity from shifting so that the bench will tip over or wobble, the top of the backrest should not extend beyond the vertical axis passing through the extreme points of the lower supports and legs. It is better if the legs protrude further than the back of the bench.

Another significant parameter. There are various original design benches, chairs, etc., but for a standard bench or chair, the backrest slope is within 30° from the vertical axis.
Another bench made of logs that is easy to make with your own hands
This option is suitable if you have logs of small diameters. To make it clear, it’s better to see it once:


Everything here is also clear from the picture. The logs are connected - articulated into longitudinal grooves. Half logs - for the back and seat. For the backrest supports, grooves are cut out in the logs of the “legs”, but, in principle, they can be secured with screws or nails. The bottom bar is necessary for the rigidity of the supports.
What's the main thing here? The main thing is to fasten the supporting logs, “legs”. They can be fastened together:
- – metal or wood; as such, reinforcement can be used;
- nails;
- screws, self-tapping screws.
The fastening elements should be staggered between different logs. When attaching the supports for the backrest to the body of the main lower supports, you need to make sure that the fastening elements do not intersect inside the solid wood.

Important: Do not screw in a screw or drive a nail from scratch! This way you can split the log, especially if it is small in diameter. Pre-drill the holes with a drill equipped with a long drill bit!
DIY log table
For example, in this video you will see in two minutes how a master will make a simple set of a bench and a table in a “wild” style without a single nail:
By the way, to strengthen the structure, no one bothers to use glue, nails, etc.
The tabletop can also be installed on a wide stump, which remains from a cut down tree. In general, if there are stumps left on your site, take a closer look at them before uprooting them. Perhaps, if they are positioned well, it will be possible to install a bench on them, but certainly - you can put a table! In this case, it is better to knock down the tabletop from rough boards, or use a homogeneous array.
If you make a table entirely from logs, then the principle is the same as in the construction of benches. The structure is assembled in the same way as a log house - the elements are placed in grooves. If it is necessary to increase rigidity, fasteners and glue are used.
In the following image one-piece design, combining both a table and benches. Doing this is technically no more difficult than a separate bench. The only difference is that you need to tinker with calculations and drawings; you can’t do it by eye.

A simple way to make a “wild” stool from thick wood
... which you won’t be ashamed to put in your home. See how easy it is:
Please note that it is not at all necessary to master a chainsaw, since the scale of the workspace allows you to correct the unevenness of the first cut.
Such a stool will fit into the interior, as well as a table made of logs, especially in a log house in the “wild style”.
Another method of making a stool, where you don’t even need to cut anything out:
A thick enough piece of wood can make an excellent chair. If you burn it, sand it and varnish it, you get an exclusive product that would be a pity to take outside:
For inspiration
Any material can be used to make garden furniture if you get creative. Any snag, branch, or stump. Below are photos that confirm this.


A massive table made of logs is the ideal solution for decorating any summer cottage. With its help, you can originally complement the design of a wooden gazebo or create a cozy atmosphere in the yard. Log furniture has many advantages. In addition, you can build such a table yourself.
Log tables are quite relevant for country houses. They are simply installed in the yard under a canopy or placed in the house. This piece of furniture looks especially beautiful against the backdrop of timber buildings.
Log tables differ in the shape of the tabletop:
- Rectangular, long design. At such a table it is convenient not only to gather the whole family, but also to invite guests.
- With rounded edges. The semicircular shape gives the table an elegant look.
- Square. This tabletop looks good in small gazebos.
The dimensions of log tables depend on the location of their use and the number of users. A special feature of such pieces of furniture is the unusual design of the legs. They can be made either from a round log or from its halves.
Tables are made from rounded logs various breeds tree. Often such material remains after the construction of houses or various garden buildings. You can make a log table with your own hands from leftover wood.
Manufacturing technology
Almost anyone with carpentry skills can build a table from logs. Before work, you should select suitable logs and prepare tools. It is also necessary to determine what shape and size the table will be.
Tools and materials
To work with wooden material The following tools are required:
- plane;
- hammer;
- saw;
- chisel;
- axe.

You will also need:
- hacksaw;
- drill with screwdriver function;
- file;
- paint brush.
The material you need to select is:
- nails;
- self-tapping screws;
- iron rods with a diameter of 15 mm;
- wood varnish;
- sandpaper with different spray fractions;
- glue for metal and wood;
- logs;
- smooth hewn boards more than 2 cm thick.

If necessary, you can use stain to open up the wood.
Drawing
Before work, you need to determine the layout of the logs and the dimensions of the table. To make the product correctly, you should use a drawing with the exact parameters of the entire structure.
When aligning logs on one side, three-dimensional sketches are performed. Without turning the logs, you can use a two-dimensional diagram of all the constituent elements.
All parts in the drawing must match each other. You can separately sketch the length, width and height of the log table.
Preparation of logs
The material is selected according to the drawing, which indicates all the required dimensions of the product. You can build a table using logs without surface treatment. This table will look rougher.
To build a product from hewn wood material, you will need to spend a little time preparing it. To do this, use an ax or chisel with a hammer to remove all the bark from the tree. In this case, it is necessary to make the surface of the log as smooth and even as possible.
 To make a table from logs you will need to remove all the bark
 If a table is supposed to be made of log halves, then you may need to cut along each material. You can do this procedure yourself using a chainsaw or entrust it to professionals at a sawmill.
Special grooves can be made to connect wood material. But this requires additional tools and skills. There is a simpler way - this is to grind a small area at the joints with a plane. The width of the flat surface should be more than 3 cm.
To create a beautiful shape, the edges of the lower and upper logs can be cut at the same angle - 45 degrees. All roughness and protrusions are processed with a file to a flat and smooth surface.
After this, holes should be made to install the iron rods. The drill must match the diameter of the selected reinforcement. Holes should only be made at right angles. Their location should be the same in each log. All edges of the wood material are carefully sanded. The surface must be completely smooth.
Assembling a log table
After full preparation the logs are assembled into a single structure. Initially, the base is installed. Into the hole made bottom log an iron rod is installed. Next, according to the diagram, all drilled elements of the table are fixed to the reinforcement.
After assembly, the protruding rods are cut off. If the design is correct, then you can start gluing it with special wood glue. To do this, you should disassemble and reassemble the structure, coating all joints with adhesive solution. Then reinforcing rods are inserted into the holes of the fastened logs. Additional glue is poured into the last remaining visible opening. This strengthening of the material will give the product additional strength and will avoid loosening of parts during prolonged use.
Tabletop mounting methods
The table top can be installed in two ways.
First
After assembling the lower structure, you can begin making the tabletop. Most often, logs sawn lengthwise are used as material for covering a log table. This option is quite practical and reliable.
To make such a tabletop, it is necessary to make an even longitudinal cut of the prepared and measured material. After this, it is imperative to perfectly level the sawn surface, and then clean it to a smooth state. The process uses a plane and sandpaper coated in various sizes.

All edges are also processed. Using a file, all sharp protrusions are cut off. The table cover can be secured with self-tapping screws.
Second
The table covering material can be chipboard. The chipboard sheet is cut according to the required dimensions. It is secured using self-tapping screws. For tables larger than one meter, additional supports should be installed, since chipboard can deform even under light loads. To do this, a special timber ceiling is installed, onto which the material is fixed. To avoid chipboard swelling from moisture, you can cover the sheets with a special self-adhesive protective film.
Final finishing of the structure
After completely assembling the table from logs, you can begin to varnish it. Apply varnish only to a clean surface. The coating is carried out in two layers. After each finishing, the protective agent should be allowed to dry completely.
Features of operation
Natural wood is particularly susceptible to moisture and solar radiation. Therefore, in order to extend the service life of a log table, you should follow some rules for its operation:
- do not place hot objects on the countertop surface;
- clean from dirt after use;
- periodically update the varnish coating;
- install a log table under a canopy.
If the table is installed outdoors, then winter time It is recommended to bring it indoors. Before doing this, you must clean it of dirt and dust. The storage area for the table must be dry and ventilated.
Advantages and disadvantages
A log table fits perfectly into the interior of a summer cottage. Its massiveness creates an atmosphere of coziness and comfort in the yard or garden. Log tables have many advantages:
- Strength. The product made from logs is quite strong. Such tables can withstand various loads well and are much more practical from wooden furniture from boards.
- Aesthetic appearance. Log tables are often installed in gazebos in summer cottages. They fit perfectly into the interior of the surrounding nature. Log tables can be combined with many materials - stone, glass or metal.
- Availability of material. You can make a table from logs left over from construction. To make it, you can also use fallen trees near the site or in the forest.
- Ease of manufacture. The log table has a simple structure. By using your imagination and deciding on the dimensions, you can build any structure yourself. To do this, you just need to be able to use woodworking tools and draw up the correct drawing.
- Environmentally friendly material. Logs are a natural material that does not contain harmful substances. The use of log tables does not cause an allergic reaction and is completely safe for humans.
- Long service life. Log tables proper care can last quite a long time.
The disadvantages include the heavy weight of the product. Also without proper protective coating logs can crack, shrink or swell when exposed to moisture and direct sunlight.
A table made of logs is not only convenient to use, but also perfect for decorating a garden interior. This type of furniture, made with your own hands, will decorate your summer cottage for many years.
All photos from the article

It does not happen in nature that all the material, centimeter by centimeter, is spent on construction without leaving a trace. There are always scraps left, sometimes whole beams or logs, which are a pity to burn in ovens. It is better to find a use for them in the form of homemade country or street furniture.
The most popular, most useful piece of furniture is the table. Any material can be suitable for its manufacture: boards, slabs and even logs. Today we use scraps of logs in construction.
From design to execution

Simple design - uncomplicated execution.
Let's start with good news. You don’t particularly need drawings of log tables; the reason for this non-trivial approach to furniture construction lies precisely in the material. The instructions are very simple.
Logs can be used:
- For table legs. You can easily connect them together by placing them at the corners of the perimeter of a box made of boards. But more on that later.
- For making side posts. The technology used here is to set logs to build walls. Often, in this way, combined tables and benches are prepared from logs.
- For forming table tops. This is a whole layer of material that involves the use various techniques and techniques, methods of fastening and much more.
But for now, let’s look at the above; all other methods of use depend only on your imagination.
The simpler the more economical

On the picture - shining example skillful use of wood
Let's look at the simplest table that even a schoolchild can make with a saw, hammer and nails on hand. This is an option in which logs are used as legs.
To make it you will need scraps - in the literal sense of the word.
- First of all, we prepare the wooden perimeter. For this purpose, you need to connect four boards. As a result of this articulation, a rectangular structure is formed. There are many options for attaching boards. If you want, connect them using screws or nails, if you want, make a tenon connection, or if you want, use metal corners;
- Then fix four one-size logs in the corners of the formed perimeter.
F Fixing logs is possible in several ways:
- The first and easiest is to nail or fix with self-tapping screws;
- The second is to make recesses in the wood so that the log is inserted flush into the corner, forming a single ensemble. This technique is more complex, as it requires either skill or special equipment.
- The final stage is installing the countertop. Quality: MDF, chipboard, OSB. The tabletop can be assembled from scraps of boards that were used for sheathing. A tabletop can even be made from logs if you cut them into at least two parts on a circular saw.

Advice! It is clear that such a table has a pronounced street character, so it is better to replace the tiled material with a stacked table top made of boards. And don’t forget to cover the boards with an antiseptic. And ideally with stain and varnish.
Table like a log house
A typesetting table made from rounded logs has recently become very popular. At the same time, the technology for its manufacture is no different from building a house. The design stages are absolutely identical, except that there is no need to install insulation between the logs.
To build this structure you need:
- Decide on the type of table. Without even going into details, I would like to note that there are a lot of options for setting tables. There can be mini huts, side posts in the shape of the letter “X”, and modern assemblies with various romantic names. To move away from fantasy and tune into a more practical mood, let's approach this issue in this way:
- Do you want to build a base in the form of a mini house, where instead entrance doors or windows, it will be possible to place boxes where in the summer you can leave a small garden or carpentry tool? Then you need to remember the technology of building a house.

Note! The joining of logs in the corners is carried out similarly to the joining of logs during the construction of a house, using the “bowl” method.
- X-shaped bases are easier to assemble, and the need for previous joining may arise once to give the structure stability;
- Various modern designs involve not only the use of logs, but also tree branches of non-standard length and diameter.
A few words about joints.
Docking logs together can be done in three ways:
- Using wooden pegs;
- Using reinforcement rods;
- Using self-tapping screws of the required length.
If everything is clear with the screws, then the pegs require some explanation. In the case of them, the bottom log is drilled halfway through, and the rest through. The rods are inserted into the holes in such a way that they slightly expand the prepared hole, the principle of a chop or a cork in a bottle.
A log table is an excellent design and practical solution for your summer cottage if you want to place it in a gazebo.
This kind of DIY garden furniture made from logs also looks great in a bathhouse.
How to make a table from logs with your own hands will be discussed in our article.
What is a log table and how can it be used?
You've probably seen wooden frame– a house in a classic Russian style.
From the same logs you can make a beautiful and comfortable table along with benches, at which your family or friends invited to visit can sit.
A table made of logs will look great in dacha gazebo, and in the courtyard of a log house.
Using a log table is very important and convenient in a bathhouse.
There, the table will fit well not only in design - it will fit perfectly in its functionality.
The table can be placed both on the site and directly inside the house.
It is quite easy to install, so if you plan to install the table inside the house, we recommend assembling it there, since finished design It weighs quite a lot, so it will be at least physically difficult to carry it.
Drawing
Before you start working with a log, you need to make a drawing.
Think about what the table should look like. Write down your desired dimensions.
It will be nice if you can make a three-dimensional drawing.
This is necessary if you plan to grind logs.
A regular three-dimensional drawing of a table can be replaced, but then you will need to make three drawings: the length, height and width of the table.
How to prepare logs?
To make the table look beautiful, the logs need to be planed with a plane; You can then go over the wood with sandpaper to get rid of small sawdust and burrs.
If you want to sand your future table, start with coarse sandpaper, then go through fine sandpaper.
All logs must be cut according to the dimensions of your drawing.
 Since longitudinal grooves in logs are made using special tools, we do not offer you this idea.
A more affordable way is to use a plane to create a smooth surface at the joints of the logs.
The surface should not be narrower than 4 cm.
To make the table comfortable, the logs must be cut at an angle of 45 degrees, making them shorter to the log that will be in the center.
Then get rid of the corners. A file will help you with this.
If you leave the corners, then when using the table you will hit your knees against them.
In order for the logs to hold well, you need to drill through holes in them through which the reinforcement will be passed.
There is no need to drill through the lowest log. It is enough to make a hole to the middle.
The thickness of the reinforcement may vary. The one left over from the construction of the house will do.
Please note that when placing logs on top of each other, the hole should match, but it must be drilled at an angle of 90 degrees.
The holes are made at a distance of 30 cm from each other.
How to assemble a table?
When the holes are drilled and that's it preparatory work finished, you can begin directly assembling the table from logs.
Let's start assembly. Look at the drawing.
 Now the lower log is placed, the reinforcement is inserted into it, the logs are placed on top of each other.
For reliability, you can use glue. You stack the logs according to the drawing.
Is the reinforcement quite long and sticks out? Don't be alarmed, because that's how it was intended.
You need to saw the reinforcing rod near the hole closer to the log.
Then the rods need to be pulled out and cut 5 mm lower than the mark obtained as a result of the cut. Now the structure is disassembled.
Glue is poured into the bottom of the holes in the lower log.
All holes are also glued, after which you need to reassemble the structure and place the remaining logs on the reinforcing rod.
The result is that the reinforcement is securely glued to the logs, and does not dangle inside the holes.
Fill the top hole with glue until it is full.
How to secure the top of the table?
If you are looking quick way, and you won’t put anything heavy on the table, then you can take a sheet of chipboard, adjust it to the size of your table and glue it to the logs.
You can secure the sheet with nails or screws.
However, this method of creating a surface is only suitable if the dimensions of the table are meter by meter.
If the table is larger, then the chipboard sheet will require additional support so that it does not sag.
It can be made from beams. You don't have to process them.
Find even ones and nail them to the sides of the table.
 The beams will not only support the chipboard sheet, but will also make the entire structure more rigid and prevent the logs from moving.
You can guess how many bars you will need. Their number increases depending on the size of the table.
The larger the table, the more beams you need for it. They can be secured with nails or self-tapping screws.
A sheet of chipboard is, of course, quick, but, you see, it’s not very aesthetically pleasing: nevertheless, a table made of beams will look better if it looks like some kind of monolith.
And then you can bet anything on it. If you want just such a table, then the second option for creating the upper half of the table is suitable for you.
 The upper part can be made of beams. All that is required is to select beams of the same height, the thickness of which should not be less than 2 cm.
Such bars will simultaneously perform two functions: they can serve as a reliable support for the table and at the same time be its upper part, which can withstand any load.
The beams are nailed to the logs so that there are no gaps between them.
Afterwards you can start working with the surface.
Clean it with a plane, then start sanding with sandpaper. You need to get a smooth surface, because this is your future table.
After the beams are secured, run a file along their edges. Sharp corners can cause splinters and are uncomfortable to use.
The table is almost ready.
 If you have a drill with special nozzle for sanding, you can use it, if not, sand with sandpaper until you get a smooth surface without roughness or splinters.
Well, then all that remains is to varnish the table.
To do this, wipe the surface of debris and degrease it.
Any varnish intended for wood products will do.
It can be applied with a brush or roller, but it is most convenient to spray from a spray can.
One or two layers is enough. Let the varnish dry.
Your DIY log table is ready!
Video about wooden garden furniture


